

Introduction: The Coinsnap POS Dashboard
Your Coinsnap POS is set up. Your terminals are active. Your products are ready – and customers are paying you with Bitcoin. So what happens behind the counter once your Bitcoin POS business is up and running?
This third and final part of our Coinsnap POS Wallet Guide is about exactly that.
While the Coinsnap Wallet and its terminals handle your day-to-day sales, the Coinsnap POS Dashboard is the cockpit of your Bitcoin business. It gives you the information and tools you need to stay on top of your sales, transactions, costs and business performance – and to turn your Bitcoin payment data into the documentation required for bookkeeping, accounting and tax reporting.
This guide therefore assumes that you have already installed your Coinsnap Wallet and configured your POS and terminals. As part of this setup, you have already created your Coinsnap account. This account is also your browser-based Coinsnap POS Dashboard – the business back office for the POS Wallet and terminals we are looking at in this guide. If you haven’t completed the setup yet, start with Parts 1 and 2 of our Coinsnap POS Wallet Guide.
In this article, we concentrate exclusively on what happens after your POS starts generating business: monitoring your sales and transactions, understanding your business numbers, and creating the records you need for accounting and tax reporting.
The Coinsnap POS Dashboard is the browser-based business back office for merchants using the Coinsnap POS Wallet. It gives you an overview of Bitcoin sales and transactions, shows payment and performance data, helps you manage Coinsnap fees, and provides the records you need for bookkeeping, accounting, and tax reporting.
At a Glance: What Can You Do with the Coinsnap POS Dashboard?
Quick Facts
In short: your terminals are where you sell; the Coinsnap POS Dashboard is where you keep control of the business those sales generate.
Coinsnap POS Dashboard: Always Know How Your Bitcoin Business Is Performing
By default, the Coinsnap POS Dashboard shows the key business figures for all your stores over the last month, giving you an immediate overview of your Bitcoin POS activity.
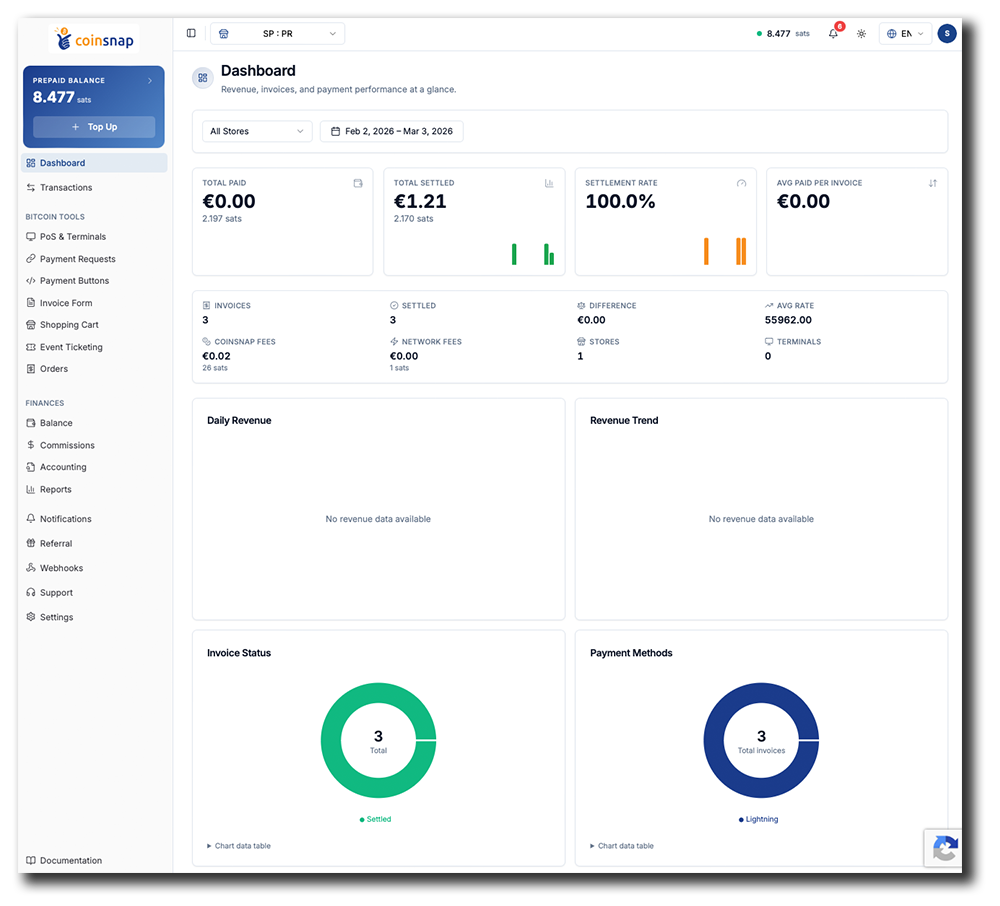
If you want to analyse a specific store or a different period, simply use the store selector and date filter above the Dashboard. The displayed figures and charts will then update to match your selection.
You can see how much your customers have paid, how much has been settled, your settlement rate, average payment value, number of invoices, Coinsnap fees and network fees.
The visual reports underneath take you beyond the individual payment. Daily Revenue and Revenue Trend show how your Bitcoin sales are developing over time, while Invoice Status and Payment Methods provide additional insight into how customers are paying.
Instead of checking individual terminals to understand what happened during the day, week or month, the Dashboard gives you the numbers you need to assess your Bitcoin POS business from one place.
Transactions: Find and Document Every Payment in your Coinsnap POS Dashboard
The Transactions section gives you a detailed record of the payment activity generated by your Coinsnap business. While the main Dashboard shows your overall sales and payment performance, Transactions lets you drill down to the individual payment level.
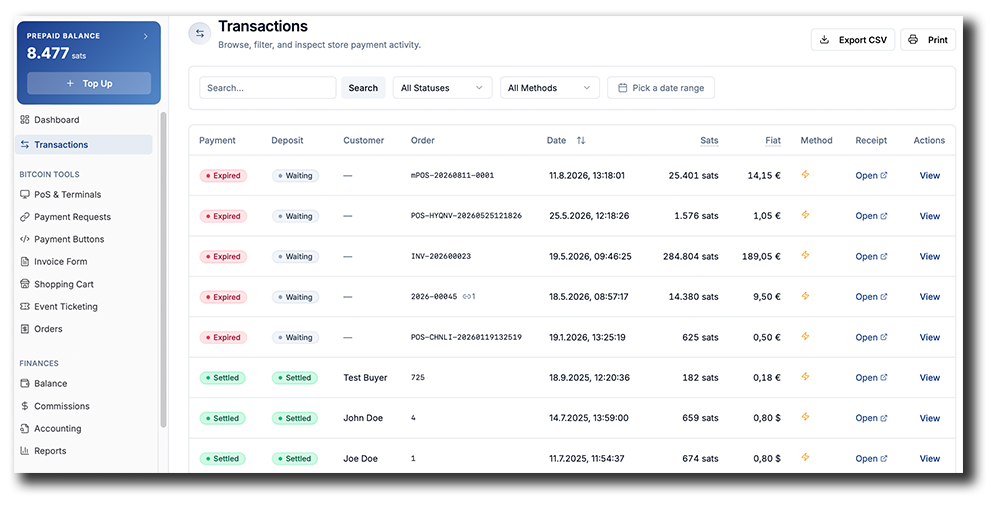
For every transaction, you can see its payment and deposit status, customer and order information, date and time, amount in sats, corresponding fiat value, payment method, and receipt. Click View to inspect the details of a particular transaction.
The search and filter functions at the top help you find exactly the transactions you need. You can search for a specific payment or order, filter by payment status or payment method, or select a specific date range. This is useful when checking a customer payment, researching an individual sale, or reviewing transactions for a particular accounting period.
The Receipt link provides access to the receipt associated with a transaction. For further business processing and documentation, you can also print the transaction overview or export the transaction data as a CSV file. This makes the Transactions section particularly useful when payment information needs to be reviewed outside Coinsnap or passed on for further processing.
POS & Terminals: Your Connection to the Point of Sale
POS & Terminals is where the Dashboard connects with the actual selling environment: your POS configurations, terminals and product catalogue.
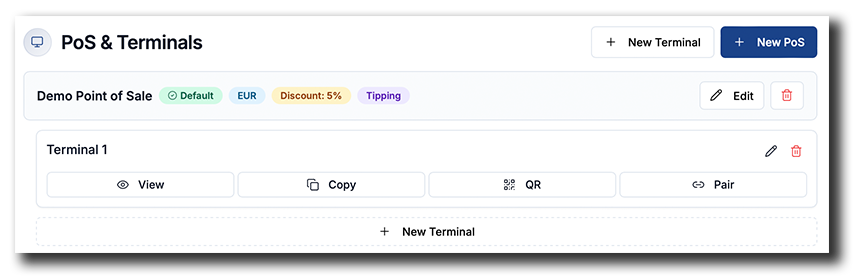
We won’t cover these functions again here. Part 2 of the Coinsnap POS Wallet Guide explains step by step how to configure your POS, connect terminals and create your product catalogue.
→ Read Part 2: Coinsnap Bitcoin POS Setup: How to Set Up Your POS, Terminals and Products
Once that setup is complete, the remaining sections of the Dashboard help you manage the business those terminals generate.
Orders: Keep Track of What You Sold
While Transactions gives you the payment record, Orders shows you the business transaction behind the payment: what you sold, when you sold it, how much the order was worth, and its current status.
In practical business terms, the two sections serve different purposes: Transactions keeps you up to date on your Bitcoin cash flow, while Orders gives your logistics and fulfilment teams the information they need to process, prepare, and deliver customer orders efficiently.
Open Orders under Bitcoin Tools in the Coinsnap POS Dashboard. The Orders overview lists all paid orders generated by your Coinsnap POS Wallet and any other Coinsnap Bitcoin Tools you use for the selected store..
For each order, you can see the order number, date, type, summary, total amount, and status. The Type column also shows where the order originated – for example, from a store or an event – while the Summary gives you an immediate overview of the products, services, or tickets included in the order.
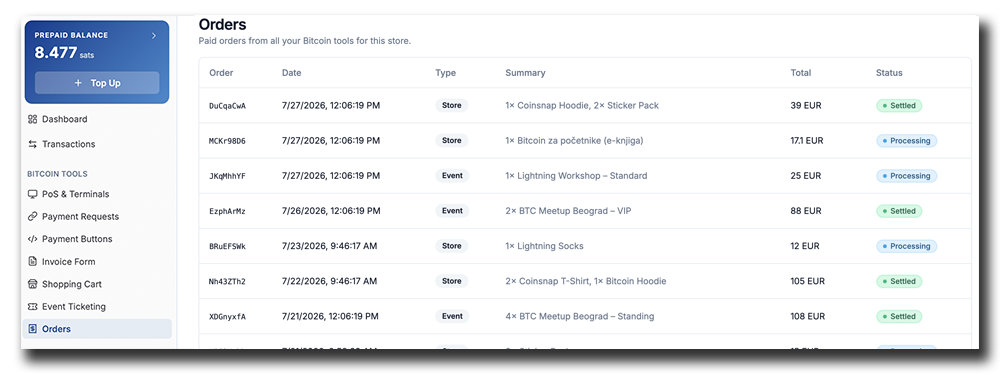
This makes Orders particularly useful when you need to answer the business question behind a Bitcoin payment: What exactly did I sell?
Check the Details of an Order
Click an order in the overview to open its detailed view.
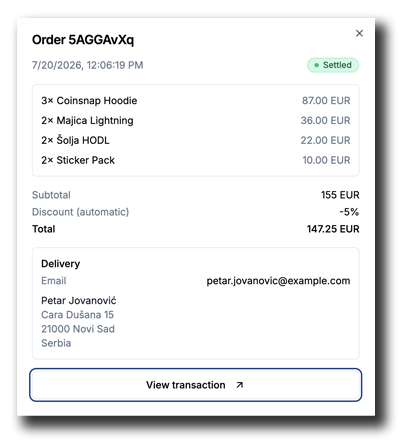
Coinsnap now shows you the individual products or services included in the order, together with their quantities and prices. You can also see the subtotal, any discount applied, and the final order total.
If customer or delivery information was collected with the order, it is displayed here as well. This gives you the information you need to identify the customer and, where applicable, process or fulfil the order.
The status displayed at the top lets you see the current state of the order at a glance.
Connect the Order with Its Bitcoin Payment
The order and its payment remain directly connected in the Coinsnap Dashboard. At the bottom of the order details, click View transaction to open the corresponding Bitcoin transaction.
This lets you move directly from the commercial side of the sale to its payment record whenever you need to verify or investigate it.
The distinction between the two Dashboard sections is simple:
Transactions tells you how the money is flowing. Orders tells you what needs to be fulfilled.
Together, they let you trace a sale from the products or services purchased all the way to the corresponding Bitcoin payment – while giving both your financial and operational teams the information they need to do their jobs.
Balance: Keep Your Coinsnap Fees Funded
Coinsnap is strictly non-custodial. When a customer pays you with Bitcoin, the payment goes directly from the customer’s wallet to your merchant wallet. Coinsnap never receives, holds, or takes custody of your Bitcoin.
This also means that Coinsnap cannot simply deduct its service fee from your incoming payments. Instead, Coinsnap uses a prepaid balance from which the fees for successfully processed payments are deducted.
When you open a Coinsnap account, Coinsnap provides you with an initial prepaid credit that covers the Coinsnap fees for your first €500 in Bitcoin sales. This means you can start accepting Bitcoin payments immediately without having to fund your fee balance first.
Once this initial credit has been used, you need to keep sufficient credit in your Coinsnap account to cover future Coinsnap fees.
Check and Top Up Your Prepaid Balance
Your current prepaid balance is always visible in the blue Prepaid Balance box at the top left of the Coinsnap Dashboard. Open Balance under Finances for a detailed view of your fee account.
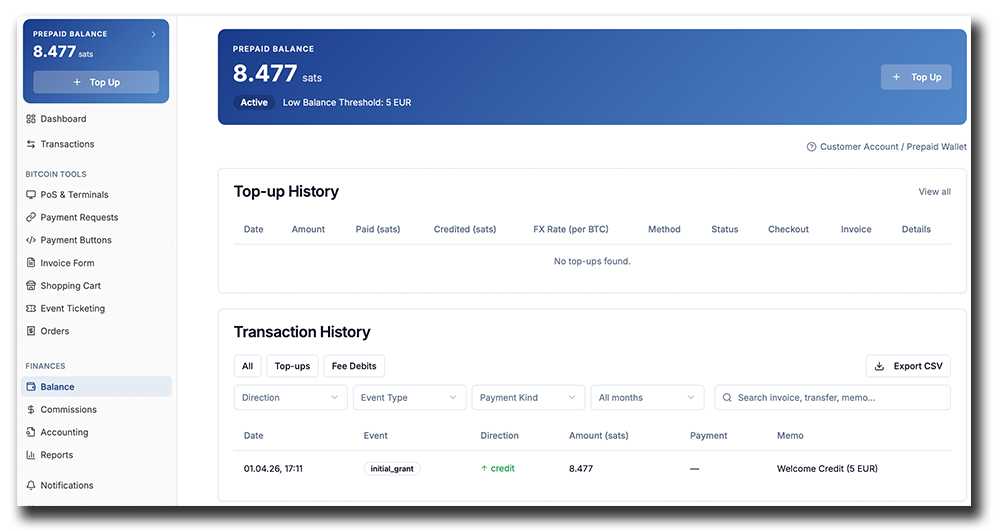
Here you can see your current prepaid balance and account status as well as your Top-up History and Transaction History. The transaction history documents credits to the account and fee debits, so you can see how your prepaid balance changes over time. You can also filter the history or export the data as a CSV file.
If you need these records for your bookkeeping or tax declarations, you can export your complete top-up and fee transaction history as a CSV file at any time and pass it on to your accountant or tax adviser.
To add credit, click Top Up either in the blue Prepaid Balance box in the Dashboard navigation or at the top right of the Balance page.
Coinsnap then asks you how much you want to add. You can select one of the predefined amounts – €5, €10, €20 or €50 – or enter a custom amount. Click Continue to Payment to proceed.
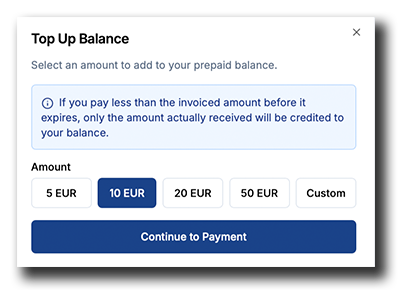
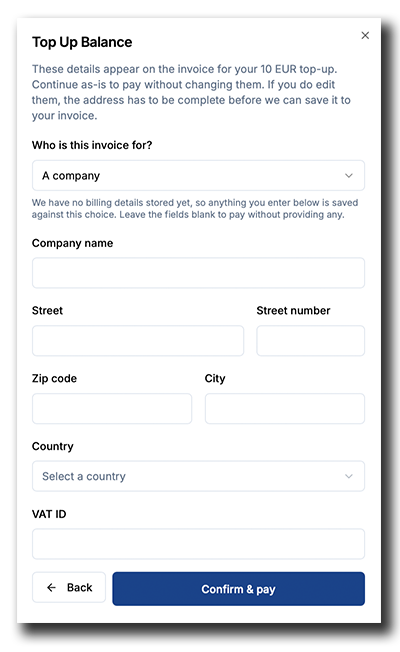
Before creating the top-up payment, Coinsnap displays the company and address information that will appear on the invoice. Check the information and, if necessary, complete or update it. You can also enter your VAT ID. Then click Confirm & pay.
Coinsnap creates a Bitcoin payment request for the selected top-up amount. You can pay it with Bitcoin on-chain or Lightning, either by scanning the QR code or by opening a compatible Bitcoin wallet directly.
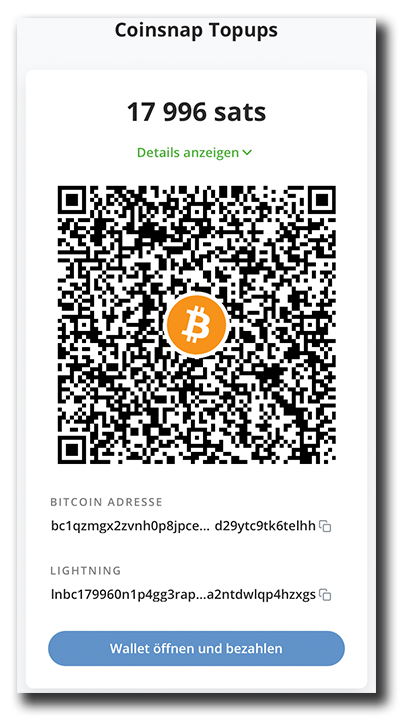
Once the payment has been received, the corresponding amount is credited to your prepaid balance and becomes available for future Coinsnap fees.
Important: The prepaid balance shown in your Coinsnap Dashboard is not the balance of your merchant Bitcoin wallet. Your customer payments go directly to your wallet; the prepaid balance is used exclusively to pay the fees for using Coinsnap.
This system allows Coinsnap to charge for its service without ever taking custody of the Bitcoin your customers pay you.
Commissions: See What You Earn from Referrals
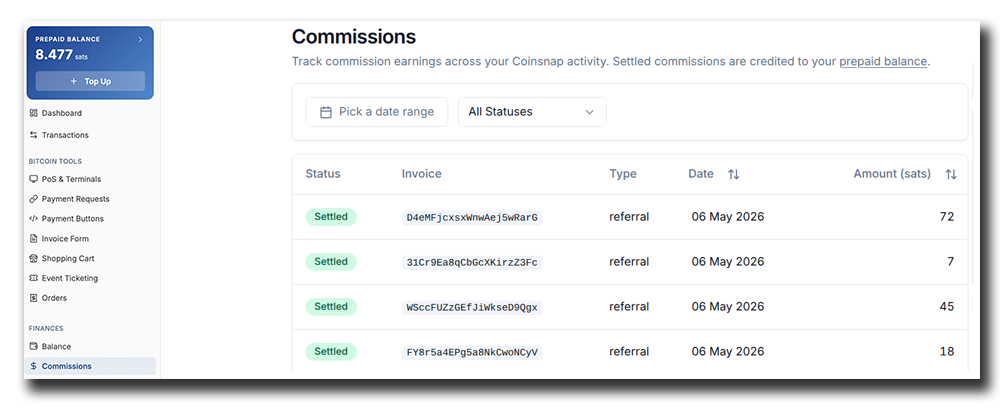
If you use your Coinsnap referral code to recommend Coinsnap to other merchants, Commissions shows the commissions generated by those referrals.
The section gives you an overview of your referral earnings:
→ Learn more about the Coinsnap Referral Program
Accounting: Bring Your Bitcoin Sales into Your Bookkeeping
Accepting a Bitcoin payment and accounting for the resulting sale are two different business processes.
The Accounting section helps bridge that gap.
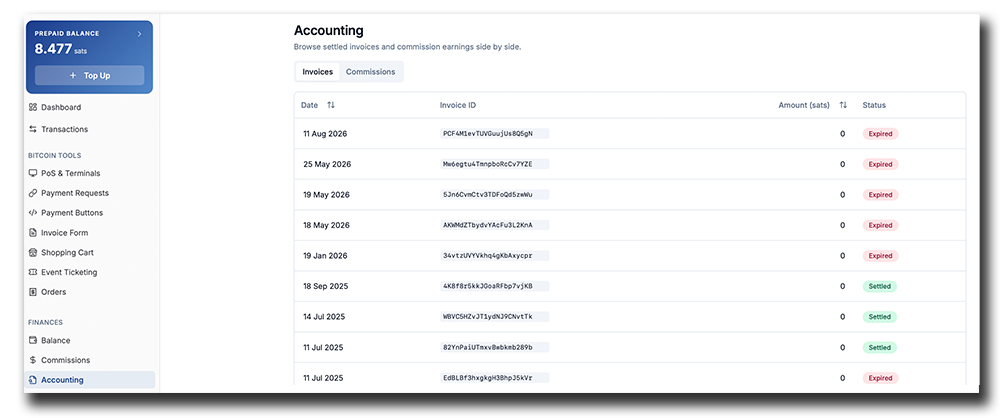
It provides the transaction information generated by your Coinsnap business in a form that can be used for your bookkeeping and financial administration. This allows you to transfer the relevant information from your Bitcoin POS operation into your normal accounting processes or make it available to your accountant or bookkeeper.
Your accountant does not need to work at your POS terminal to understand your Bitcoin sales. The Dashboard provides the business records behind them.
Reports: Document Your Bitcoin Business for Accounting and Taxes
While the Dashboard helps you monitor your business and Transactions lets you inspect individual payments, Reports provides the bigger picture for a defined reporting period.
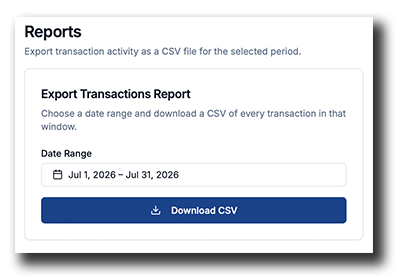
This is particularly useful when your Bitcoin sales need to leave the operational environment of the POS and become part of your regular business documentation.
Reports can support periodic bookkeeping, management reporting, year-end accounting and the preparation of information required by your accountant or tax adviser for tax declarations.
Important: Coinsnap provides the payment records and reports that can support your accounting, tax reporting and other documentation requirements. The accounting and tax treatment itself depends on the rules applicable to your business and jurisdiction.
Setting: Choose How You Receive Your Bitcoin Sales
Once customers start paying through your Coinsnap POS, you need to decide where Coinsnap should send the funds you receive. Go to Settings → Deposit in your Coinsnap Dashboard to choose and configure your deposit method.
Coinsnap gives you three options. With Lightning, your Lightning payments are sent directly to the Lightning address you have configured. This is the simplest option if you want to receive and keep your sales via Lightning.
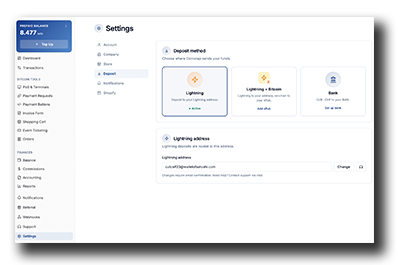
Choose Lightning + Bitcoin if you also want to accept Bitcoin on-chain. Lightning payments continue to go to your Lightning address, while on-chain payments are sent directly to addresses derived from the xPub you provide. This allows your POS to accept both payment methods while the funds still go directly to wallets you control.
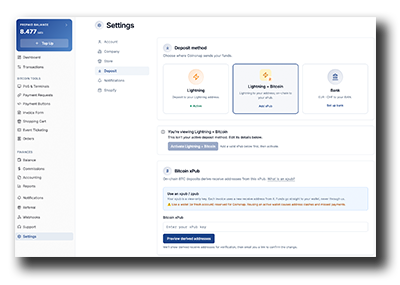
The third option is Bank. This is for merchants who want to convert their Bitcoin sales into fiat and receive EUR or CHF directly to their IBAN. Coinsnap works with external off-ramp partners such as DFX, Bringin and Wave for this purpose. Instead of keeping the received Bitcoin, the off-ramp converts the payment and settles the corresponding fiat amount to your bank account according to the conditions of the selected service.
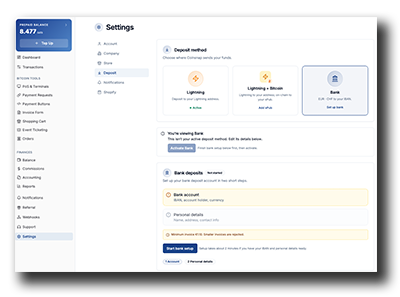
Whichever route you choose, you configure it under Settings → Deposit. Select the deposit method you want to use, enter the required wallet, xPub or bank information, and activate it. The currently active deposit method is clearly marked in the Dashboard, and you can return here whenever you need to change how your Coinsnap payments are settled.
Where does Coinsnap send my Bitcoin payments?
You decide where your Coinsnap sales are sent under Settings → Deposit. You can receive payments via Lightning, accept both Lightning and Bitcoin on-chain, or use a supported off-ramp solution to convert Bitcoin payments and settle them to your bank account in EUR or CHF.
From Bitcoin Sale to Business Record: Your Complete Workflow – in your Coinsnap POS Dashboard
Once your POS and terminals are running, the Coinsnap POS Wallet and Dashboard form one continuous business process: Your Coinsnap terminal(s) takes care of the payment at the counter. The Coinsnap POS Dashboard gives you the cockpit you need to manage the business behind it.
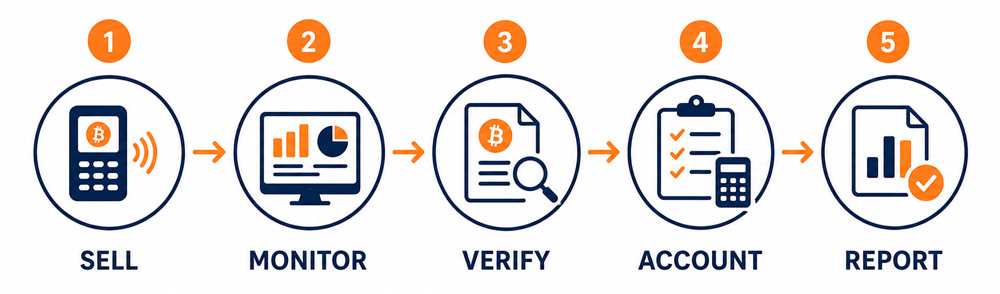
SELL: Accept the customer’s Bitcoin payment with your Coinsnap terminal.
MONITOR: Use the Dashboard to see sales, settlements, costs and performance.
VERIFY: Use Transactions whenever you need the details of an individual Bitcoin payment.
ACCOUNT: Use the accounting data generated by your Coinsnap business for bookkeeping and financial administration.
REPORT: Create the records your business, accountant or tax adviser needs for the relevant reporting period.
The Coinsnap Wallet starts as something deliberately simple: a modern Bitcoin wallet that lets you receive and send Bitcoin without making everyday payments unnecessarily complicated.
But for merchants, that is only the beginning.
Activate the merchant features and the same wallet becomes a complete Bitcoin POS environment built around the way a business actually works. You can create POS locations and terminals, build product catalogues, accept Bitcoin at the counter, and keep track of the orders those sales generate. Your Dashboard then gives you the business side of every payment: sales performance, transactions, orders, settlements, fees, accounting data and reports.
And you decide what happens to the money.
Receive your sales directly to your Lightning wallet. Add Bitcoin on-chain settlement to a wallet you control through your xPub. Or use the bank settlement option when your business needs EUR or CHF instead of Bitcoin.
At the same time, Coinsnap remains strictly non-custodial. Customer payments are not collected in a Coinsnap merchant account waiting for you to withdraw them. They go directly to the destination you have configured. Even Coinsnap’s own fees are handled separately through the prepaid balance precisely so that Coinsnap does not have to take its fee out of money it holds on your behalf.
That combination is what makes the Coinsnap POS Wallet different.
A wallet in your pocket. A Bitcoin terminal at your counter. A business cockpit in your browser.

The interface remains simple enough to take a Bitcoin payment in seconds, while behind it sits the infrastructure a serious merchant needs to turn those payments into an actual business process – from selling and monitoring to verification, fulfilment, accounting and reporting.
Coinsnap was not designed by taking a conventional payment processor and adding a Bitcoin button. It was designed around Bitcoin and around the merchant. The result is a POS Wallet in which payment, self-controlled settlement and business administration work together as one system – without forcing the merchant to become a Bitcoin technician just to accept Bitcoin.
That is ultimately what this three-part Coinsnap POS Wallet Guide has been about:
Install your wallet. Set up your business. Start selling. And let Coinsnap take care of the business infrastructure behind your Bitcoin payments.
FAQ: Using the Coinsnap POS Dashboard
The Coinsnap POS Dashboard is the back-office interface for merchants using Coinsnap to accept Bitcoin payments. It provides an overview of sales and transactions and gives merchants access to financial data and reports for managing, accounting for and documenting their Bitcoin POS business.
The Coinsnap POS Wallet and its terminals are used to create and accept Bitcoin payment requests during a sale. The Dashboard is used to monitor those payments, review transactions and performance, manage Coinsnap fees, and prepare business records for accounting and reporting.
Open Transactions in the Coinsnap Dashboard to review the individual Bitcoin payments generated through your Coinsnap business.
Balance shows the prepaid credit used to pay Coinsnap service fees. It is separate from your Bitcoin wallet and should not be confused with the Bitcoin balance you receive from customer payments.
Use the Accounting and Reports functions in your Coinsnap Dashboard to prepare transaction and reporting information that can be incorporated into your regular bookkeeping and provided to your accountant or tax adviser.
Coinsnap Reports can provide payment and transaction records that support accounting and tax preparation. The applicable accounting and tax treatment depends on your business, jurisdiction and local regulations.
The Complete Coinsnap Bitcoin Wallet Guide
Everything you need to get started with the Coinsnap Bitcoin Wallet, Bitcoin POS, and the business management tools behind it is covered in our four-part Coinsnap Bitcoin Wallet Guide.
From installing your wallet and setting up your first POS and terminals to managing sales, transactions, orders, fees, accounting, and reporting, we have broken the complete process down into four practical step-by-step guides:
- Coinsnap Bitcoin Wallet Setup: Install and Set Up Your Wallet — Install your Coinsnap Wallet, create your personal and business Lightning addresses, and get ready to receive Bitcoin.
- How to Send and Receive Bitcoin with the Coinsnap Wallet — Pay for something with Bitcoin, or create a payment request for someone to pay you.
- Coinsnap Bitcoin POS Setup: How to Set Up Your POS, Terminals and Products — Create your POS, connect your terminals, and configure your product catalogue.
- Coinsnap POS Dashboard: The Cockpit of Your Bitcoin Business — Monitor your Bitcoin business, manage transactions and orders, choose how you receive your funds, and prepare the records you need for accounting and reporting.
From your first wallet setup to your first Bitcoin sale – and from that sale to your accounting records – these four guides give you everything you need to run your Bitcoin POS business with Coinsnap.