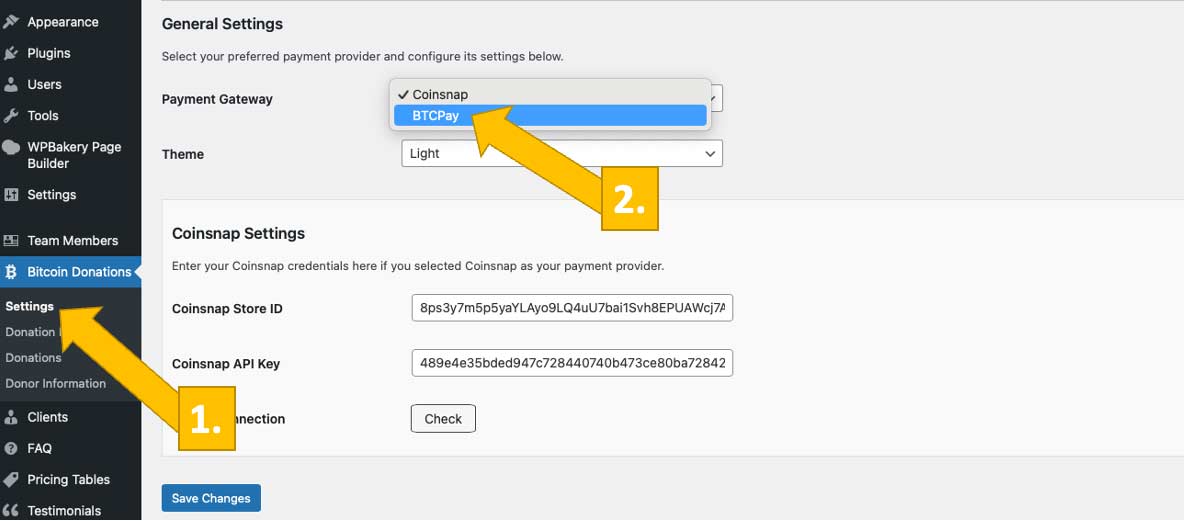
Step 1: Choose BTCPay Server as Your Payment Gateway
Go to your plugin settings [1], and choose BTCPay Server as your payment gateway [2].
You will now see this screen:
Step 2: Enter the Required BTCPay Server Credentials
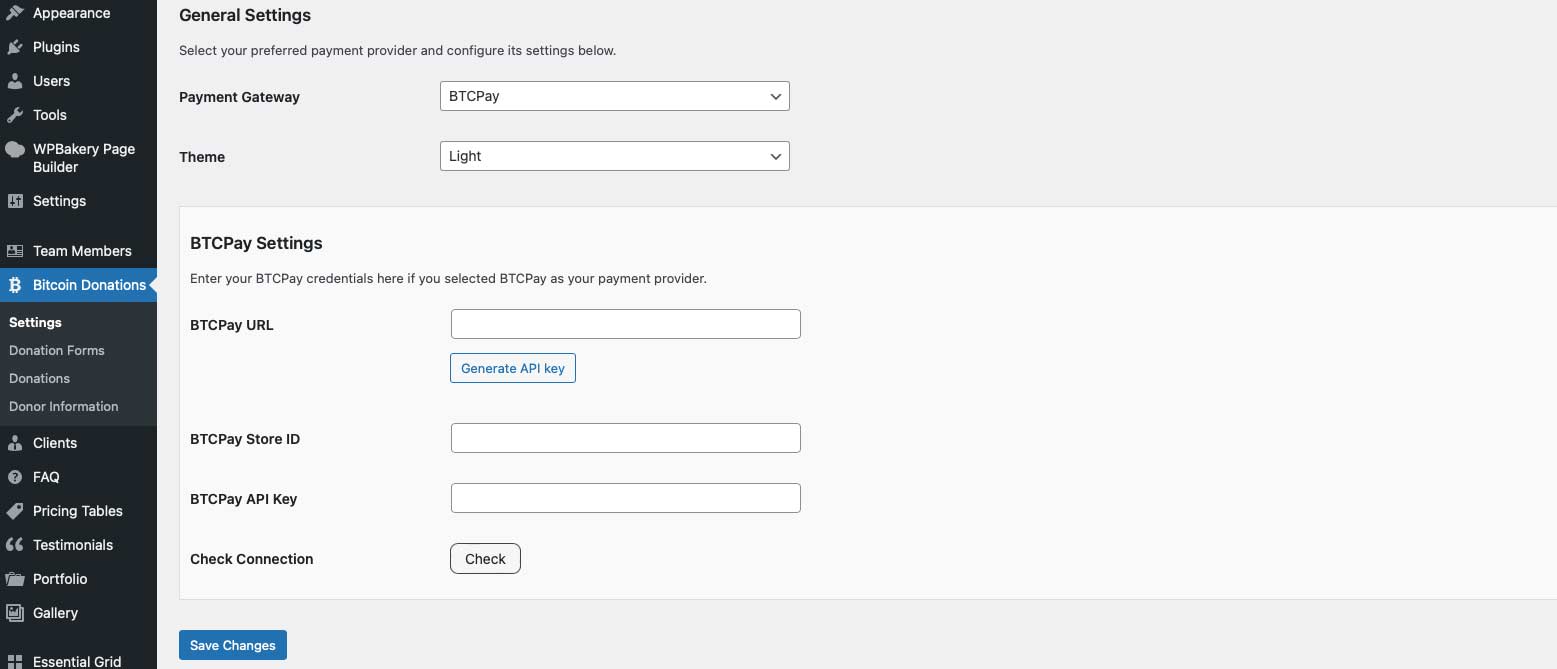
Now you need to enter your BTCPay Server URL [1], generate an API Key [2], and enter your BTCPay Server Shop ID [3] and API Key [4]. If you follow the next step, Coinsnap’s BTCPay Server wizard will complete the final two tasks for you.
In the next step, we show you how to get this done.
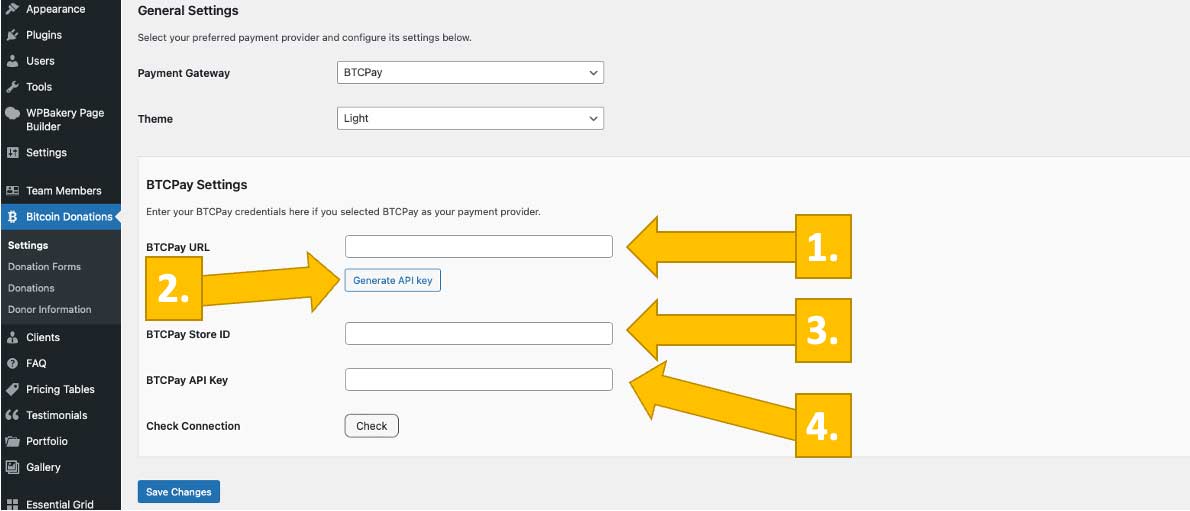
Step 3: Get Your BTCPay Store ID and Your BTCPay API Key Filled In
Log in to your BTCPay server.
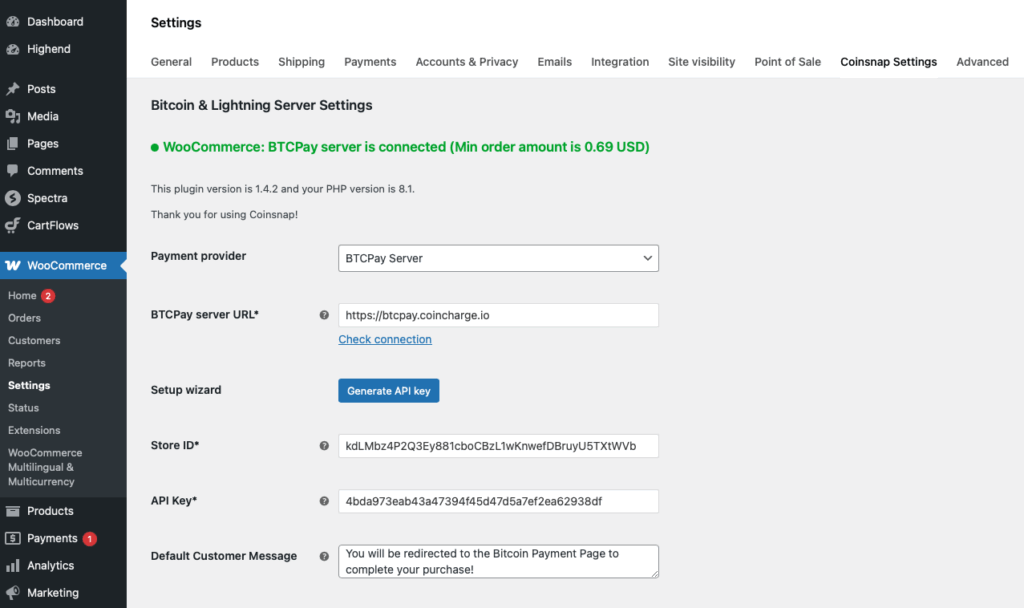
Once you have done this, enter the URL of your BTCPay Server in the BTCPay URL field [1, image above]. Next, click the Generate API Key button [2, image above]. This starts the BTCPay wizard, which automatically retrieves your BTCPay Store ID [3, image above] and API Key [4, image above] and fills them into your plugin settings.
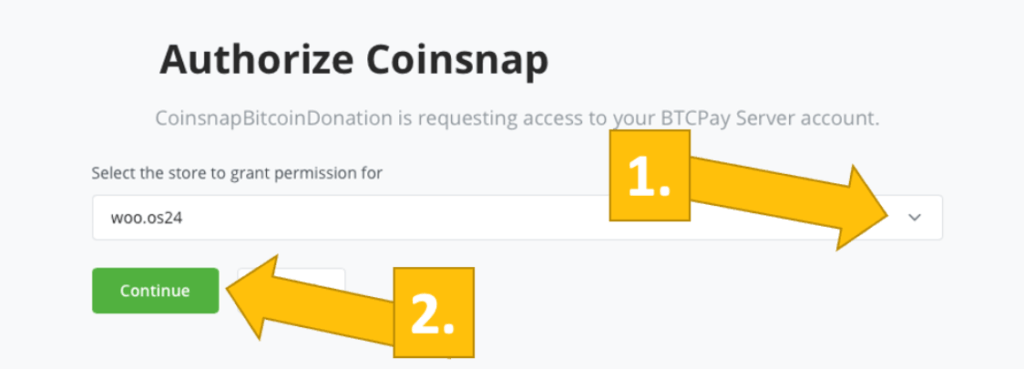
As soon as you enter your BTCPay Server URL, you will be redirected to your BTCPay Server. Select your Store [1] and then click Continue [2].
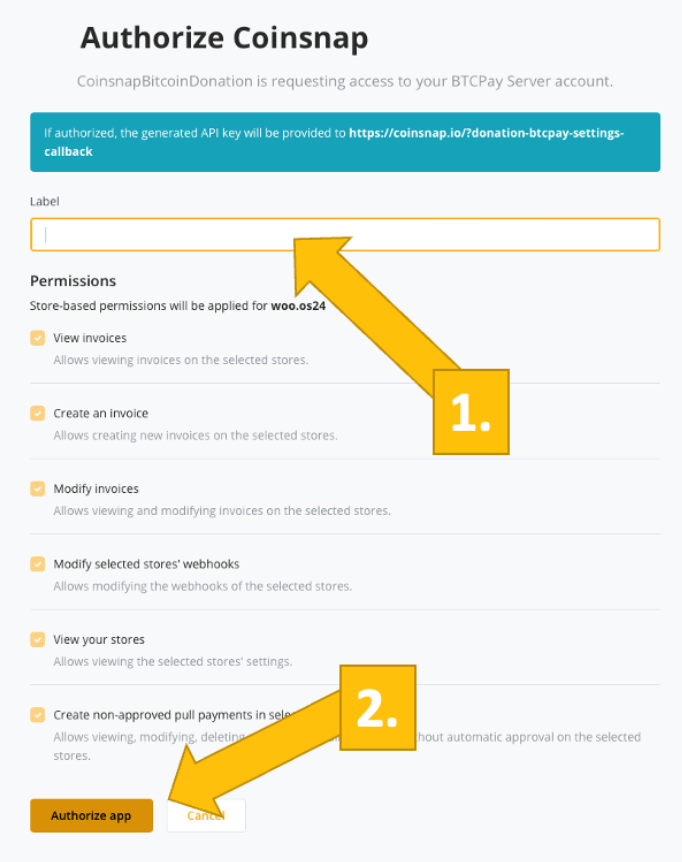
On the following screen, enter the name of your store at the top [1] and then click Authorize App [2].
Done
Your BTCPay Server is now successfully connected to your online store via the Coinsnap plugin. (Look for the green success indicator!)
You are logged in to your WordPress admin dashboard
If you haven’t created a Coinsnap account yet, do that first and complete the initial setup (store name and wallet connection).
Step 1: Log in to Your WordPress Admin Area
Open your WordPress backend and navigate to Plugins to ensure the Coinsnap plugin you want to use is installed and activated.
Once activated, you’ll find a new Coinsnap entry in your WordPress menu or under the settings section of the specific plugin (for example: Donation, Invoice, Voting, Paywall, or Web POS).
Step 2: Open the Coinsnap Plugin Settings
Note: This guide applies to WordPress plugins only. If you use a different website platform, please refer to the relevant installation guide.
Find the plugin in the left sidebar of your WordPress dashboard and click Settings.
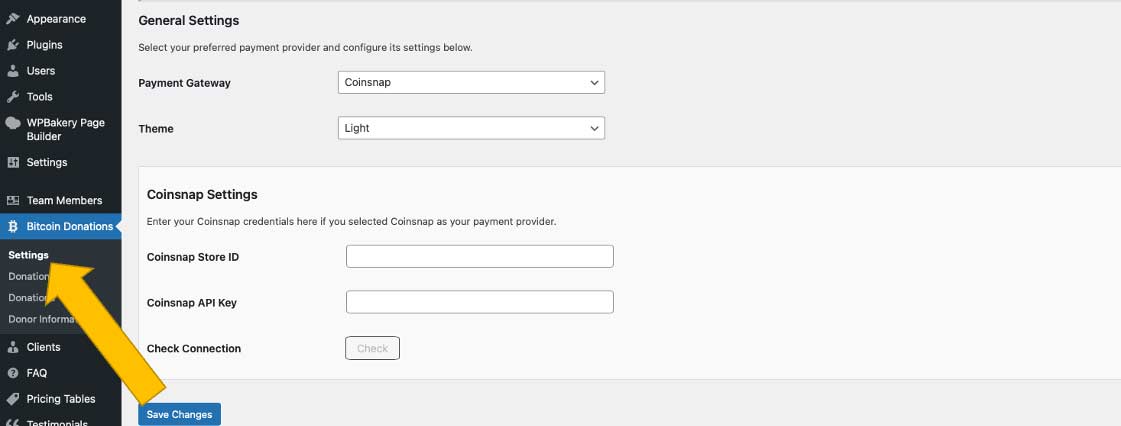
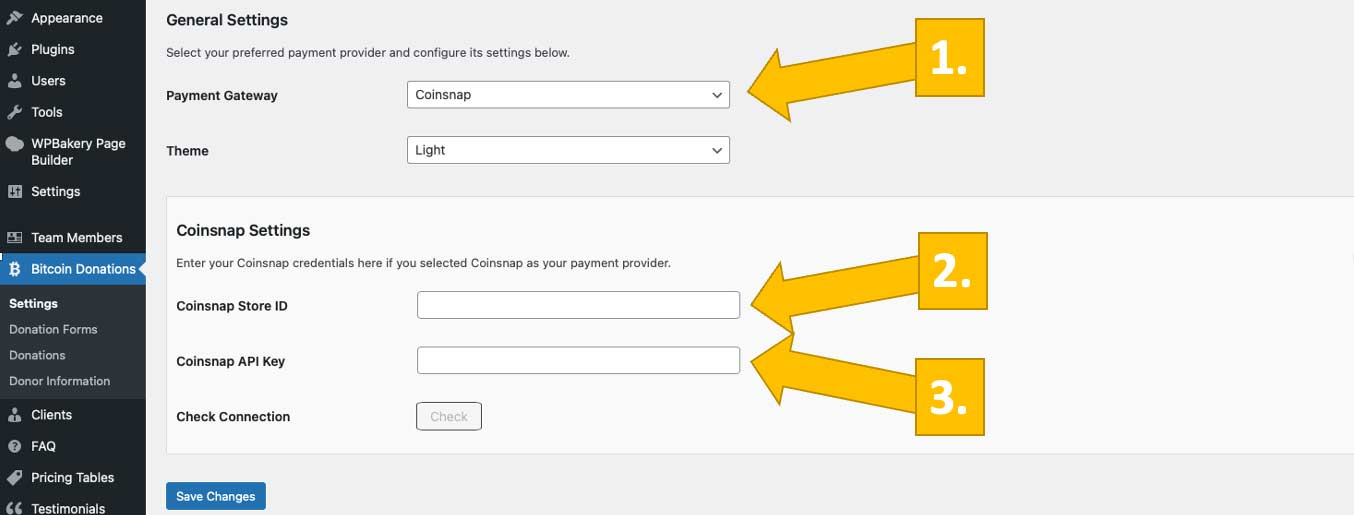
Step 3: Connect the Plugin to Your Coinsnap Account
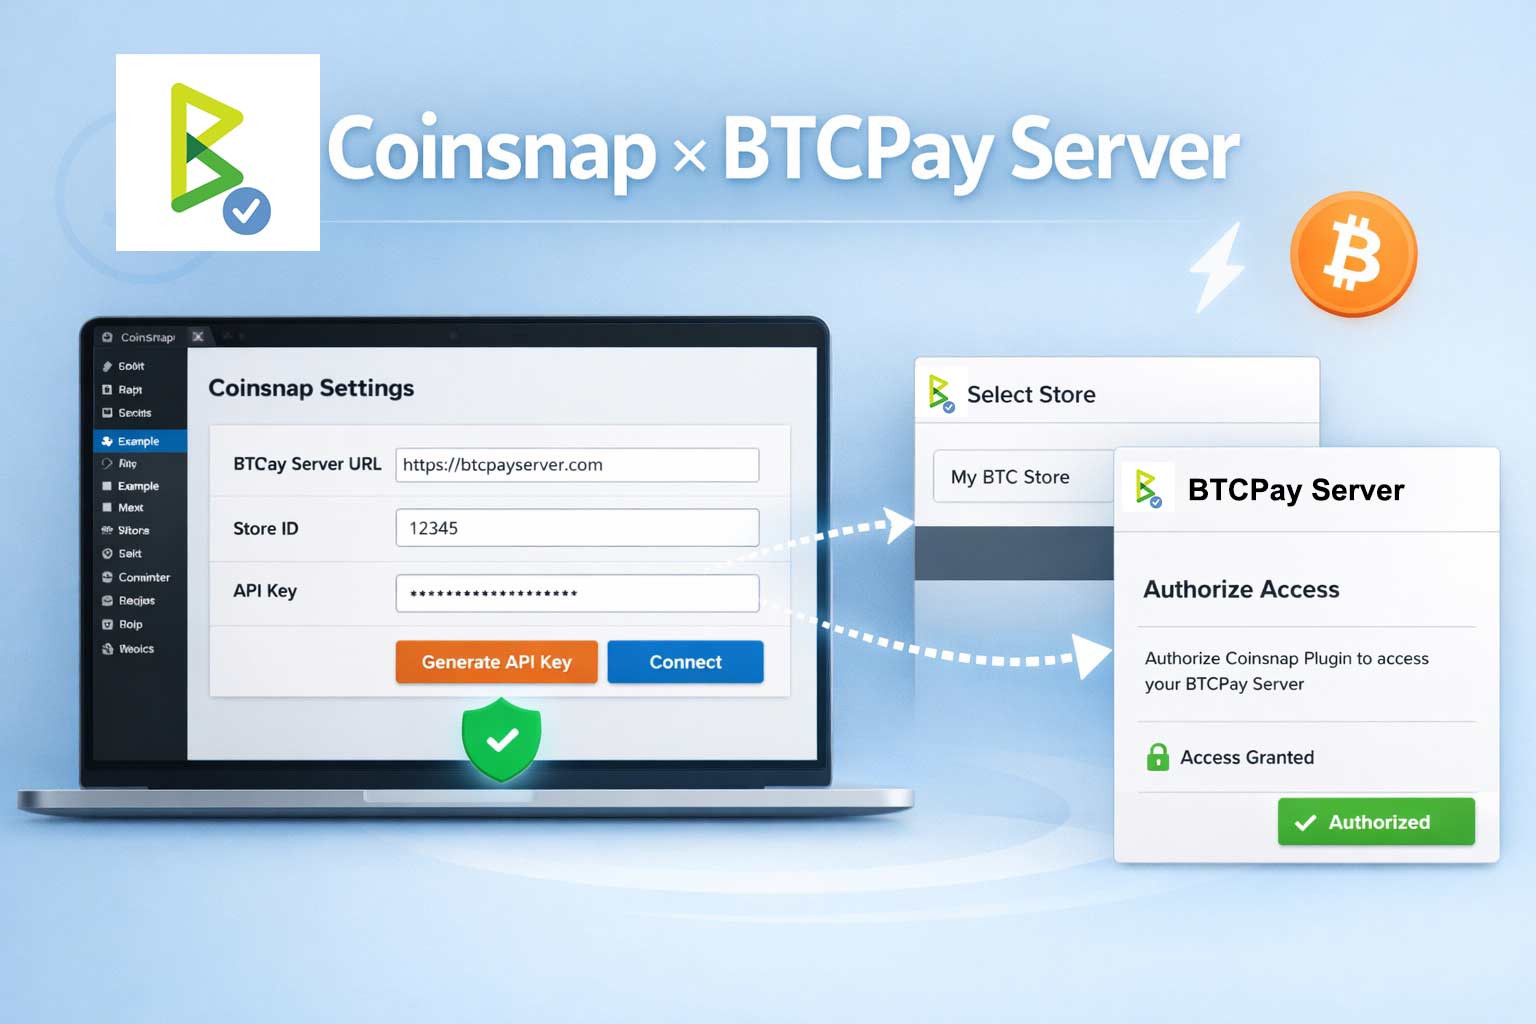
To connect your plugin to your Coinsnap account, select Coinsnap as your payment gateway [1], then enter your Coinsnap Store ID [2] and your Coinsnap API Key [3].
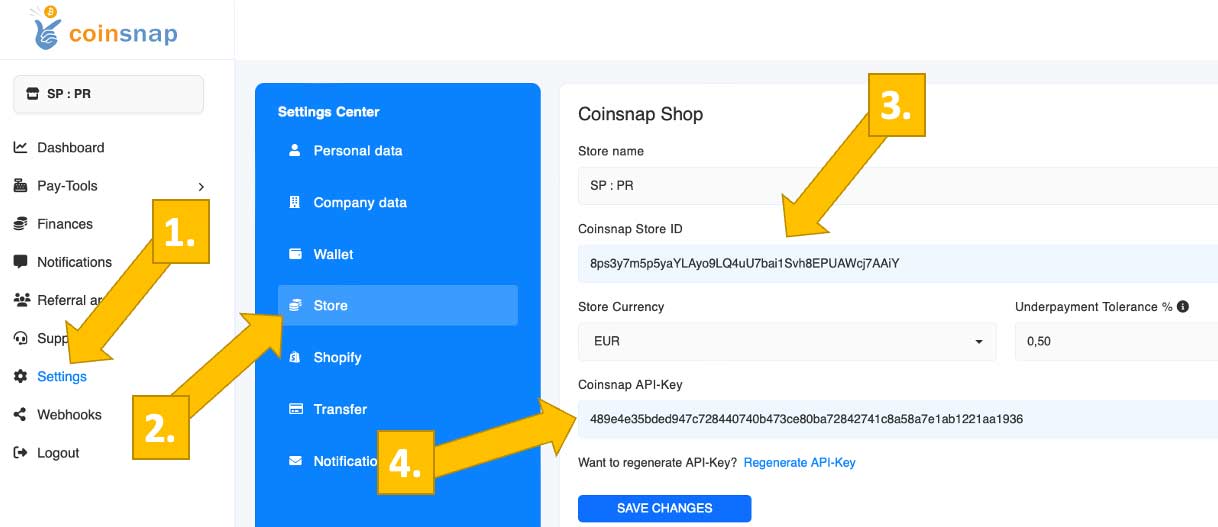
Step 4: How to Retrieve Your Coinsnap Store ID and Your API Key
Go to your Coinsnap dashboard, click on Settings [1], then Store [2]. Now you can copy your Store ID [3] and API Key [4].
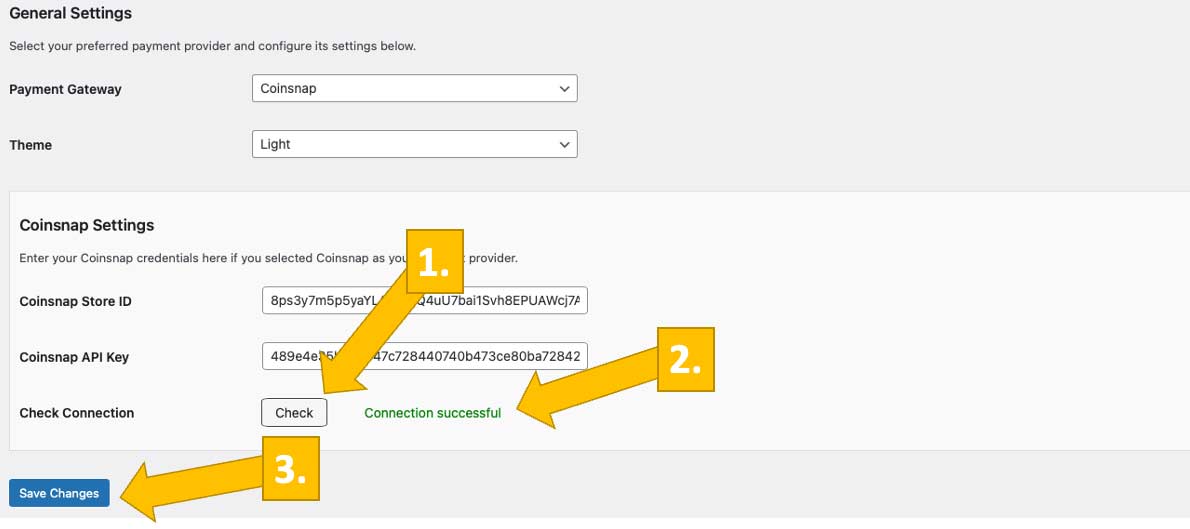
Step 5: Save Settings and Start Accepting Bitcoin
After copying the Store ID and API Key into their respective fields, click Check [1]. A small green success notice will appear [2]. Save the changes [3], and from then on you can accept Bitcoin Lightning payments.
Next Steps
Your Coinsnap plugin is now connected and fully operational. You can start placing payment forms, buttons, or widgets on your website using shortcodes or blocks.
Advanced configuration options, analytics, and account-level settings are covered in separate guides.
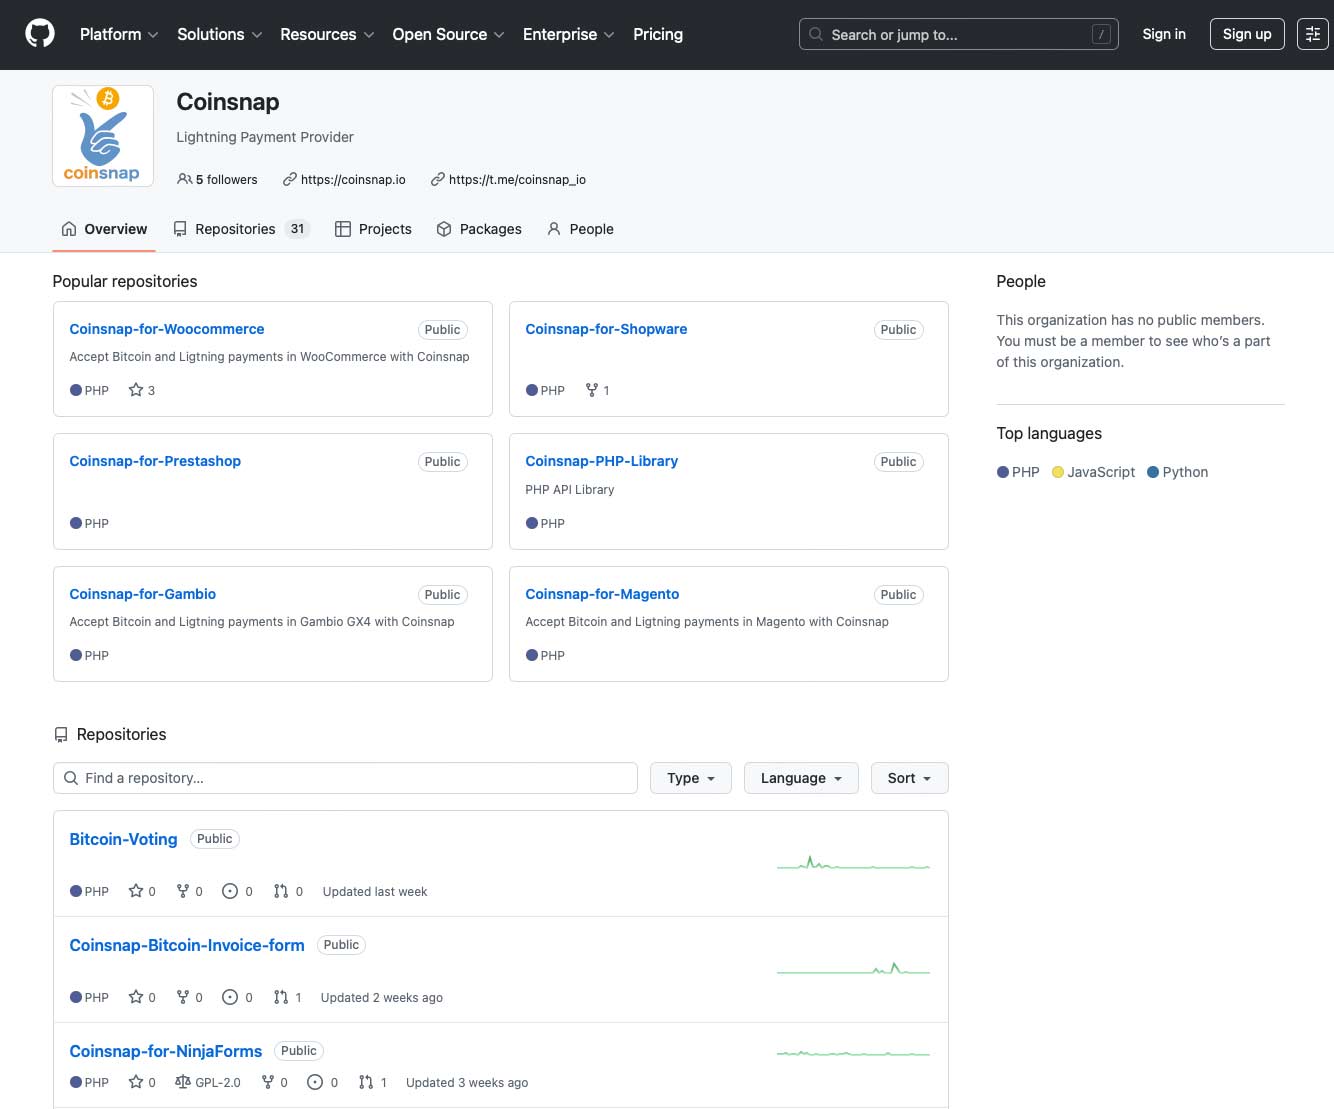
You will see a list of all Coinsnap repositories, each corresponding to a specific shop system or platform:
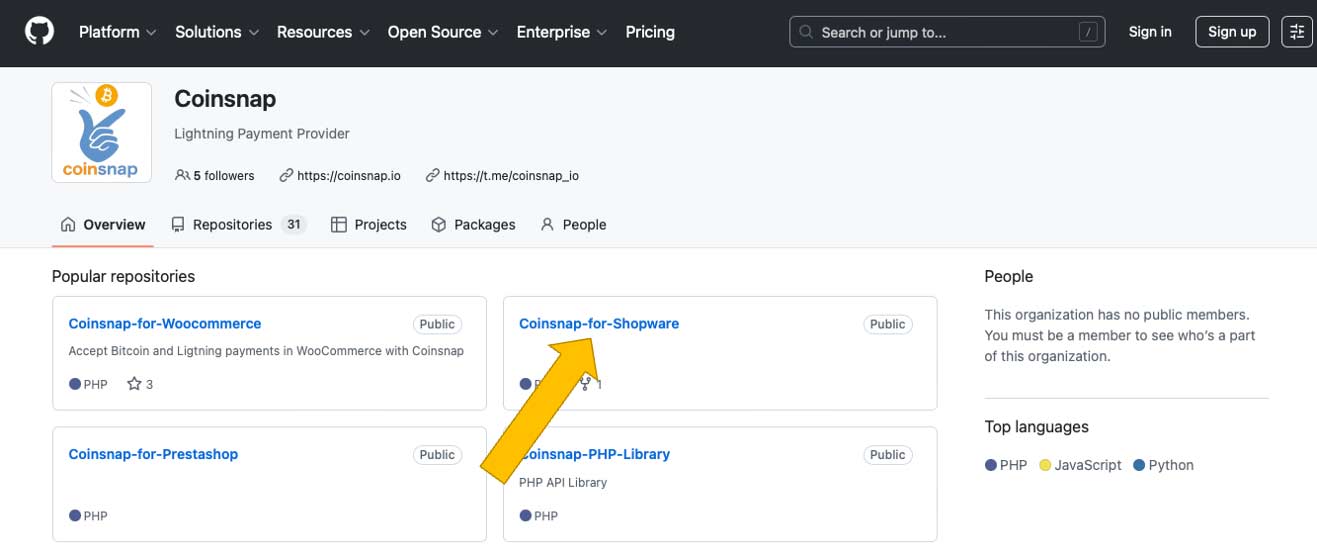
Step 2: Locate the repository that matches your shop system
For example: you are looking for the Coinsnap for Shopware module. In this case, click here:
Click on the repository name to open the module’s GitHub page. Make sure you select the correct module for your shop system to ensure proper compatibility and functionality.
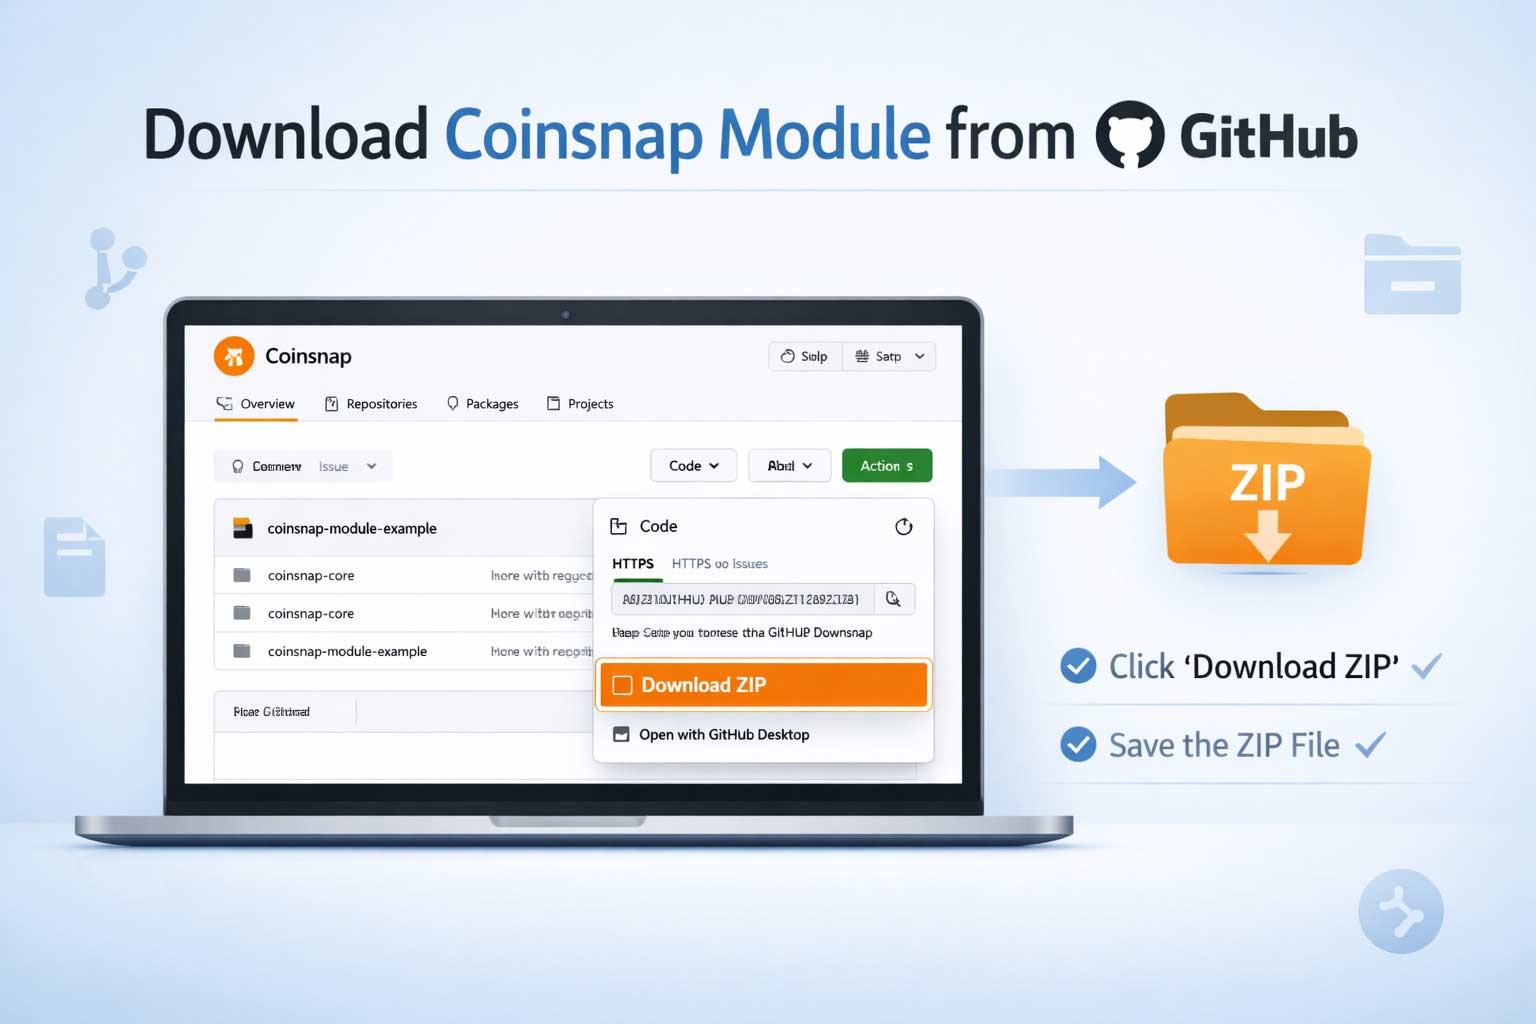
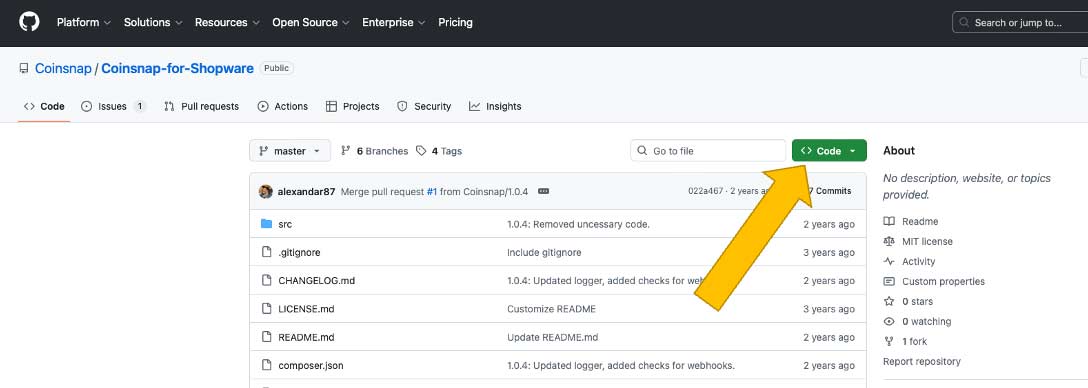
Step 3 — Download the module as a ZIP file
On the GitHub repository page, click the Code button:
Select and Download ZIP, and save the ZIP file to your local computer.
This ZIP file contains the full Coinsnap module source code required for installation.
Done
You now have the ZIP file containing the Coinsnap module and can proceed with the platform-specific instructions to install it into your shop system.
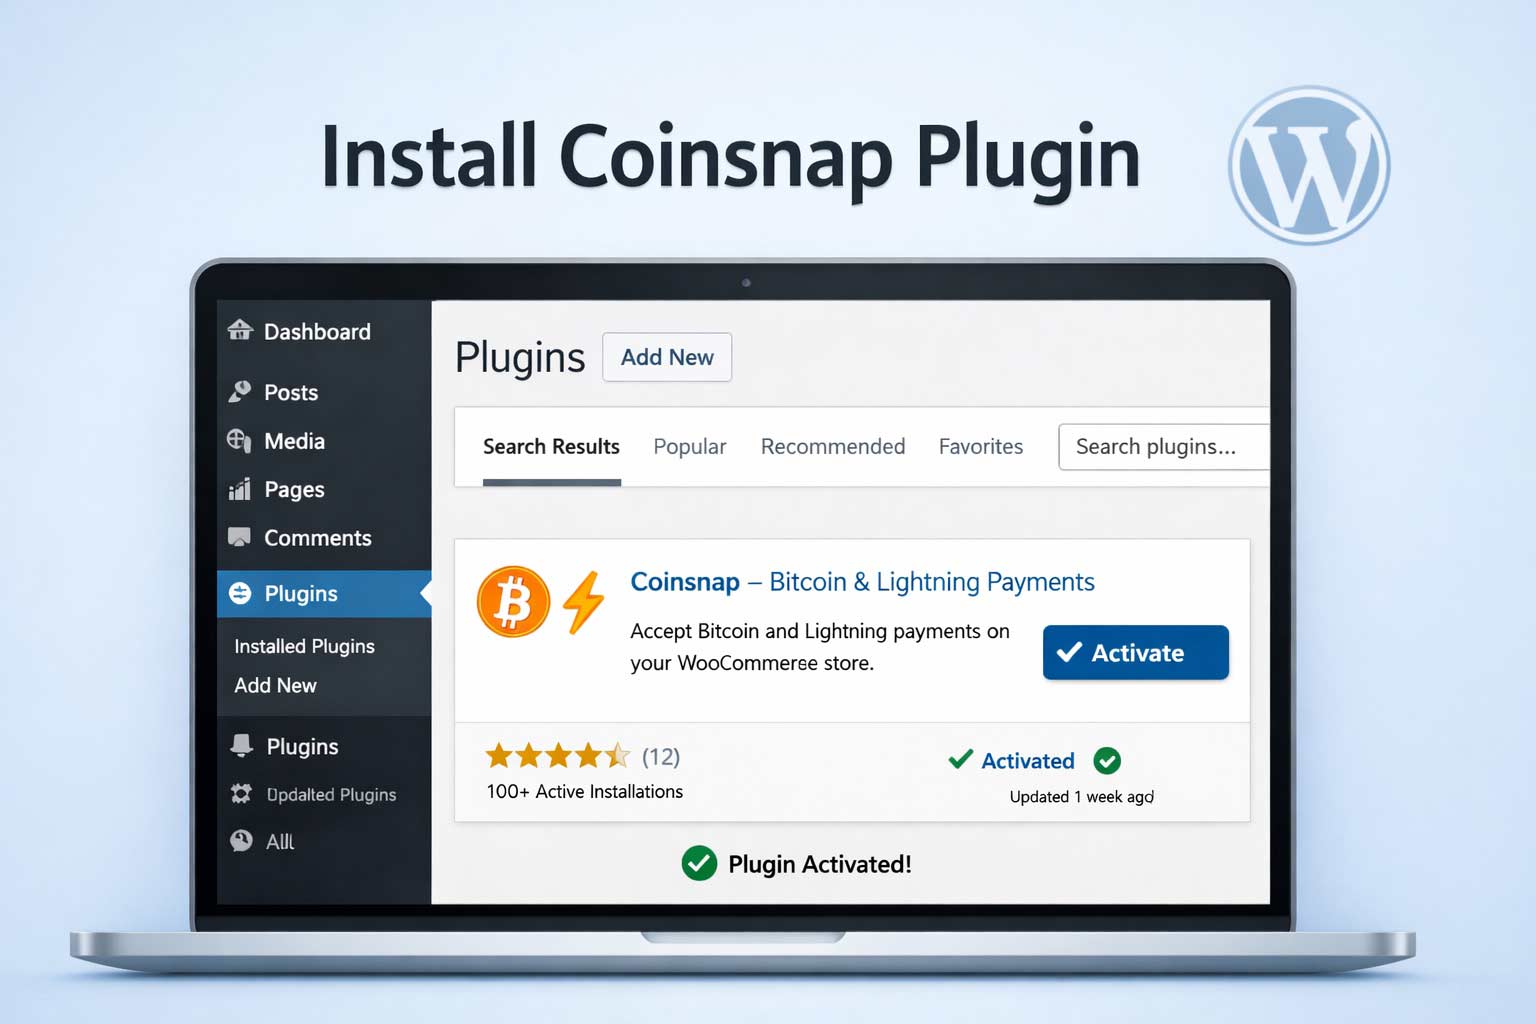
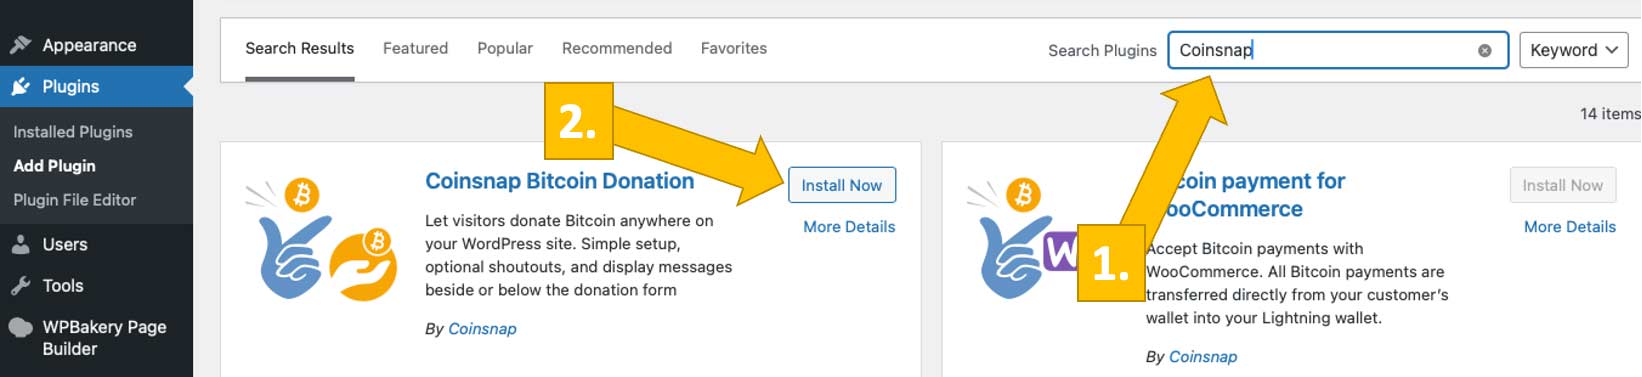
Log in to your WordPress admin area and navigate to Plugins → Add Plugin
This opens the built-in WordPress Plugin Directory, where all verified WordPress plugins are listed.
Step 2: Search and Install the Coinsnap Plugin
Use the search field in the top right and enter Coinsnap [1] or the specific plugin name you want to install (e.g. Bitcoin Donation, Bitcoin Invoice, Bitcoin Voting). Choose the one you want to install, and click Install Now. [2]
Step 3: Activate the Plugin
Once installation is complete, click Activate.
The plugin is now enabled and immediately available in your WordPress backend.
Step 4: Open the Plugin Settings
After activation, a new Coinsnap menu item or settings page will appear in your WordPress dashboard, depending on the plugin. It can look like this [1]:
From there, you can connect your Coinsnap account and configure the plugin [2] according to your use case. We explain how to do this here.
Done
The Coinsnap plugin is now installed, active, and ready to be connected—no manual uploads, no technical setup, and no external tools required. Done in less than a minute!
Before you follow these 3 simple steps to open a Coinsnap account, make sure you have:
A valid email address
A Bitcoin wallet (Lightning or on-chain)
A web browser (desktop or mobile)
That’s all. Now we show you – step by step – what to do:
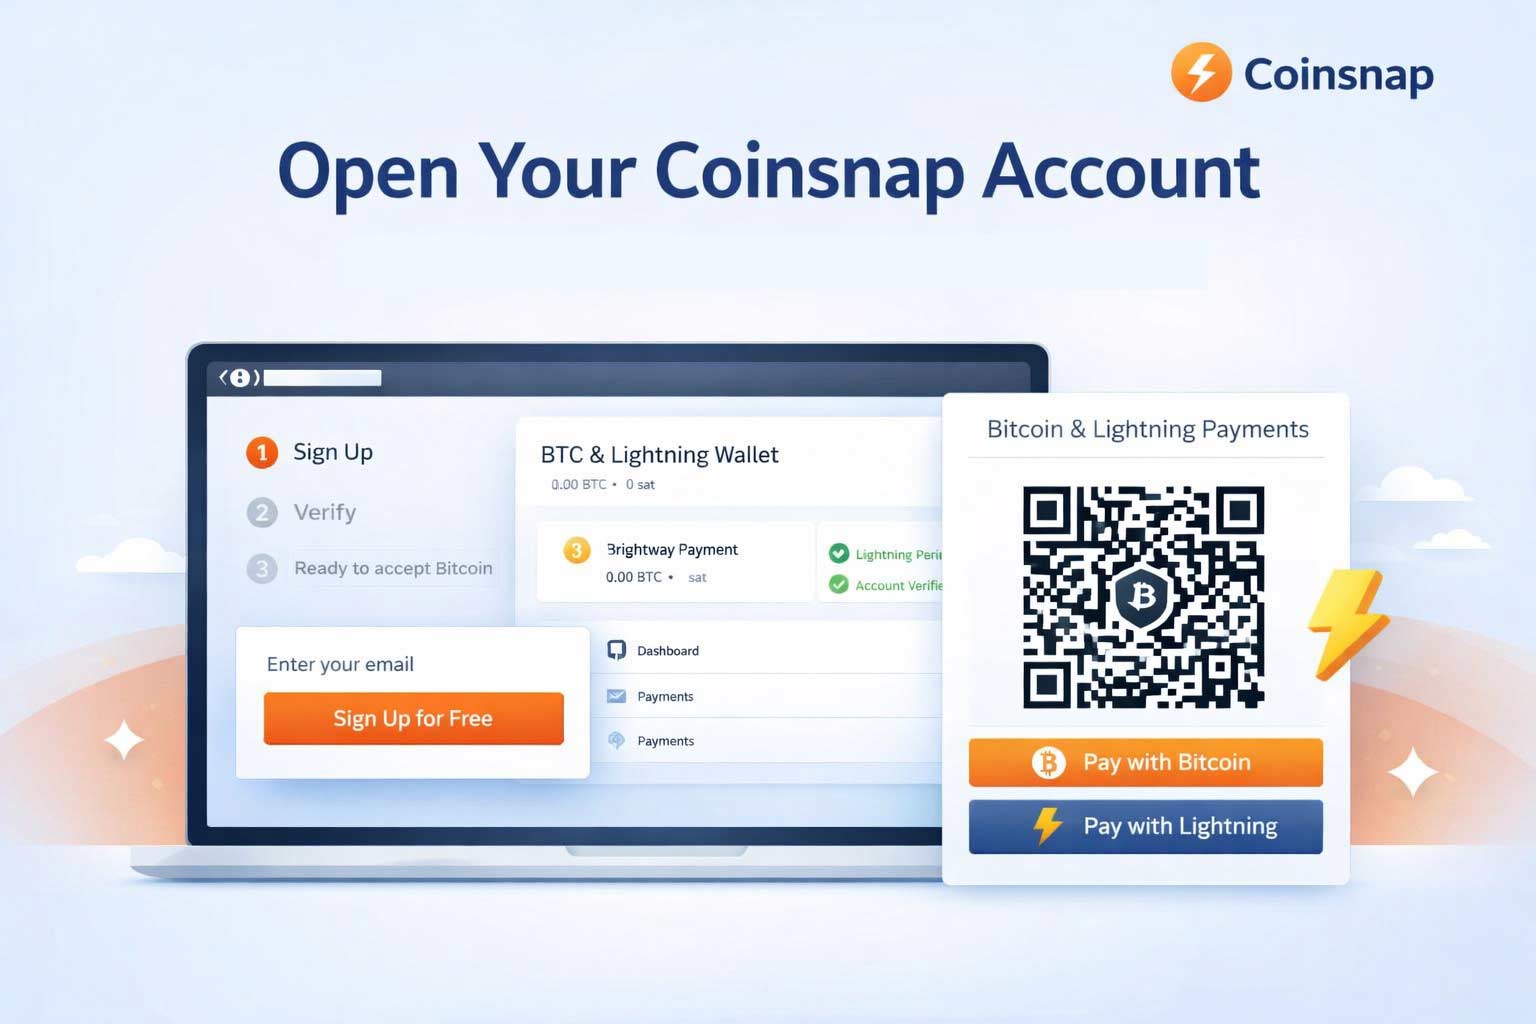
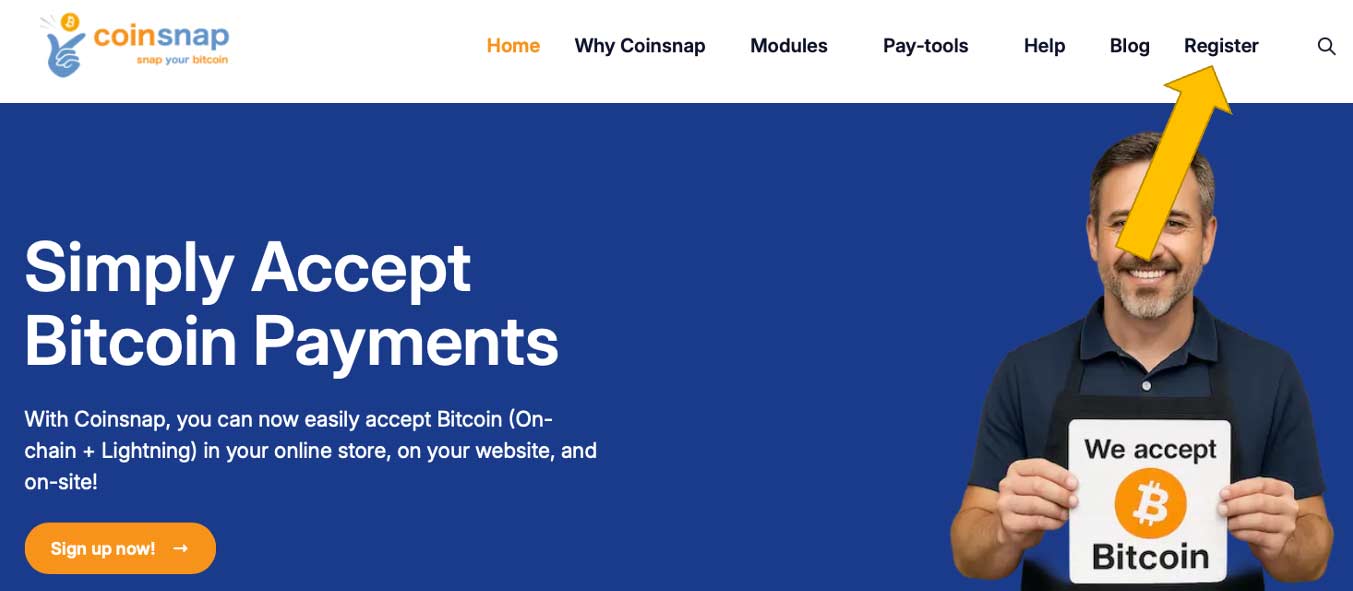
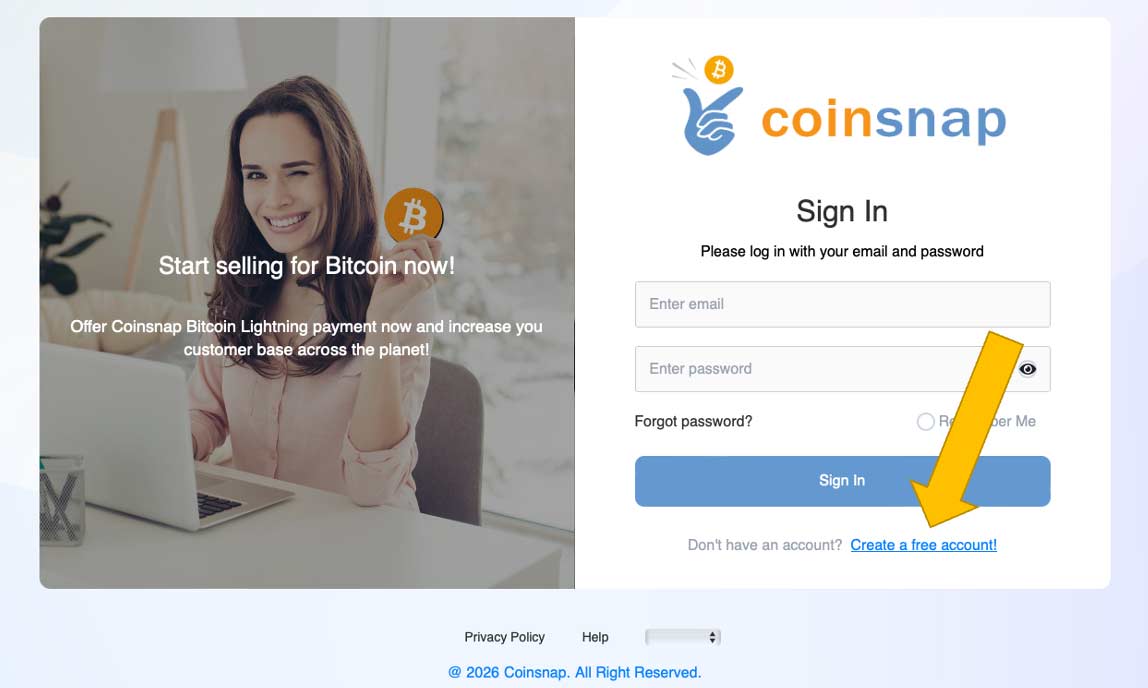
Step 1: Open the Coinsnap website and start registration
On the Coinsnap website, click Register in the main menu at the top of the page.
Click on Create a free account!
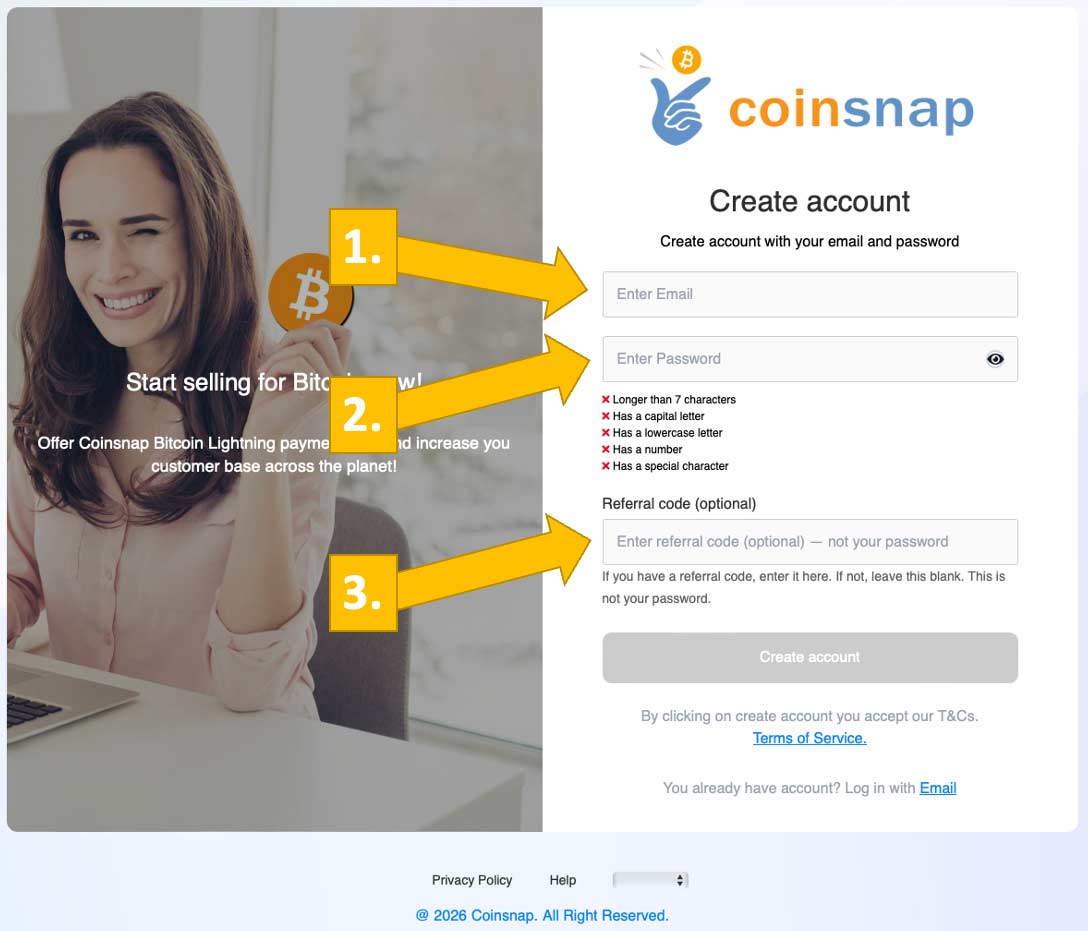
Enter your email [1], your preferred, secret password [2] and, if you have one, your referral code [3]. Then click the Create account button below.
Step 2: Confirm your email address
Check your inbox for the confirmation email from Coinsnap
Click the verification link
After confirmation, your account is active and you can log in.
Step 3: Log in to the Coinsnap dashboard
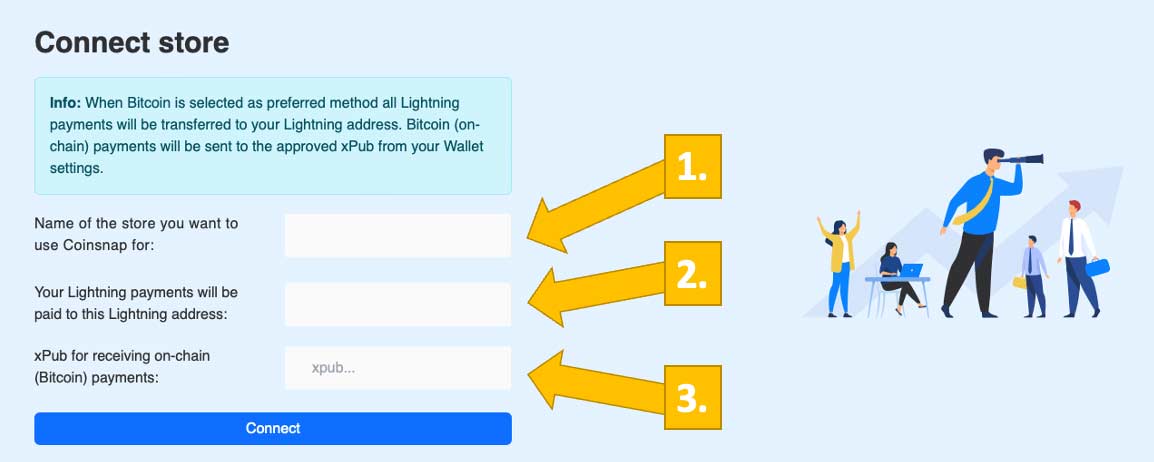
After clicking the confirmation link and logging into your new Coinsnap account, you will see this screen:
Enter the name of your store [1] and your Lightning wallet address [2] , or—optionally, if you prefer to use an on-chain wallet—your public key (xpub-key) [3]. Once you’ve entered the required information, click Connect.
Done
Your Coinsnap account is now open and fully functional.
Bitcoin payments are becoming increasingly relevant for online shops and digital business models. With Coinsnap, developers and web agencies can integrate Bitcoin quickly, securely, and without unnecessary complexity — either using ready-made plugins or by connecting custom applications via API.
This article explains the available integration options and outlines a recommended setup process for developers and agencies.
Integrating Bitcoin Payments with Coinsnap
Coinsnap provides a wide range of Bitcoin payment modules that allow for fast and simple integration into popular shop and eCommerce systems, including WordPress, WooCommerce, Shopify, and more.
For custom-built shop systems or individual eCommerce applications, Coinsnap also offers a fully documented API, enabling direct Bitcoin payment integration tailored to your specific requirements.
API Integration for Custom Shop Systems & Applications
If you are working with a custom-developed shop system or a bespoke eCommerce application, the Coinsnap API is the right approach.
You’ll find comprehensive API documentation, including detailed interface descriptions and practical code snippets to help you implement Bitcoin payments efficiently.
Recommended Setup for Developers & Agencies
To ensure a smooth integration process, we recommend the following steps:
1. Create a Developer or Agency Account
Start by creating a dedicated developer or agency account with Coinsnap.
All you need is an email address.
2. Set Up a Bitcoin Wallet
To receive Bitcoin payments, you’ll need a Bitcoin wallet.
If you don’t already have one, we recommend Wallet of Satoshi, as it is quick and easy to set up.
Next, store your Lightning address in the Coinsnap backend.
If you need test funds, simply send a short message via the support system in the backend, and Coinsnap will send you a few sats for testing purposes.
4. Retrieve Store ID and API Key
For API-based integrations, you will need:
Coinsnap Store ID
API Key
Both can be found in the backend under: Settings → Store
Implementation & Support
All additional technical details are covered in the API documentation.
If you need assistance or have project-specific questions, the Coinsnap team is happy to help.
Just contact them via the support section directly from within the Coinsnap backend.
Best Practices for a Successful Bitcoin Checkout
To ensure Bitcoin is perceived as an attractive payment option, we recommend the following best practices:
Offer a Bitcoin Discount
Consider offering a discount for Bitcoin payments.
This increases visibility and encourages customers to choose Bitcoin at checkout.
Use Clear Payment Naming
Always label the payment method as “Bitcoin”, not “Coinsnap”, to avoid confusion and ensure a clean user experience.
Enable Payments at a Later Time
If a Bitcoin payment is not completed, send the customer a Bitcoin payment link so they can finalize the transaction later.
Monetization Opportunities for Developers & Agencies
If you are building an API integration not only for a single project but for a broader audience, you can include your Coinsnap referrer code in the application.
This allows you to earn a commission whenever merchants use your integration — an ideal option for agencies, plugin developers, and SaaS providers.
Conclusion
Coinsnap enables flexible Bitcoin payment integration — from ready-to-use shop plugins to full API-based custom implementations.
Developers and agencies benefit from clear documentation, direct support, and built-in monetization options.
Help more online stores accept Bitcoin and Lightning as a means of payment and earn a few sats in the process.
Are you an online merchant who already actively uses Coinsnap and can pass on your experience to other eCommerce merchants?
Or are you a Bitcoin consultant, web designer or an eCommerce agency that supports online stores with the integration of Bitcoin and Lightning as a payment method?
Help merchants accept Bitcoin
Earn Bitcoin with the Coinsnap affiliate program by helping merchants accept Bitcoin and Lightning payments.
Coinsnap enables online stores to accept Bitcoin and Lightning payments quickly and easily.
No lengthy application and registration process is necessary. As a merchant, all you need is your own Lightning wallet with a Lightning address to which incoming Bitcoin payments are credited.
For fast technical integration, payment modules are provided with which the most common store systems can be connected to Coinsnap.
This simplicity makes it easy to support online merchants in accepting Bitcoin and Lightning payments.
Discount for the new merchant, commission for you
If you help a new merchant to accept Bitcoin and Lightning payments, the new merchant will receive a 0.25% discount on the Coinsnap fee based on your recommendation.
Since you have recommended Coinsnap, you also benefit and receive a commission of 0.25% on the turnover of the new Coinsnap merchant.
This way, both the new merchant and you benefit from using the Coinsnap discount code.
Recruit merchants and earn Bitcoin.
Earn 0.25% commission and the new merchant saves 0.25% in fees
Who can participate?
Whether an existing Coinsnap merchant or implementation partner, anyone can join the Coinsnap Affiliate Program and earn a few sats.
All you need is a Coinsnap account and a Lightning Wallet to which the commissions are paid out.
In the Coinsnap backend, you will automatically receive an individual code that can be used as a discount code for new merchants.
This means that every Coinsnap merchant is automatically able to recruit new merchants and earn commissions. Bitcoin consultants, web and eCommerce agencies are also welcome to participate in the Coinsnap partner program.
Simply create a Coinsnap account, enter your Lightning address and off you go.
How can I promote my discount code?
You will receive your individual discount code in the form of a link in the Coinsnap backend.
You can include this discount code link on your own website and when a new merchant comes to the Coinsnap website via this link, the discount code is automatically transmitted during registration and the new merchant is assigned to you as a link provider.
You can also include the link in combination with the Coinsnap logo on your website. You can download the Coinsnap logo from the Coinsnap Media page and embed it on your website.
The discount code can also be printed on flyers and brochures or mentioned in YouTube videos and podcasts. The code is then entered manually during registration and the assignment is made.
If you carry out the Coinsnap integration for an online merchant, you can enter the code yourself when creating the merchant account.
Integrating Bitcoin and Lightning payments in online stores
As a web or e-commerce agency, you can expand your services and process Bitcoin and Lightning payments for your customers in their online store.
As an implementation partner, you integrate the payment module for your customer or realize an individual API connection. You are the first point of contact for your customer and Coinsnap supports you with the implementation.
On request, Coinsnap can also take over the integration into your customer’s online store.
Any Questions?
How and where do I receive my commission?
The commission is paid out as Lightning to the registered Lightning address as soon as the minimum amount of 1,000 Sats has been reached. You will also receive a monthly commission statement.
Can I use my own code to reduce my fees?
It is not possible to use your own code to get a discount on your own fees.
Can I add a code at a later date to reduce the fees?
Once a new merchant account has been created, a code can no longer be stored. Likewise, once a code has been stored, it can no longer be changed.
Can I get an individual code?
For YouTubers and podcasters, we offer the option of creating an individual code that is linked to the name of the YouTube channel or podcast. If you run a YouTube channel or podcast and would like to draw attention to Coinsnap, simply get in touch with Coinsnap and we will create a code for you.
Where can I find more information about the Coinsnap Affiliate program?
Where can I get Coinsnap logos and banners for my website?
You can embed the Coinsnap logo on your website and add your own referrer code as a link. You can download the Coinsnap logo and advertising banner from the Coinsnap Media page.
How can I get started?
Start helping online merchants accept Bitcoin and Lightning payments today. You need your own Lightning Wallet with a Lightning address. Then you open a Coinsnap account, deposit the Lightning address and start helping merchants accept Bitcoin and Lightning payments.
2. Request the free Shopify installation service from Coinsnap
If you don’t want to go to the trouble of connecting Coinsnap for Shopify with your Shopify store, we’ll be happy to do it for you – free of charge and reliably.
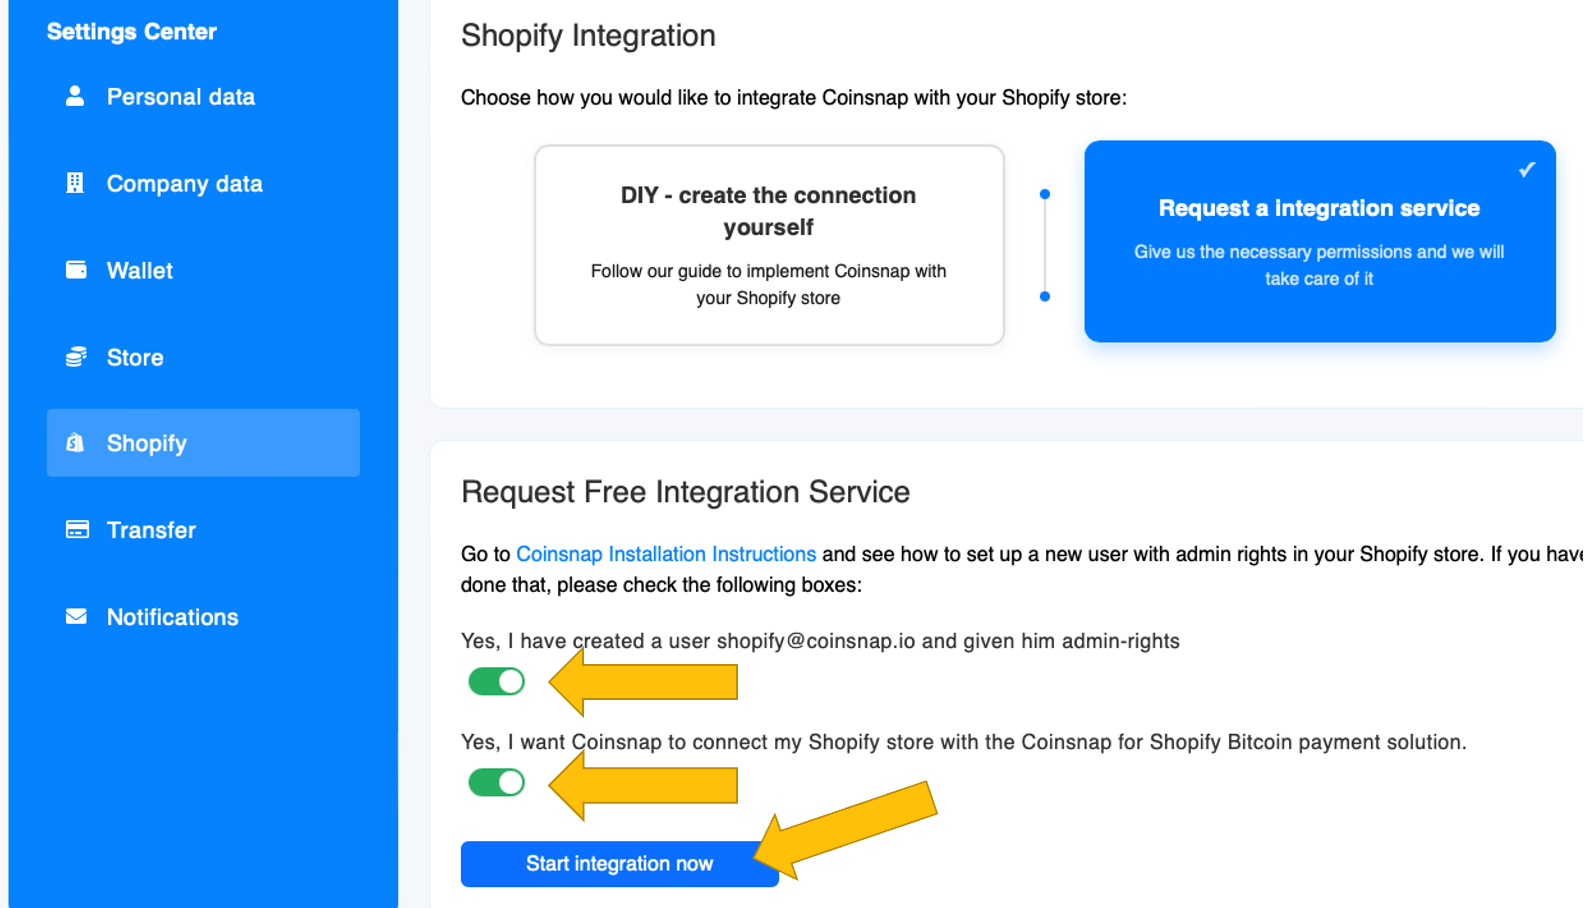
To take advantage of this free Shopify integration service, just complete these two small tasks:
instruct us to install Coinsnap for Shopify in your Shopify store for free
Create shopify@coinsnap.io as administrator of your Shopify store
To install Coinsnap Bitcoin-Lightning payment in your Shopify store, we need access to the backend of your store.
To do this, please set up a new user shopify@coinsnap.io. (After successfully setting up Coinsnap in your Shopify store, the employee is no longer needed and should be deleted).
Creating shopify@coinsnap.io as the administrator of your Shopify store works like this:
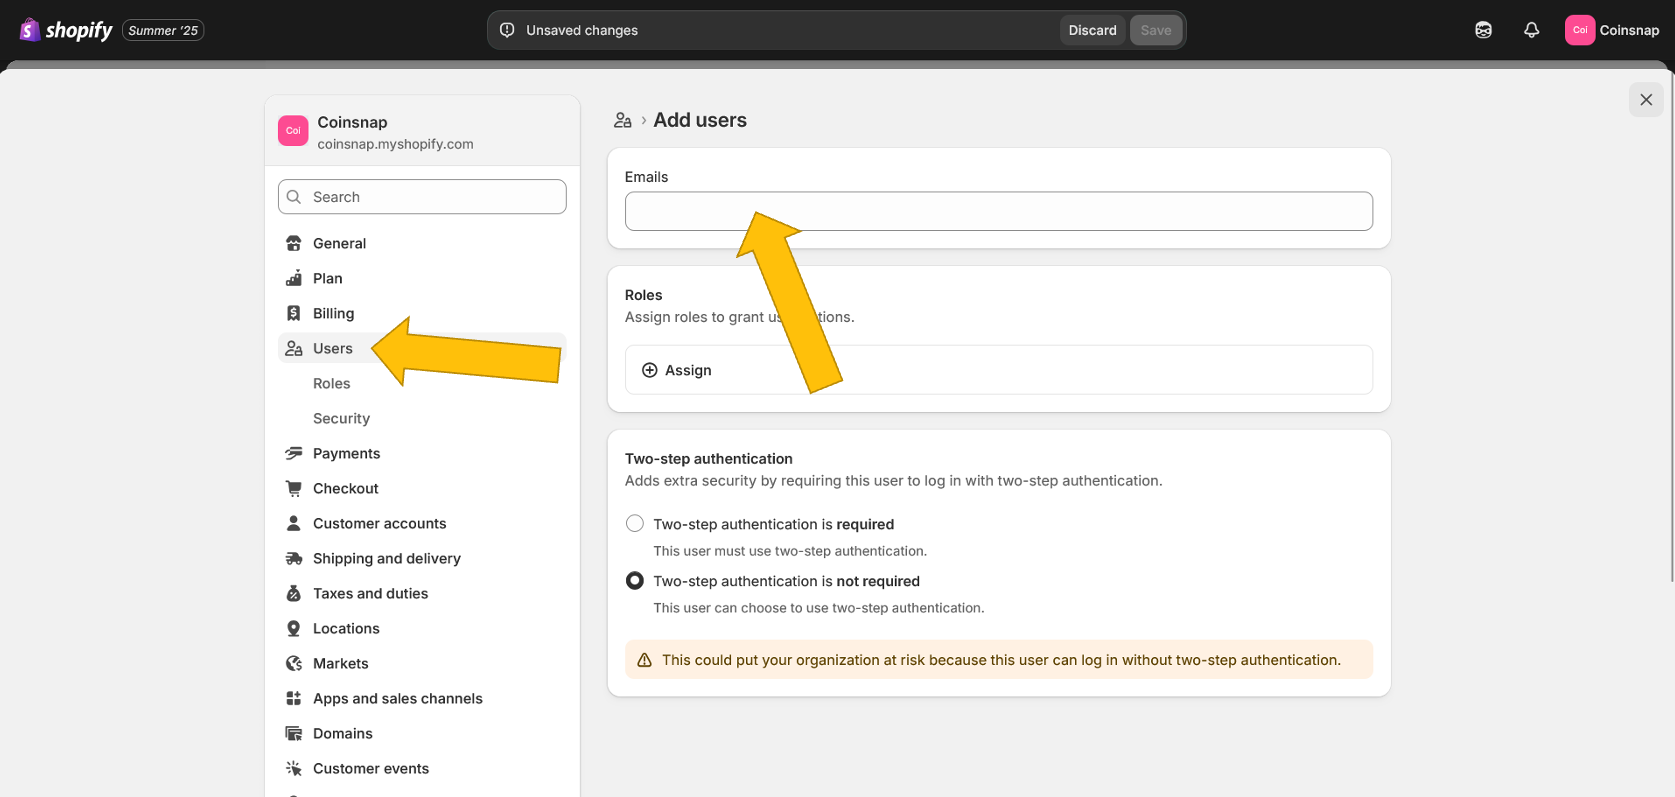
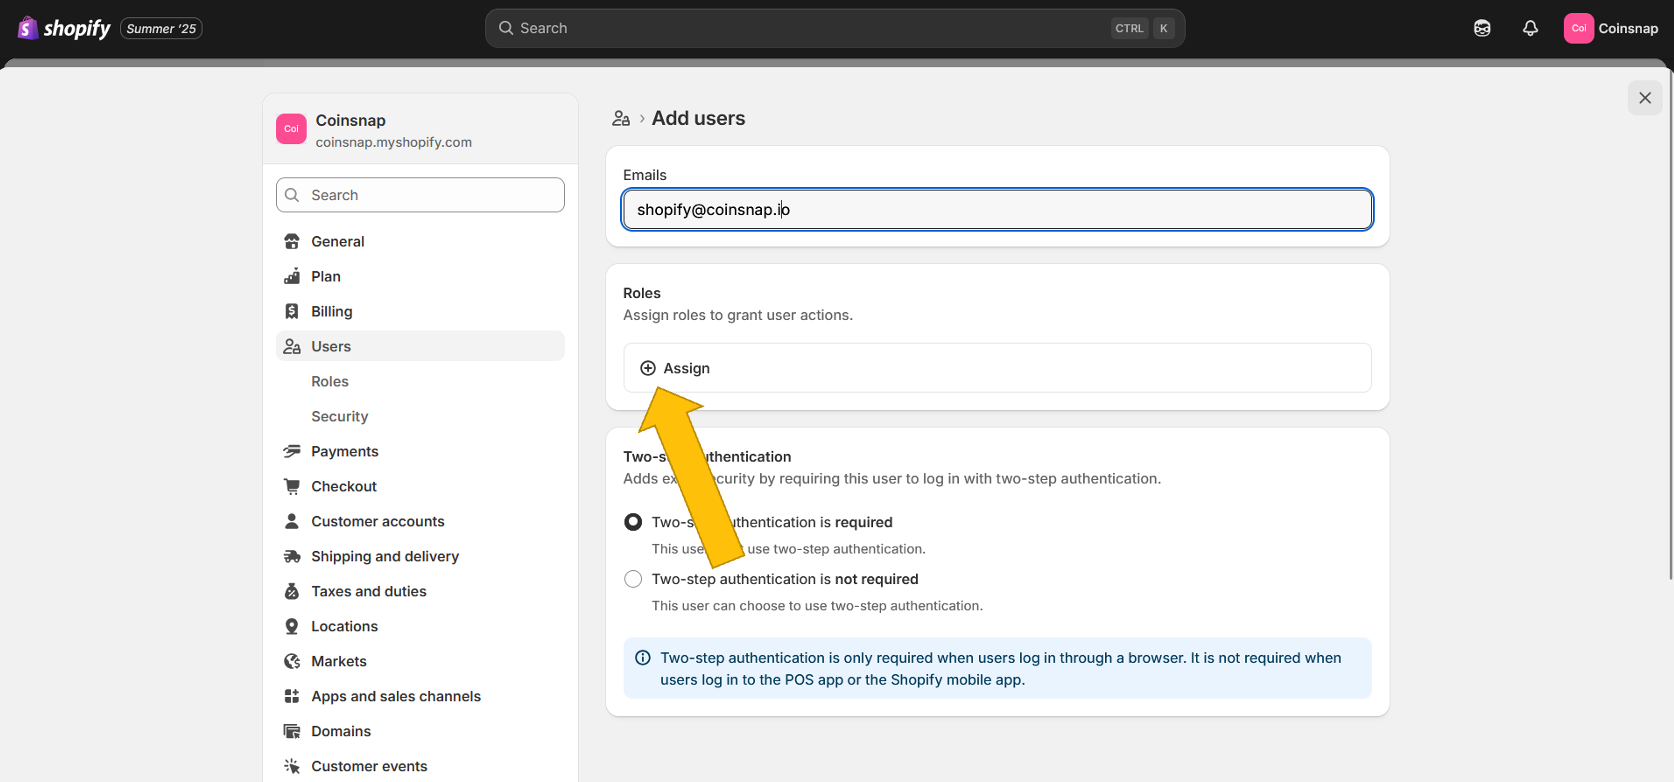
Click on Users in the left sidebar of your Shopify backend. Then enter our email address shopify@coinsnap.io at the top.
Now you need to give the new Coinsnap user admin rights so that we can make the necessary settings in your system. To do this, click on (+) Assign in the second field.
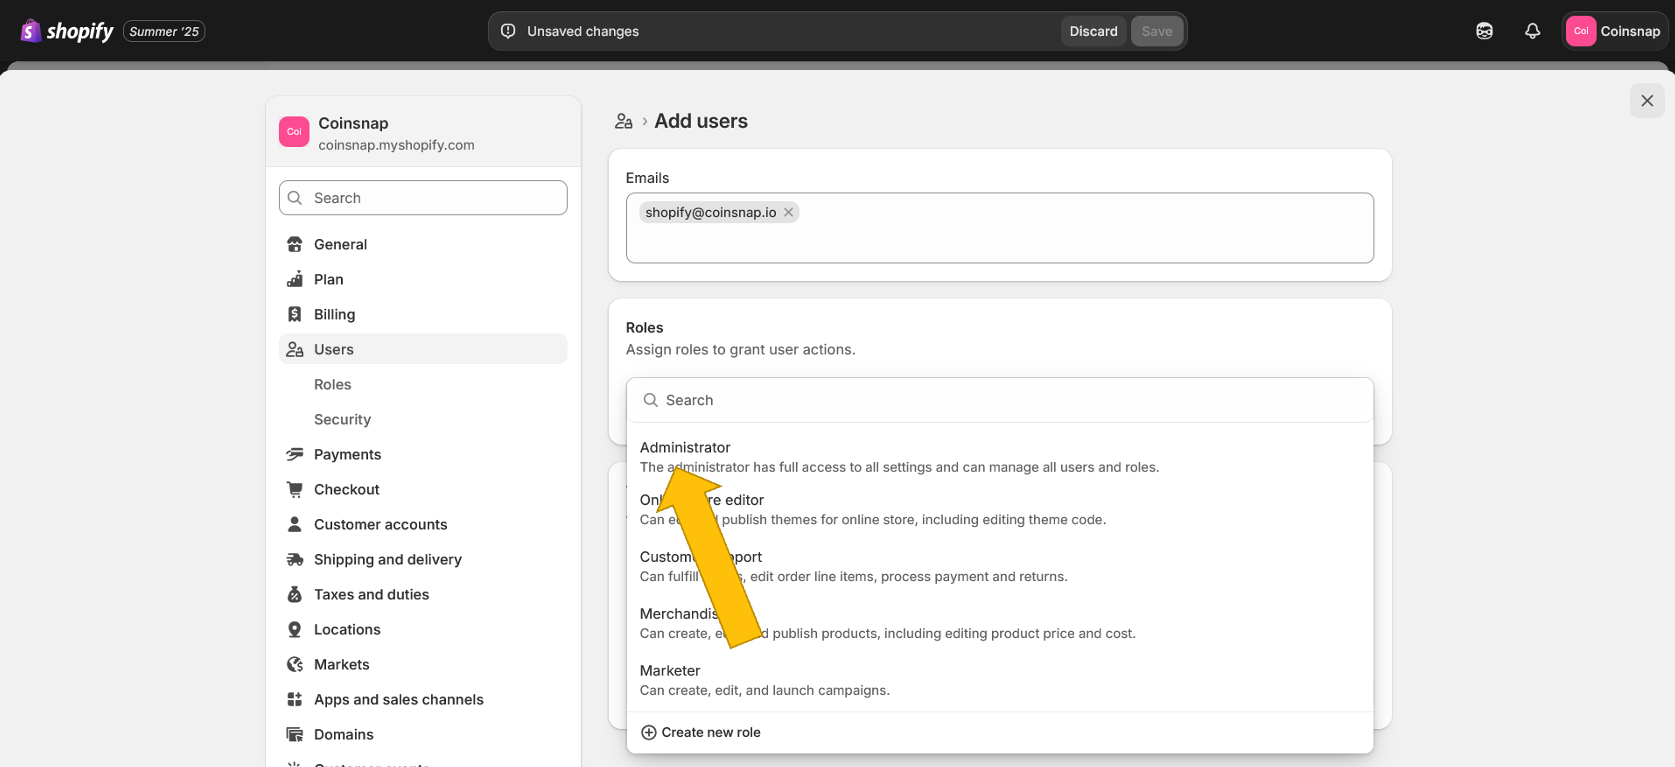
In the pop-up window that now appears, please click on Administrator.
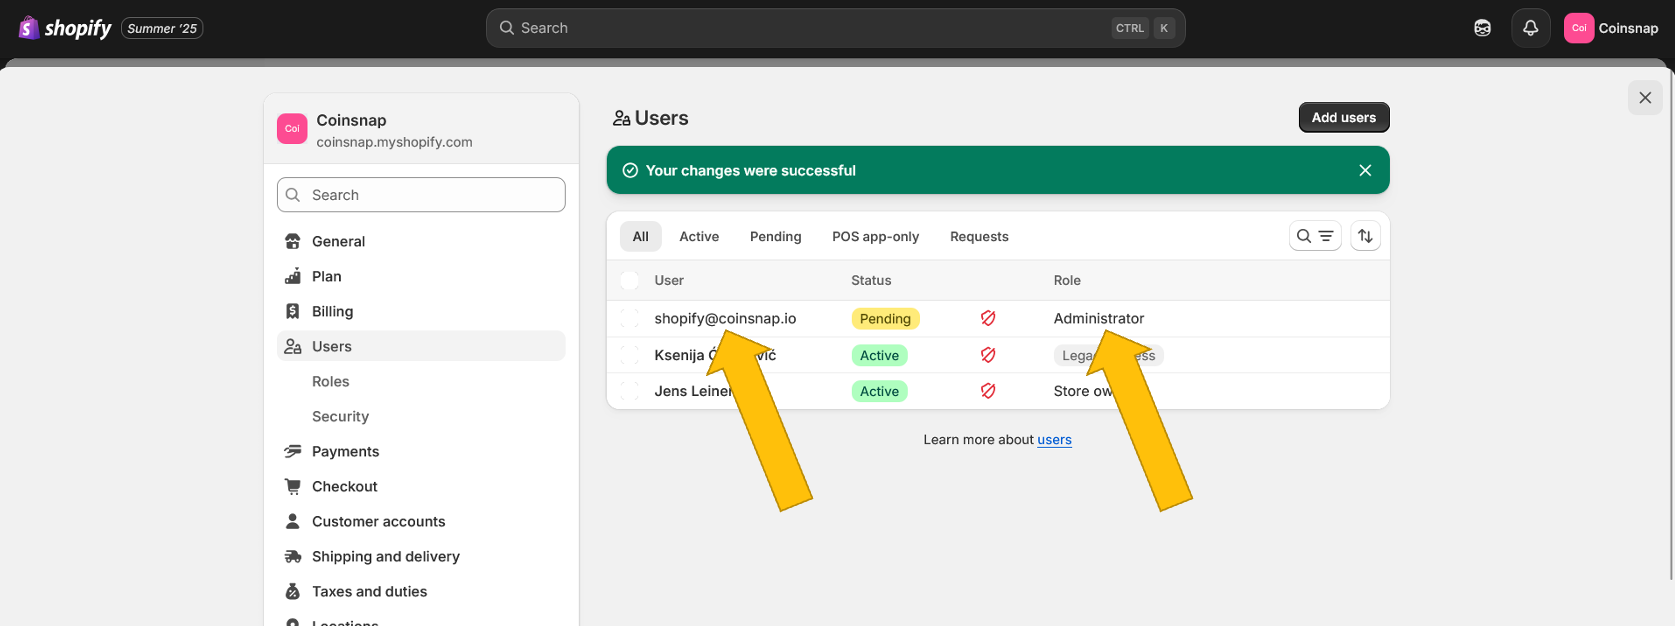
Then you will see this screen – shopify@coinsnap.io is now set up as an administrator and will receive an email that our technicians can use to log into your Shopify to link Coinsnap for Shopify to your store! (As soon as we log in, the yellow Pending field will change to green Active).
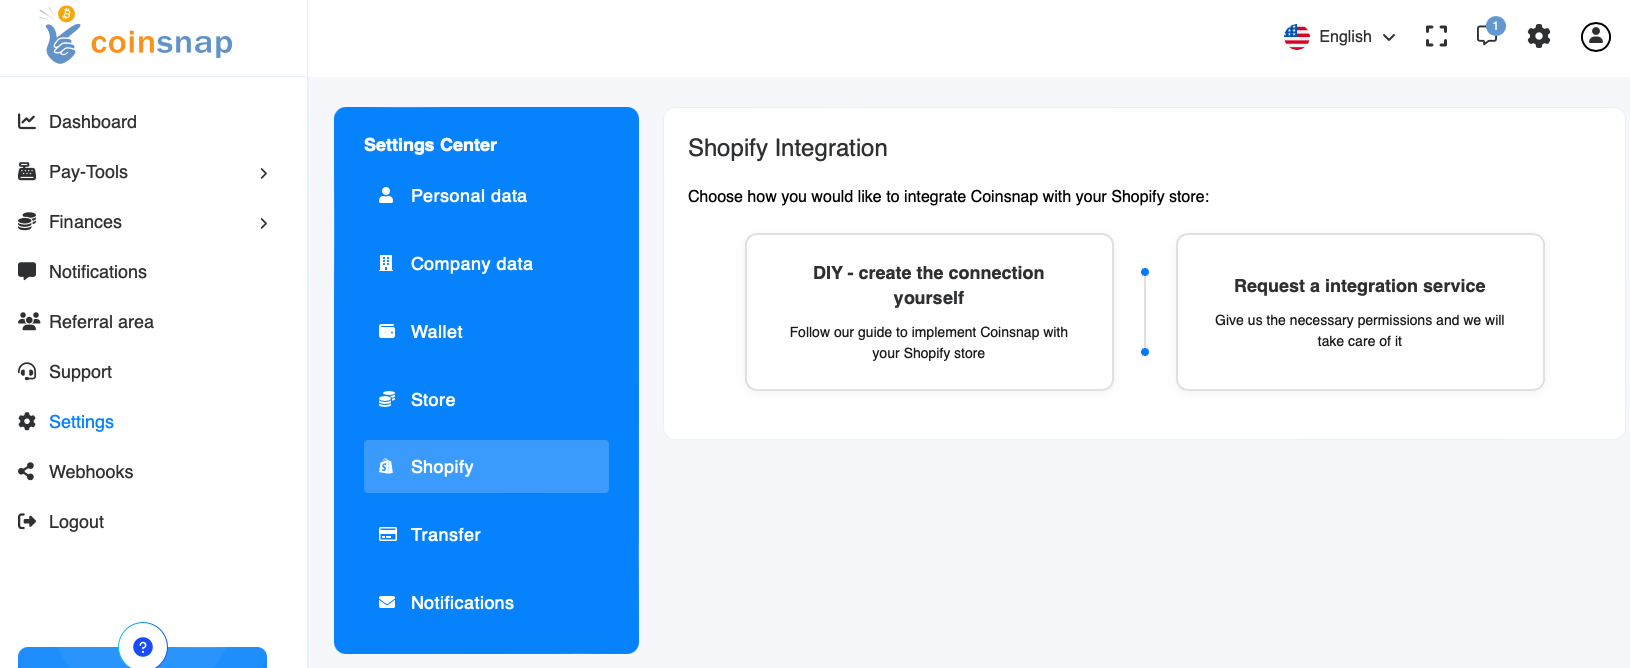
Order the free Shopify Integration Service
Log in to your Coinsnap account here and click on Settings in the left sidebar, then on Shopify in the blue box. Then you will see this screen:
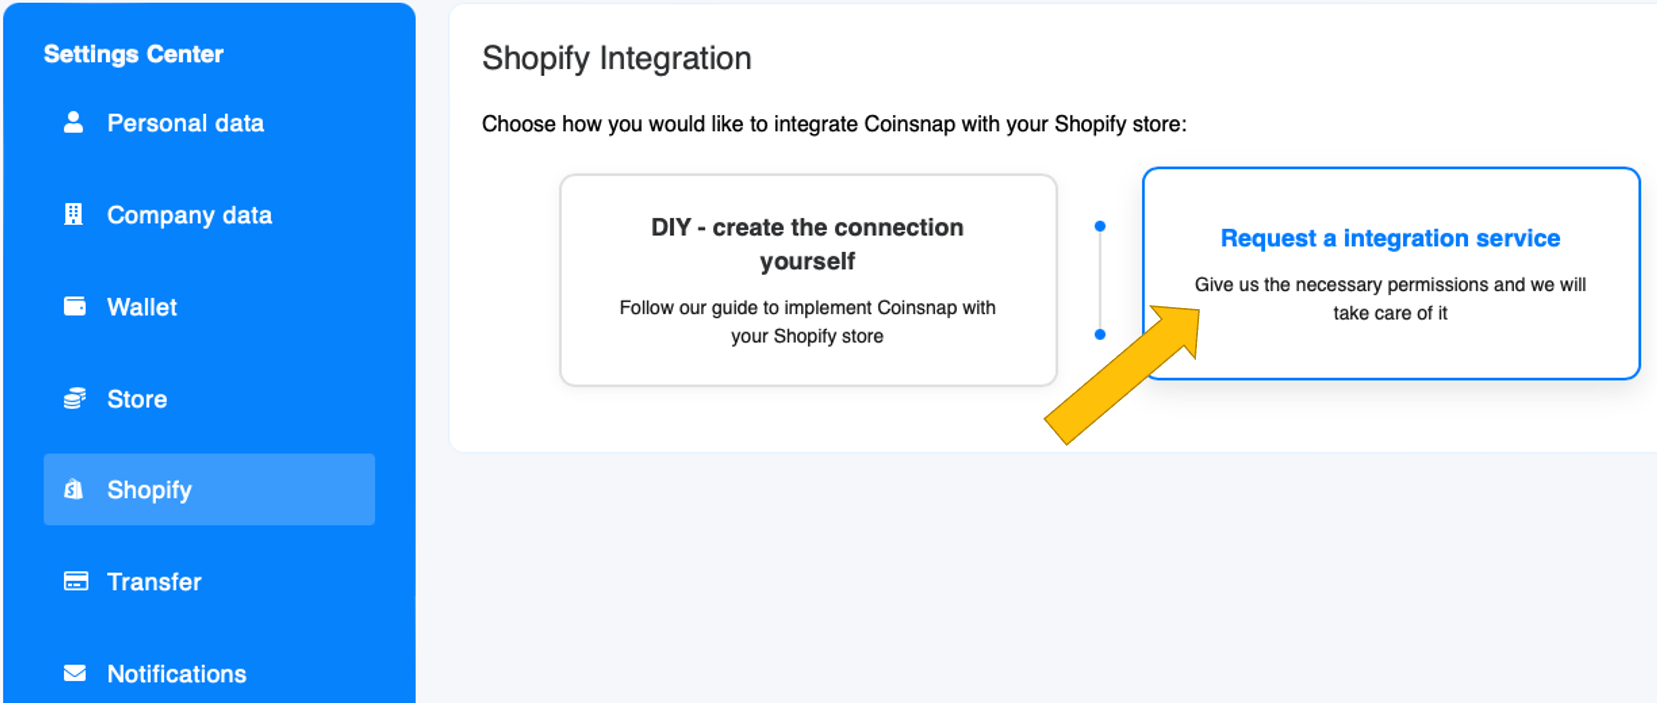
To order the free integration service, click on the right-hand tile (blue):
If you have followed our instructions for creating the shopify@coinsnap.io-admininstrator in your Shopify backend (see above), all you have to do now is move the two sliders to the right and click on the start integration now button.
We will take care of everything else – and inform you immediately when Coinsnap for Shopify is installed and you can delete the administrator shopify@coinsnap.io from your Shopify system!