WordPress Bitcoin Crowdfunding User Guide
This user guide shows you how to accept Bitcoin and Lightning payments on your WordPress website using the Coinsnap Bitcoin Crowdfunding plugin. It walks you through the technical requirements, installing and activating the plugin, connecting it to your Coinsnap Bitcoin gateway or your BTCPay Server, configuring all relevant settings, and publishing crowdfunding campaigns that supporters can fund directly on your pages.
Run crowdfunding campaigns on your website—funded with Bitcoin (on-chain + Lightning).


Requirements
THESE REQUIREMENTS MUST BE MET FOR BITCOIN CROWDFUNDING TO FUNCTION CORRECTLY:
WordPress & Bitcoin Crowdfunding
- A self-hosted WordPress website
- Bitcoin Crowdfunding installed and activated
Bitcoin Gateways (Coinsnap or BTCPay Server)
For this plugin, you need either a Coinsnap account with a Lightning address or your own BTCPay Server. Consequently, one of the following requirements must be met:
- An active Coinsnap account
-> How to set up a Coinsnap account
- A Bitcoin Lightning wallet
-> How to get a Lightning address
or
- A connected BTCPay Server
-> How to connect a Cponsnap plugin with your BTCPay Server
and
- The installed Coinsnap Bitcoin Crowdfunding plugin
->How to install the plugin and connect it with your Coinsnap account or your BTCPay Server
Server & Access
- Ability to install and activate WordPress plugins
- HTTPS (SSL) enabled on the website
Bitcoin Crowdfunding Campaign Setup
- At least one Bitcoin Crowdfunding campaign created (to enable a test payment)
STEP 1 - CONFIGURE AND CUSTOMIZE THE PLUGIN
All the requirements listed above are met, and you have successfully installed the plugin in your WordPress. If not, here is a Step-by-step: How to install a Coinsnap plugin in WordPress guide to help you install the plugin.
You will soon be able to accept Bitcoin payments (on-chain and Lightning) directly from simple Bitcoin Crowdfunding forms anywhere on your website — without the need for a complex shop system like WooCommerce or traditional payment providers such as credit cards or PayPal. But before you can do that, you need to configure Bitcoin payments in your Bitcoin Crowdfunding plugin.
HOW TO CONFIGURE THE PLUGIN
1. Choose and set up your Bitcoin Gateway
After installing and activating the Bitcoin Crowdfunding plugin, you need to configure a Bitcoin gateway connection, either with Coinsnap or with a BTCPay Server.
In the WordPress admin dashboard, go to Coinsnap Bitcoin Crowdfunding → Settings in the left-hand sidebar.
You now need to choose between two payment gateways: Coinsnap or your own BTCPay Server, and to enter your Store ID and API Key.
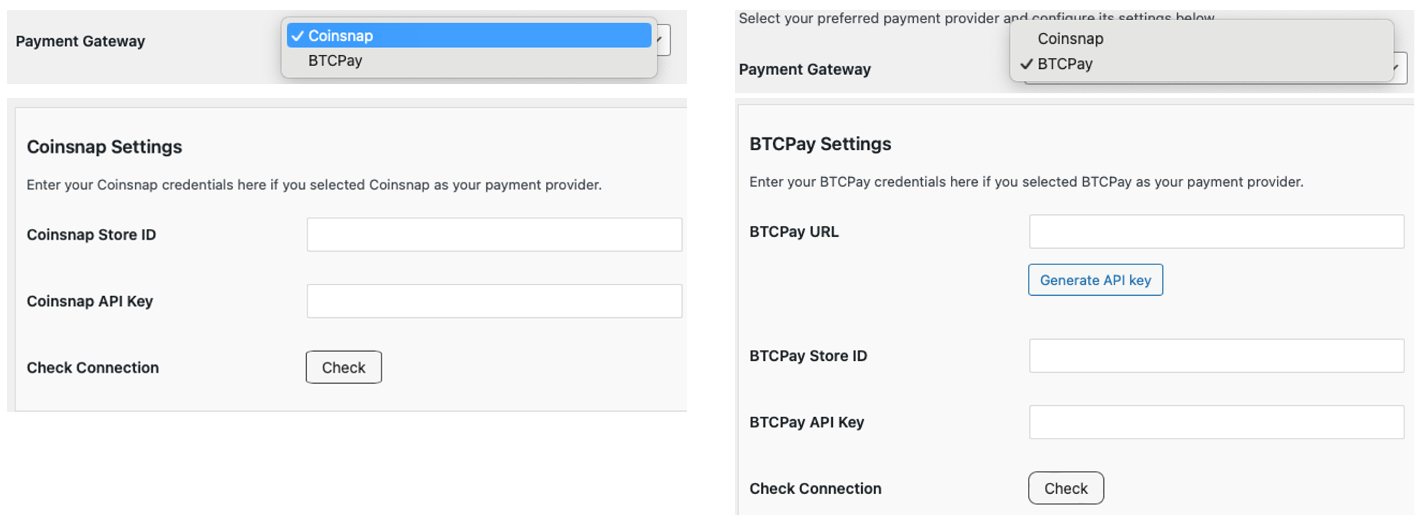
Coinsnap
Coinsnap is the easiest option. Coinsnap handles the technical setup for you and connects your store to Bitcoin and Lightning payments with just a few clicks. It’s ideal if you want a quick, hassle-free solution without managing your own payment infrastructure.
Learn here how to retrieve your Coinsnap Store ID and API Key:
-> Step-by-step explanation: How to connect your Coinsnap account with your plugin
BTCPay Server
BTCPay Server is a self-hosted option for merchants who want full control. You run your own Bitcoin and Lightning payment server, manage your own wallets, and don’t rely on a third party. This option offers maximum independence but requires more technical setup and maintenance.
Learn how to retrieve your Store ID and API Key using our BTCPay Server wizard here:
-> Step-by-step explanation: How to connect your BTCPay Server with your plugin
Check Connection
Whichever gateway you’ve set up, once you’re done, click the check button.
![]()
If everything went well, you should now see the following notification at the top of the settings screen:
![]()
2. Choose a theme
You can also choose the color scheme for your Bitcoin donation forms — light or dark — to match the design and style of your website.

STEP 2 - CREATE A SIMPLE BITCOIN DONATION BUTTON
With the Coinsnap Bitcoin Crowdfunding plugin, you can turn any WordPress page into a private Bitcoin funding page to collect money from friends, family, teammates, or your wider personal circle. Whether it’s a wedding gift, a birthday or jubilee, a shared trip, an event, or new jerseys for a kids’ football team, you can collect Bitcoin globally—without coding, intermediaries, or regional payment restrictions.
Go to Bitcoin Crowdfunding → Crowdfundings in the left sidebar, then click Add New Crowdfunding at the top left of the screen. You will now see the settings options for your crowdfunding campaign:
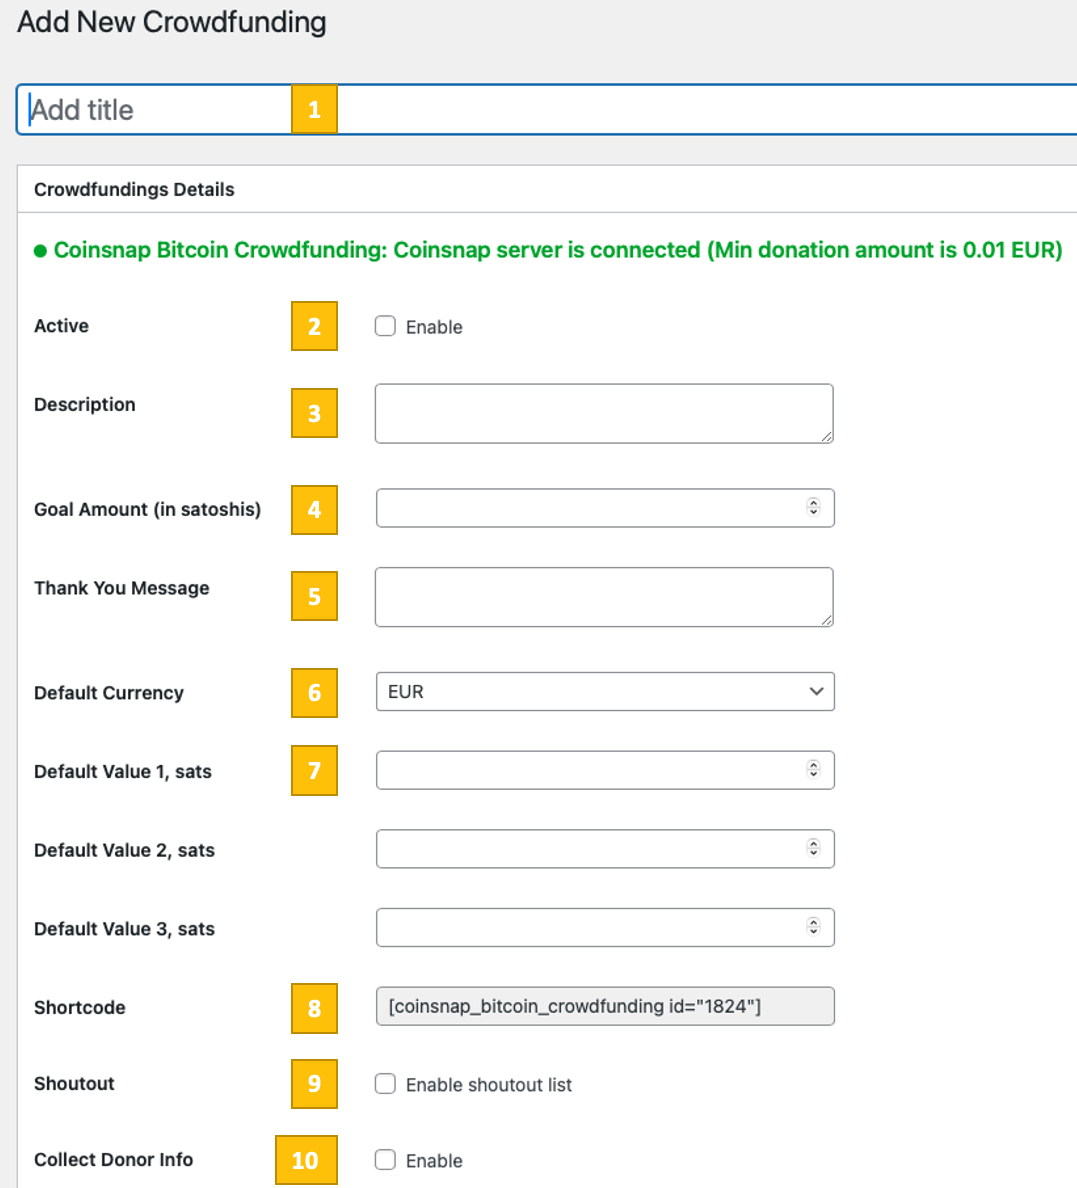
Now you’ll need to configure 10 parameters to match your needs:
[1] Title
Enter an internal name for your crowdfunding campaign. This is mainly for your own orientation in the WordPress backend.
[2] Active
Enable this checkbox to make the crowdfunding campaign live. If it is not enabled, the campaign will not accept payments even if embedded on a page.
[3] Description
Enter a short description of your crowdfunding project. This text is shown to visitors and should clearly explain what they are funding and why.
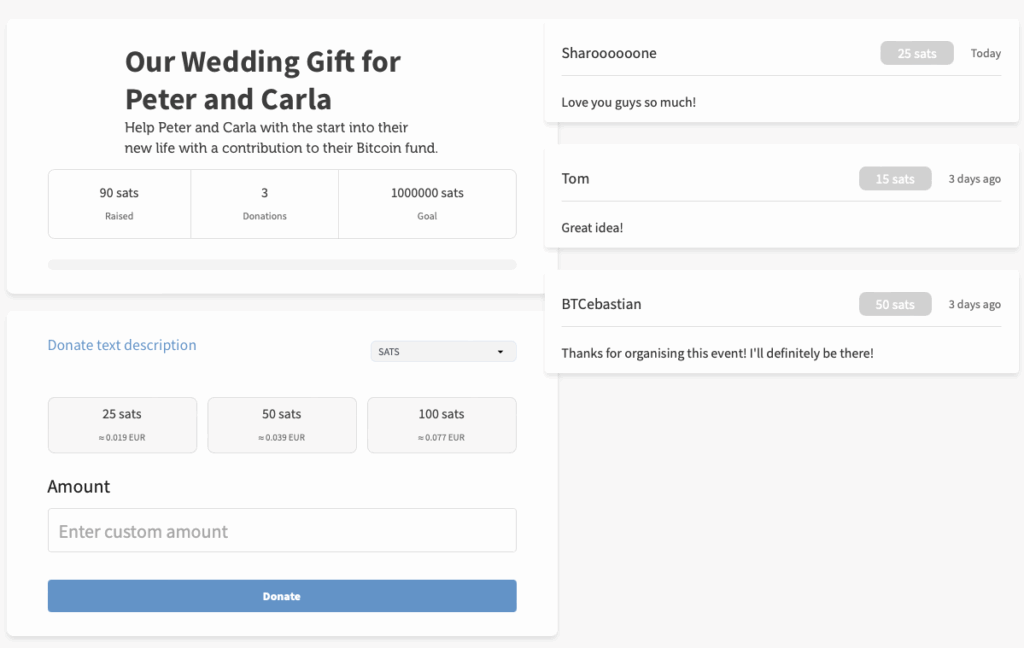
[4] Goal Amount (in satoshis)
Define the total funding goal in satoshis. Once this amount is reached, the campaign goal is fulfilled. Leave it empty or set a very high value if you do not want to limit the campaign.
[5] Thank You Message
Enter the message supporters will see after a successful payment. Use this to thank donors or explain what happens next.
[6] Default Currency
Select the reference currency (e.g. EUR). This currency is used for display and conversion, while the actual payment is always made in Bitcoin.
[7] Default Value 1 / 2 / 3 (sats)
Define preset contribution amounts in satoshis. These values are shown as quick-select buttons, making it easier for users to choose a contribution amount.
[8] Shortcode
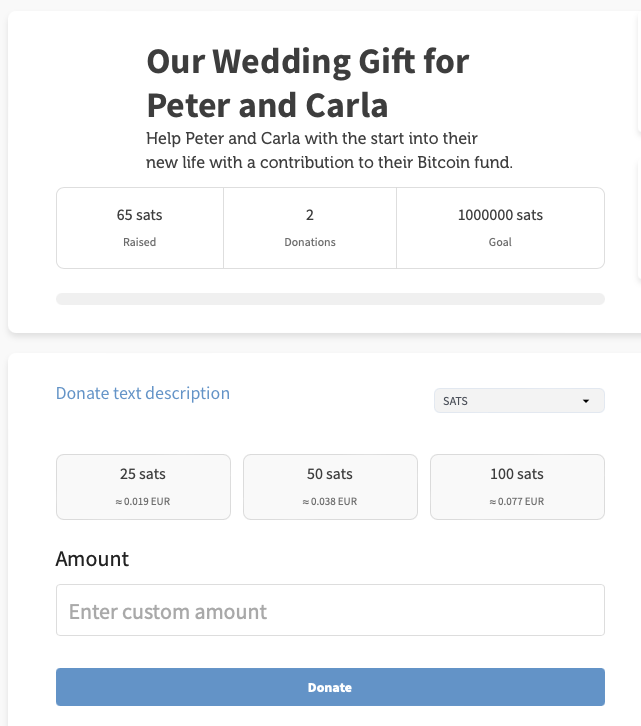
This shortcode is generated automatically for this crowdfunding campaign. Copy and paste it into any page or post where you want the crowdfunding box to appear.
[9] Shoutout
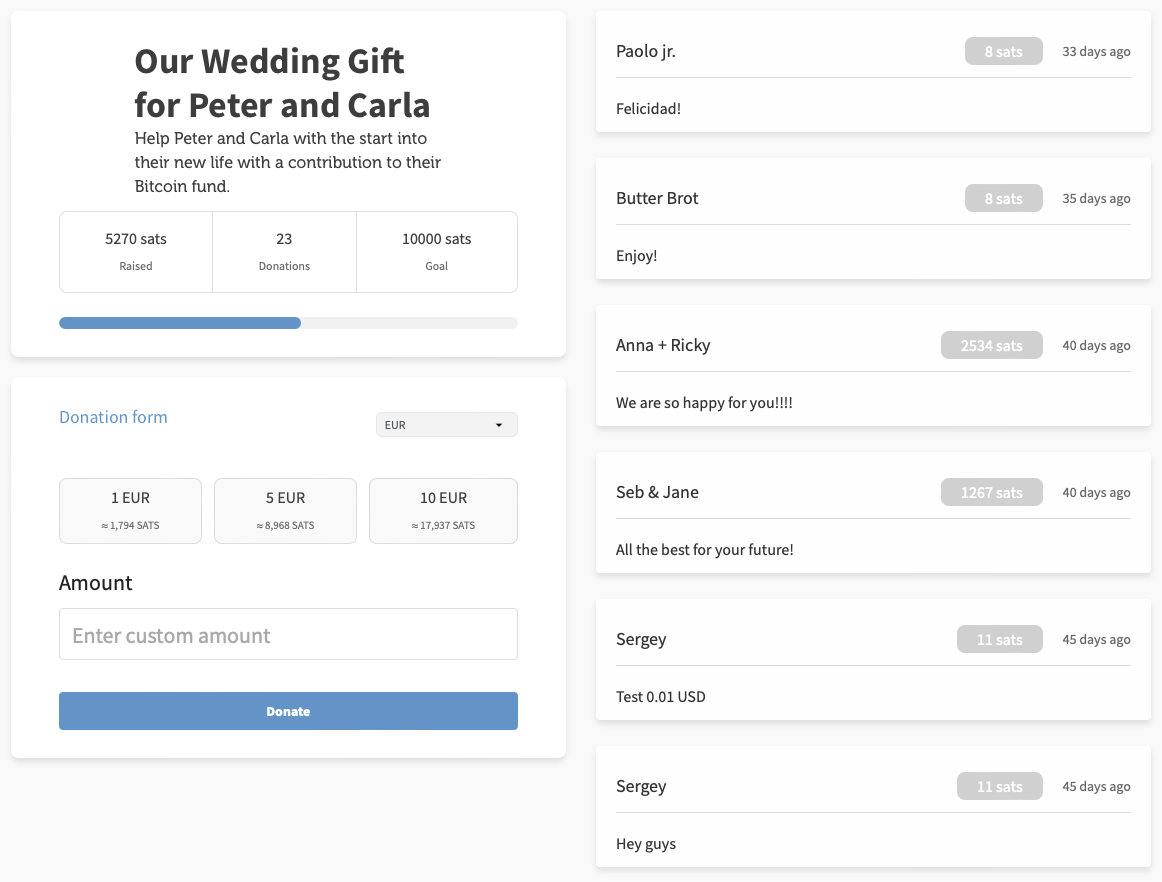
Enable this option if you want to display a public list of supporter messages (you can see it in the first image in this paragraph, on the left). Supporters can leave a short message that appears in the shoutout list after payment.
[10] Collect Donor Info
Enable this option if you want to collect additional information from supporters (such as name or email).
Only enable this if you actually need the data and have a legal basis to collect it.
Done — you can now start collecting funds in Bitcoin (on-chain + Lightning)
Once all settings are configured, save the campaign and place the shortcode on your desired page. The crowdfunding campaign will then be live and ready to accept Bitcoin and Lightning payments.
STEP 4 — MAKE A TEST PAYMENT TO ENSURE EVERYTHING WORKS CORRECTLY
After all settings have been made, a test transaction should be carried out.
Fill out a crowdfunding box that you created on your website and click the payment button (Donate).
If you are collecting donor information, fill out the form that appears next.
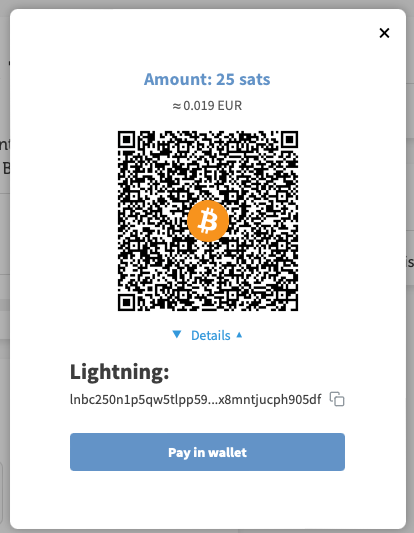
You will then be redirected to the Bitcoin payment page to complete the purchase. The Bitcoin payment page allows the payer to choose between Bitcoin and Lightning. Both payment methods are integrated into the displayed QR code.
After a successful payment, you will see the updated crowdfunding box showing the current amount of sats received and the new shoutout (if enabled).
Frequently Asked Questions
What Users Ask About This plugin
Can supporters donate anonymously?
Yes — Bitcoin payments do not require personal data unless you request it.
Is any personal data of supporters required?
No. Collecting donor information is optional and can be enabled or disabled per campaign.
Do supporters need a Coinsnap account to contribute?
No. Supporters only need a Bitcoin or Lightning wallet.
Can contributors pay with both Bitcoin on-chain and Lightning?
Yes. Each payment is processed via a single QR code that supports both on-chain Bitcoin and Lightning payments.
Is it possible to run multiple crowdfunding campaigns at the same time?
Yes. You can create and manage multiple crowdfunding campaigns and embed each one on different pages using individual shortcodes.
What happens when the funding goal is reached?
Once the defined goal amount is reached, the campaign is marked as fulfilled. You can then disable the campaign or continue accepting contributions, depending on your use case.
Can I change campaign settings after publishing?
Yes. All campaign settings can be adjusted at any time. Changes take effect immediately without affecting previous contributions.
Are funds paid out instantly?
Yes. Payments are credited directly to your connected Bitcoin wallet or Lightning address without delays or intermediaries.
