JTL Store Bitcoin User Guide
This User Guide shows you how to accept Bitcoin and Lightning payments in your JTL Store with Coinsnap. It explains the requirements, how to install and connect the Coinsnap payment plugin, how to configure all relevant settings, and how to enable Bitcoin payments at checkout so customers can pay instantly via Bitcoin (on-chain + Lightning).
Add Bitcoin + Lightning to your JTL checkout — fast setup, no complex integration.


GET STARTED - REQUIREMENTS
To enable Bitcoin and Lightning payments with Coinsnap in your JTL Store, you must meet the following requirements:
- A JTL-Shop installation with administrator access
- An active Coinsnap account
- The Coinsnap for JTL Store payment module, downloaded from the Coinsnap GitHub repository
Step 1 - install the module
You’ve already downloaded the JTL Store Bitcoin module from Github (see above). Now:
- Extract the ZIP file: Unzip the file to a folder on your computer. After extraction, you should have a folder named jtl_coinsnappayment-main.
- Rename the folder: Rename the extracted folder from jtl_coinsnappayment-main to jtl_coinsnappayment.
- Recompress the folder: Zip the renamed folder back into a new ZIP file. The ZIP file should now contain the folder jtl_coinsnappayment at its root level.
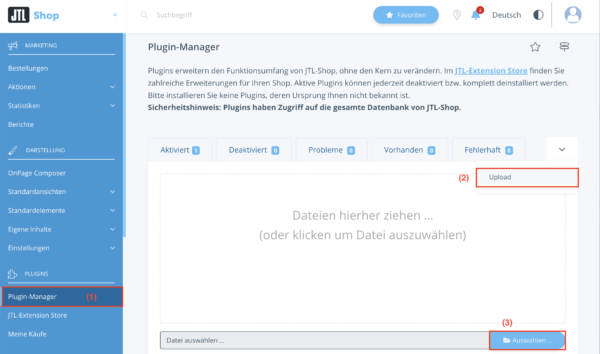
- Upload the new ZIP file: Go back to the JTL backend and upload this newly created ZIP file. JTL should now correctly recognize the folder structure and complete the installation without errors.Navigate to the Plugin Manager [1] in the left navigation menu. Select the Upload tab (the last tab on the right) [2]. Then drag the ZIP file you downloaded from the Coinsnap for JTL-Store GitHub page onto the page.
Step 2 - activate the module
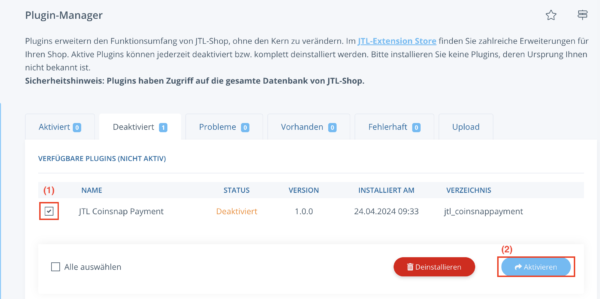
After you have installed the plugin, it will be deactivated by default. Go to the Deactivated section and select JTL Coinsnap Payment.
Click on the Activate button.
Step 3 - add Bitcoin payment to payment methods
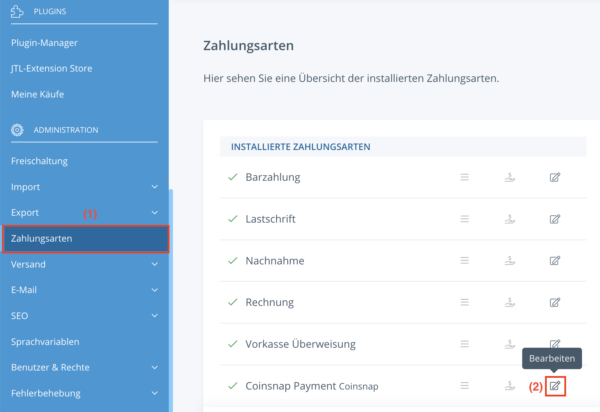
After successfully activating the plugin, navigate to the payment methods area [1].
Select Coinsnap Payment and click on the Edit button (the small pencil icon at the end of the row) [2].
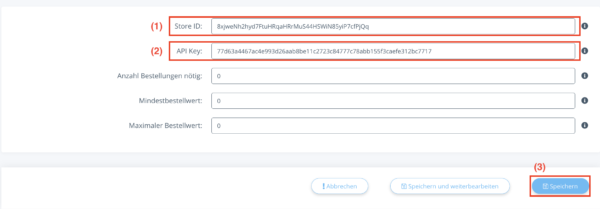
Step 4 - get your Coinsnap Store ID and API Key
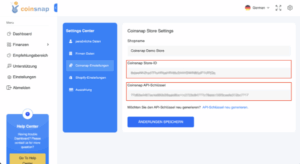
Before proceeding with further configuration, copy your Store ID and API key from the Coinsnap backend.
You can find them in the Settings section of the Coinsnap app.
Step 5 - Connect the module with the Coinsnap Bitcoin gateway
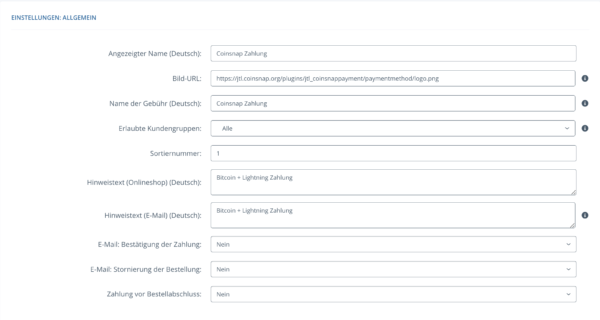
First, configure the general settings for your Coinsnap payment method [1].
Enter the Store ID and API key that you copied earlier into the corresponding fields [2].
After filling in the fields, click the Save button to activate this payment method [3].
Frequently Asked Questions
What Users Ask About This plugin
Why does the plugin ZIP need to be renamed before uploading?
JTL requires a specific folder structure for plugins. Renaming the extracted folder to jtl_coinsnappayment and recompressing it ensures that JTL correctly recognizes and installs the plugin without errors.
The plugin was installed but is not visible at checkout — what should I check?
Make sure the plugin is activated in the Plugin Manager and that the Coinsnap payment method is enabled and saved in the payment methods configuration.
Do I need additional server configuration to run the plugin?
No. Standard JTL-Shop requirements are enough as long as HTTPS is enabled.
Can I change Coinsnap settings after activation?
Yes. You can edit the Coinsnap payment method at any time in the JTL backend. Changes take effect immediately after saving.
Is it necessary to deactivate other payment plugins?
No. Coinsnap runs independently and can be used alongside other payment methods without conflict
