PrestaShop Bitcoin User Guide
The PrestaShop Bitcoin User Guide shows you how to accept Bitcoin and Lightning payments in PrestaShop with the PrestaShop Bitcoin module. It explains how to install and connect the Coinsnap module, how to configure all relevant settings, and how to enable Bitcoin payments at checkout so customers can pay instantly via Bitcoin (on-chain + Lightning).
Add Bitcoin + Lightning to your PrestaShop checkout — fast setup, no complex integration.


GET STARTED - REQUIREMENTS
To enable Bitcoin payments with Coinsnap in your PrestaShop store, you must meet the following requirements:
- A PrestaShop website with administrator access
- An active Coinsnap account
- The Coinsnap for PrestaShop module, downloaded from GitHub
Step 1 - install the module
After successfully downloading the .zip file that contains the module, go to the PrestaShop administration area and log in with your credentials.
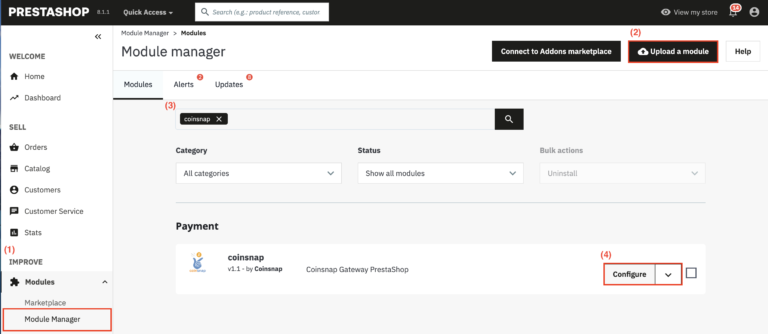
Navigate to the main menu and find the Improve section [1] , then select Modules, followed by Module Manager.
In the Module Manager [2] , upload the previously downloaded .zip file from your computer.
Enter Coinsnap in the search bar [3] and click on the Install button.
After successful installation, click on the Configure button [4].
Step 2 - connect the module with the Coinsnap Bitcoin gateway
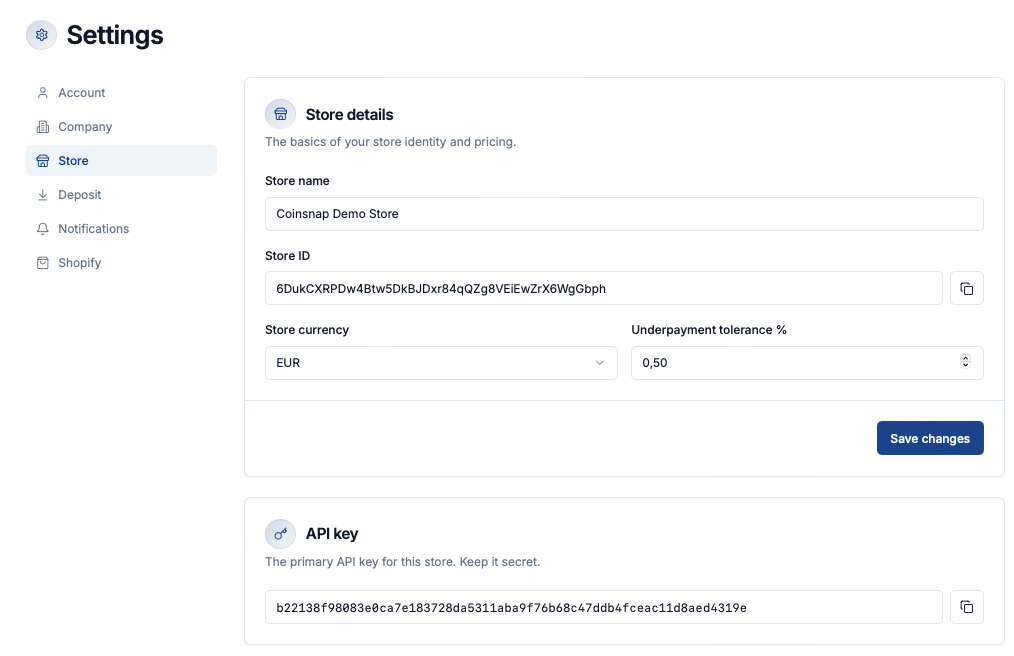
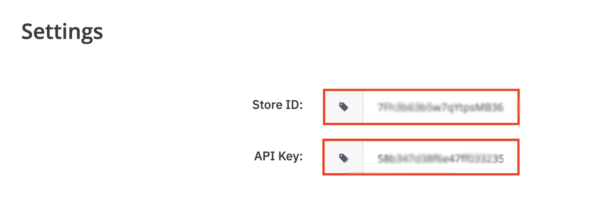
In your Coinssnap account dashboard , go to Finances -> Settings and navigate to the Store section where you need to copy the following information: Store ID and API Key.
Now go back to your PrestaShop backend, and paste the Store ID you copied into the first field, the API key into the second field.
Step 3 - configure order statuses
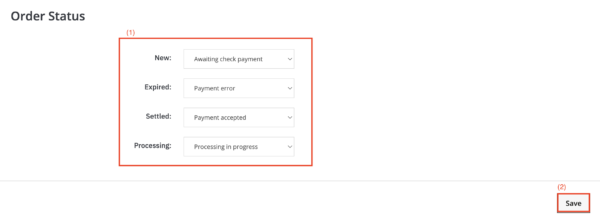
Under Order Status, select the appropriate payment statuses for the four different order statuses [1].
Click Save to ensure that your settings are applied [2].
You now have Bitcoin payments available in your PrestaShop checkout, alongside the payment methods you already use.
Frequently Asked Questions
What Users Ask About This plugin
Do my customers need a Coinsnap account to pay with Bitcoin?
No. Customers can pay with any compatible Bitcoin or Lightning wallet. No registration or Coinsnap account is required for payers.
Does the PrestaShop Bitcoin module support both Bitcoin on-chain and Lightning payments?
Yes. The payment QR code shown at checkout supports both Bitcoin on-chain and Lightning, allowing customers to choose their preferred method.
Can I keep my existing payment methods active in PrestaShop?
Yes. Bitcoin payments via Coinsnap are added alongside your existing payment methods and do not replace or interfere with them.
Where are Bitcoin payments credited after a successful checkout?
Payments are credited according to the settlement configuration in your Coinsnap account, typically to your connected Bitcoin or Lightning wallet.
Can I test the Bitcoin payment before going live?
Yes. You can create a test order with a small amount to verify that the payment flow, order status updates, and redirection work correctly.
How are order statuses handled after a Bitcoin payment?
Order statuses are mapped in the module settings. Once a payment is successfully completed, PrestaShop automatically assigns the corresponding order status you configured.
Is technical knowledge required to install or configure the module?
No. The module is installed via the PrestaShop Module Manager and configured by copying your Store ID and API key from the Coinsnap dashboard.
What happens if a customer does not complete the Bitcoin payment?
If the payment is not completed, the order remains in the unpaid or pending status you selected during configuration.
Can I use the module with any PrestaShop theme?
Yes. The Coinsnap module works independently of your theme and integrates directly into the PrestaShop checkout.
Where can I get help if something doesn’t work?
If you encounter issues, you can contact Coinsnap support directly from your Coinsnap account dashboard. The customer success team will assist you and help set up the payment method free of charge.
