Coinsnap Point of Sale Documentation
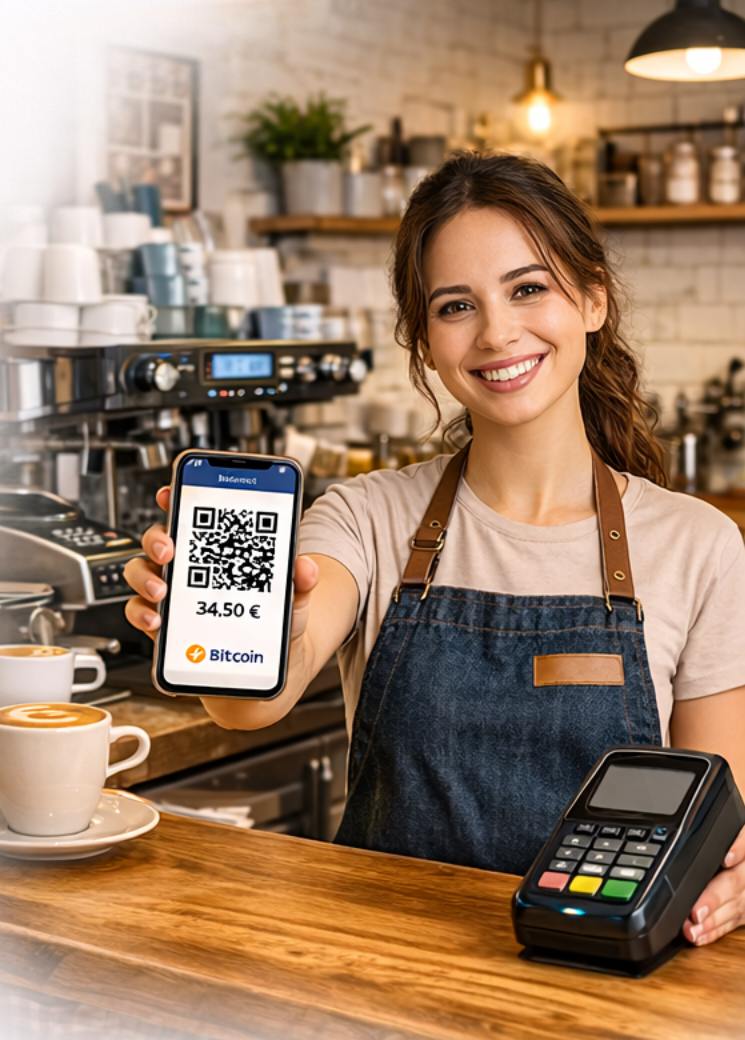
Technical overview and product documentation for the Coinsnap Wallet and Point of Sale. Learn how Coinsnap enables merchants to accept Bitcoin payments in physical stores using a smartphone or tablet.
Simple step-by-step guide for beginners
A practical walkthrough for first-time wallet users and merchants who want to accept Bitcoin in-store.
What is the Coinsnap Point of Sale Wallet?
The Coinsnap Point of Sale Wallet is two things in one app:
- a Bitcoin wallet for sending, receiving and paying with Bitcoin
- a point-of-sale system (PoS) for physical merchants who want to accept Bitcoin in their store
What makes it special: You can use the app very easily as a normal Bitcoin wallet. If you need more, you can additionally activate the PoS functions and turn your smartphone or tablet into a Bitcoin payment terminal.
The app is therefore aimed at three groups:
- Individuals who want to send, receive or pay with Bitcoin
- Business owners who want to accept Bitcoin in their shop or restaurant
- Coinsnap merchants who already use other Coinsnap solutions, for example for an online shop
What you can do with the app
As a wallet user:
- receive Bitcoin
- send Bitcoin
- pay via Lightning
- receive and send on-chain Bitcoin
- separate private and business balances
As a merchant (in-store):
- accept Bitcoin payments in your store
- use a product catalog
- offer Bitcoin discounts
- allow employees to accept payments
- pay tips directly to employees
- analyze revenue and transactions
- document data for accounting and taxes
As a Coinsnap Merchant (Online & Tools): If you already use Coinsnap (e.g. Shopify, WooCommerce, website, WordPress plugins, or other Coinsnap Bitcoin tools), then the Coinsnap app is the perfect addition for you.
Why? To receive Bitcoin payments, you must store a Lightning address in your Coinsnap backend. The Coinsnap app provides your own Business Lightning address, which you can store in the backend so all Bitcoin payments from your customers are credited directly to your own wallet.
Installation of the Coinsnap Wallet
The Coinsnap Wallet is available for:
- Apple iPhone and iPad via the Apple App Store
- Android smartphones and tablets via the Google Play Store
- alternatively as an APK via the Coinsnap GitHub page
How to install the app:
- Open the App Store or Google Play Store
- Search for Coinsnap POS Wallet
- Install the app
- Open the app after installation
Alternatively, you can use a download link or QR code from the Coinsnap website.
Setting up the app for the first time
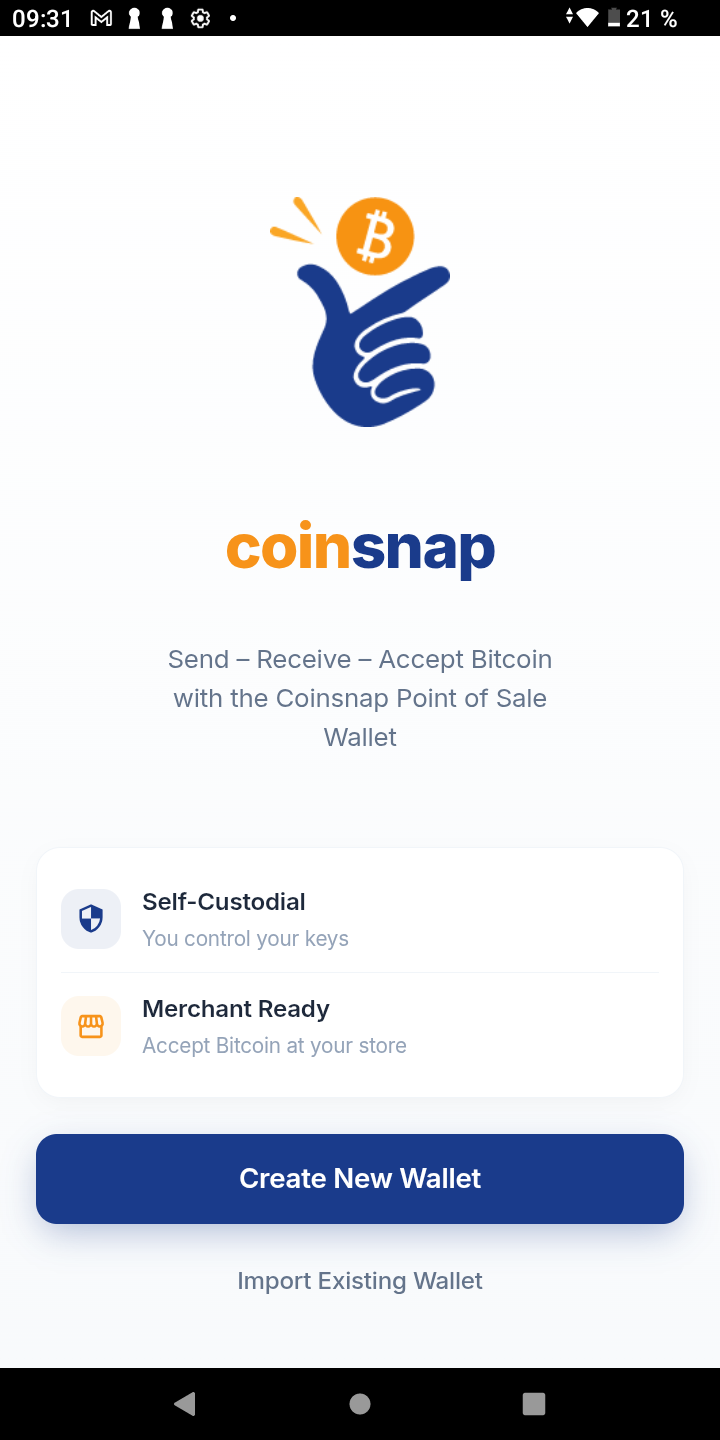
After starting the app for the first time, you will see the start screen.
You have two options:
- Create new Wallet — if you are using the app for the first time
- Import Existing Wallet — if you already have a backup and want to restore your wallet on a new device
For new users: Select Create new Wallet.
Setting up your Personal and Business Wallet
The Coinsnap app creates two separate wallets for you:
- Personal Wallet for private Bitcoin
- Business Wallet for your business
This is very practical, because it allows you to clearly separate your private Bitcoin from your business income.
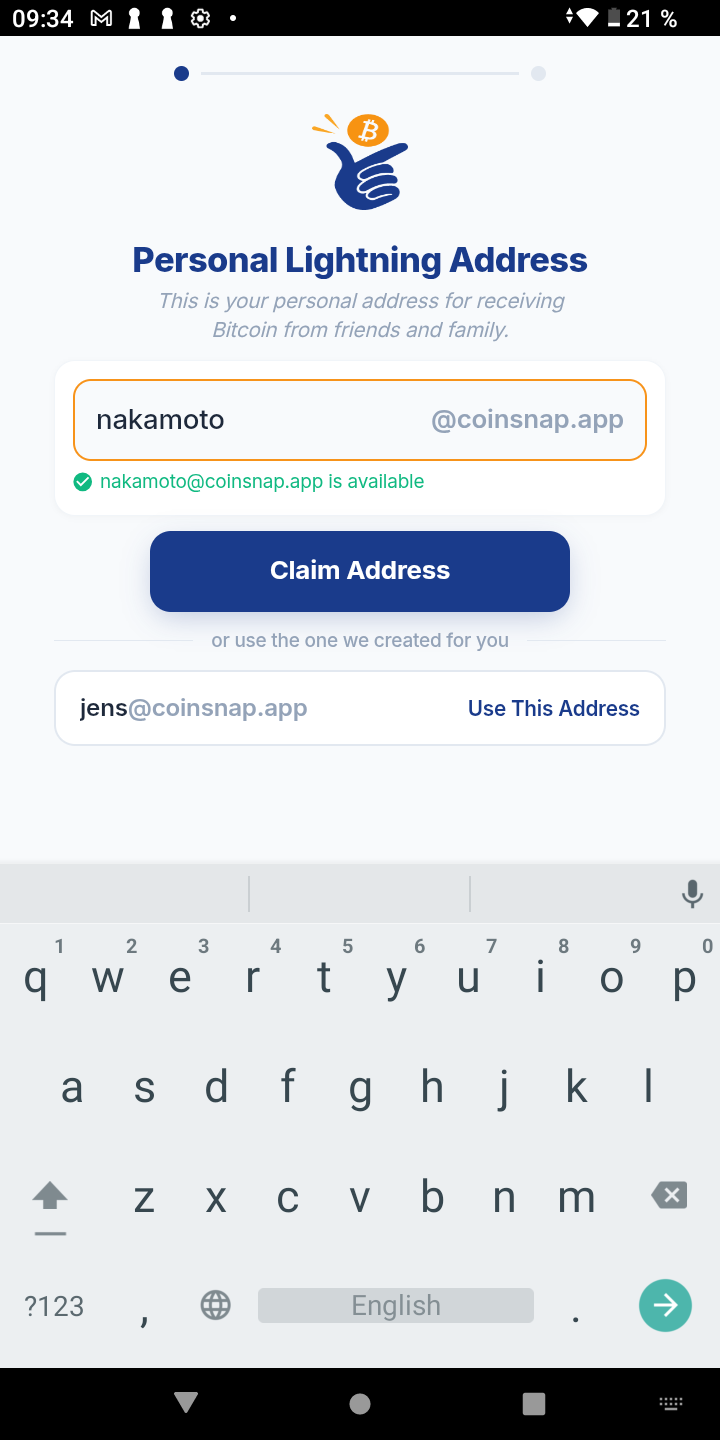
5.1 Setting up your Personal Lightning Address
Each wallet has a so-called Lightning address. A Lightning address looks similar to an email address, for example: max@coinsnap.app.
For the Personal Wallet:
- Choose a name for your personal Lightning address
- You can use your own name, or accept the suggested name
- If you like the suggestion, click Use this Address
Important: The selected name cannot be changed later.
5.2 Setting up your Business Lightning Address
After that, you set up your Business Wallet. Here you also choose a Lightning address, preferably using the name of your business, for example: bistro@coinsnap.app.
This Business Lightning address is important if you:
- want to receive Bitcoin payments for your business
- want to use the PoS function
- use other Coinsnap solutions, for example for an online shop
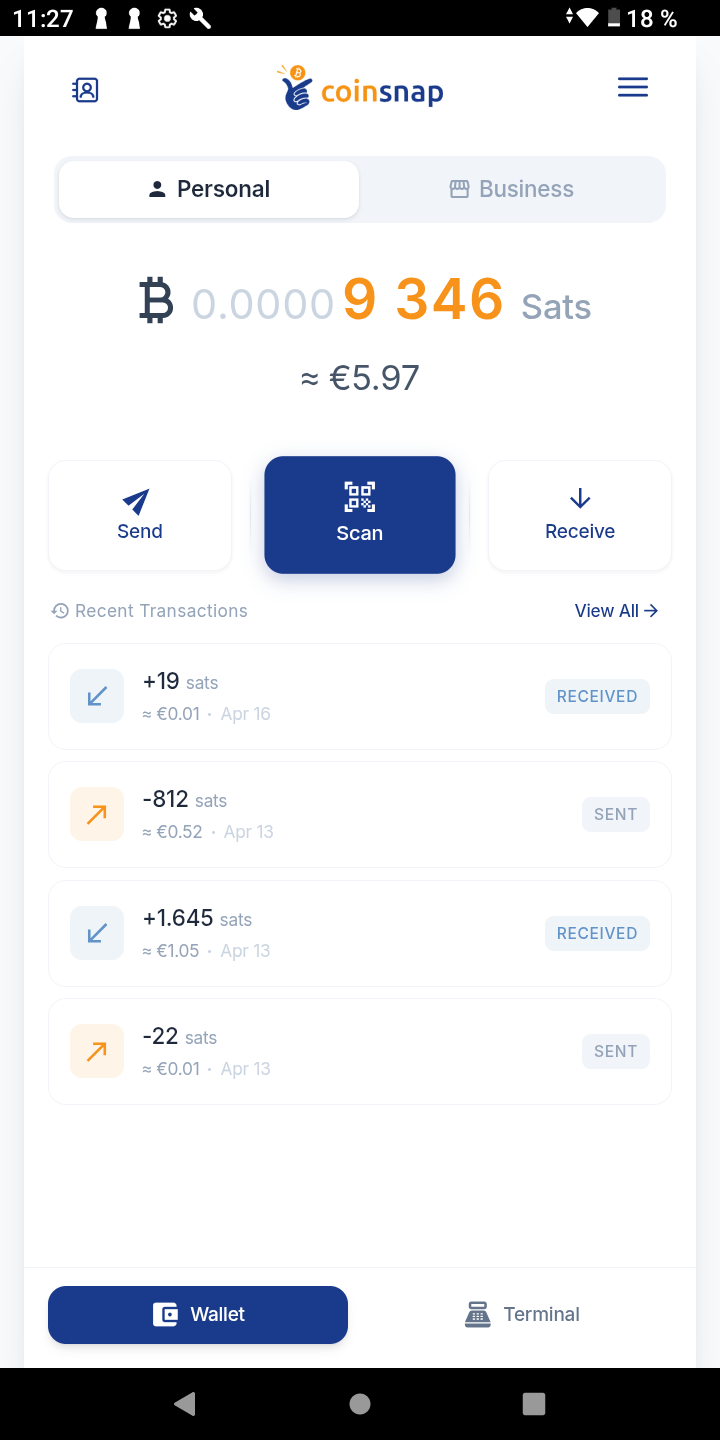
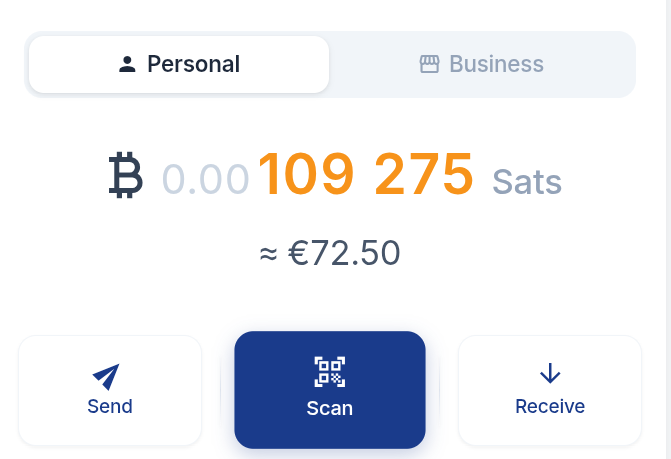
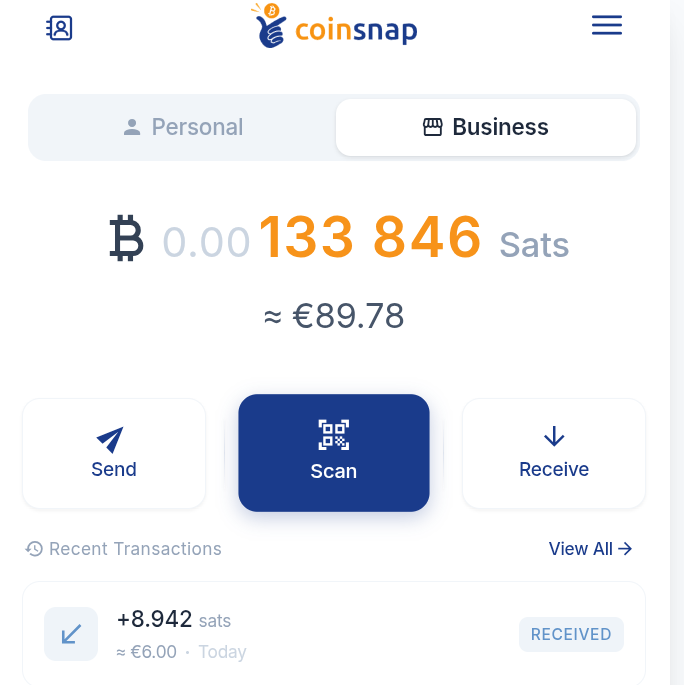
The Wallet Home Screen
After the setup, you will be taken to the Wallet Home Screen.
What you will see there:
- Selection between Personal and Business Wallet — switch between your two wallets at the top
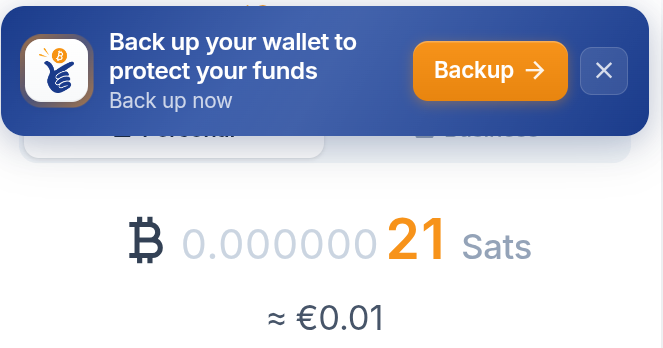
- Bitcoin balance — shown in sats (smallest unit of Bitcoin)
- Fiat equivalent — optional value in EUR, USD, CHF, etc. (adjustable later)
- Main buttons — Send, Scan, Receive
- Transaction overview — your previous transactions
Receiving Bitcoin
Since your wallet does not yet have any balance at the beginning, you should first get familiar with the Receive function.
When you click on Receive, you have three options:
- Lightning
- Onchain
- Spark
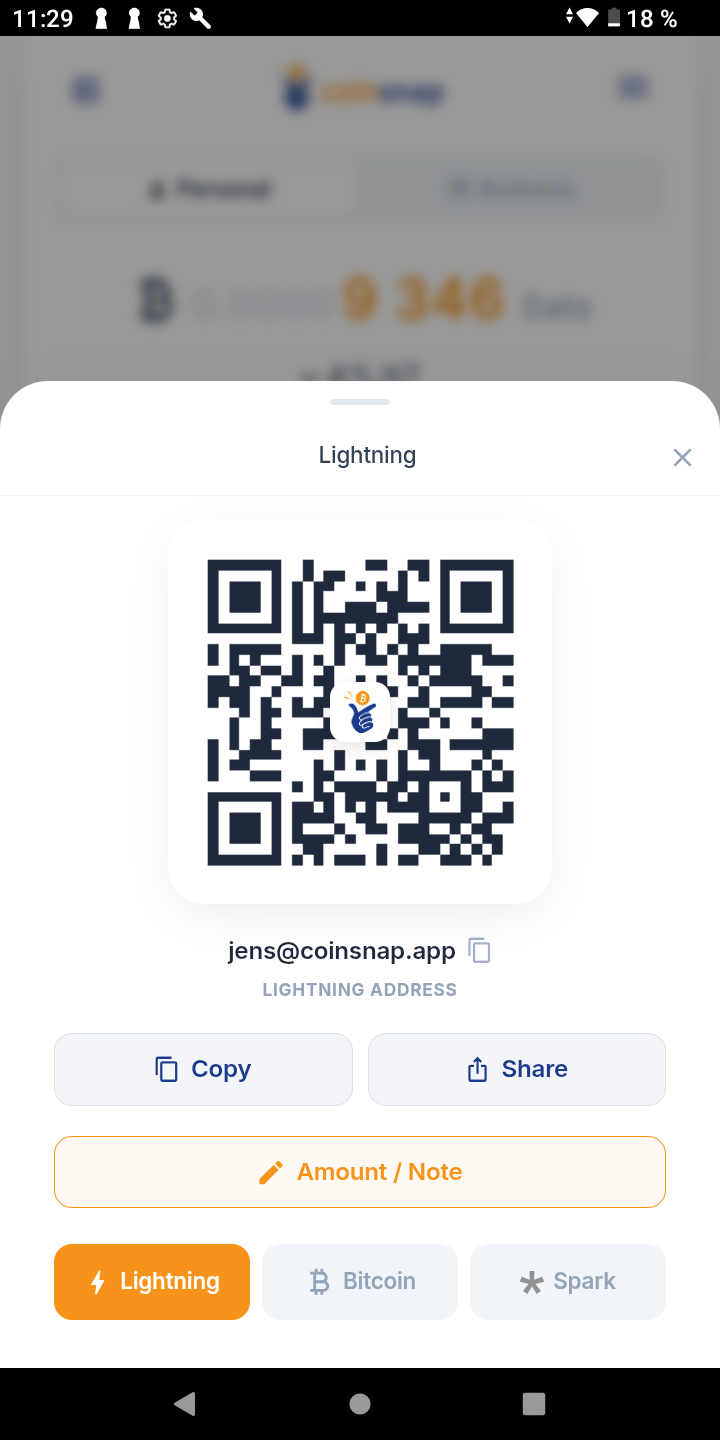
7.1 Receive Bitcoin via Lightning
Lightning is the fastest and easiest way to receive small and medium Bitcoin payments. You will get a QR code, your Lightning address, and functions to copy or share.
7.2 Request a fixed amount as a Lightning invoice
If you want to define the amount you want to receive (and optionally a reference), click Amount / Note, enter the amount, add an optional note, and generate a Lightning invoice.
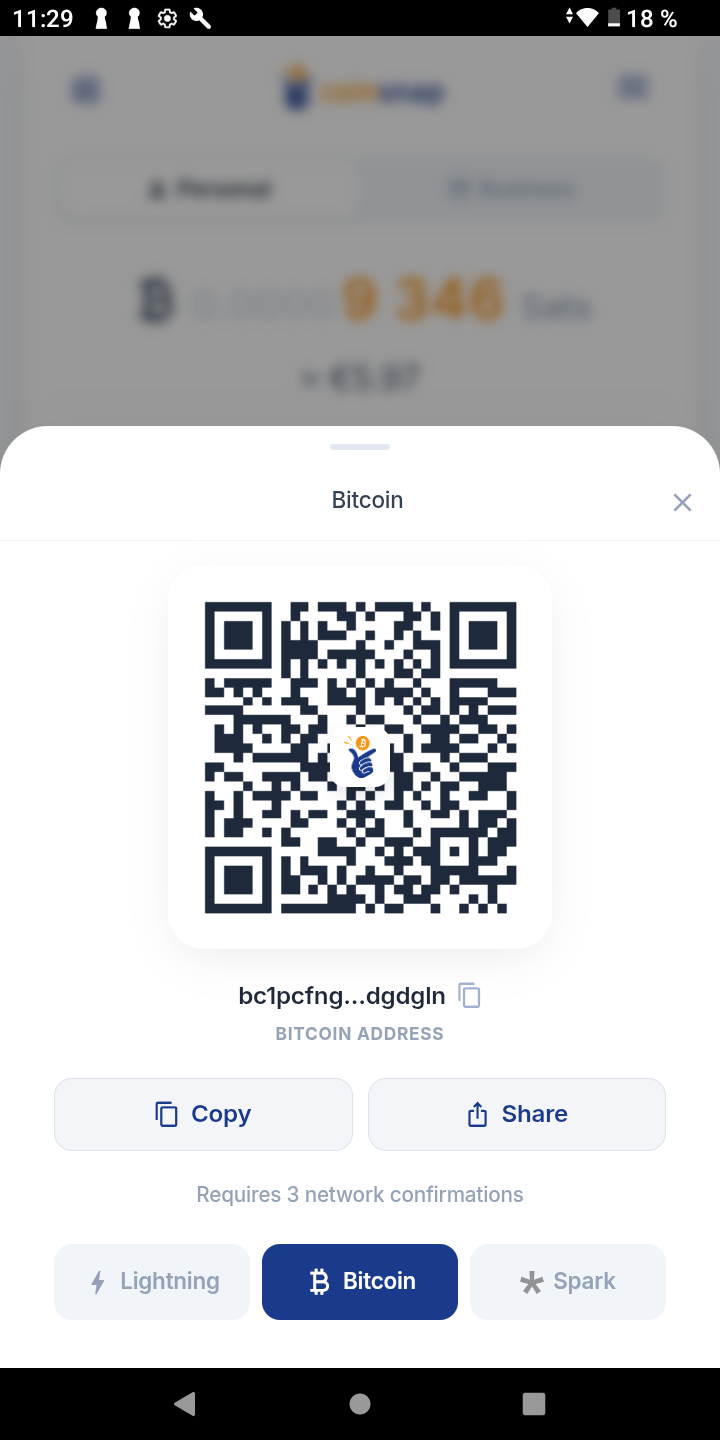
7.3 Receive Bitcoin on-chain
If you select Receive → Onchain, you will get a QR code and your on-chain Bitcoin address (usually starting with bc1...).
On-chain is useful if you store Bitcoin on an exchange, in a hardware wallet (e.g. BitBox, Trezor, Ledger), or another classic Bitcoin wallet and want to transfer it into Coinsnap.
7.4 Receive Spark
The Coinsnap Wallet also supports payments via Spark. Spark payments are received as Bitcoin and will appear normally in your wallet balance and transaction overview.
Credit to your wallet
Regardless of whether a payment is received via Lightning, Onchain or Spark, the balance will then be displayed in your wallet.
You will see the updated account balance and the new transaction in your overview.
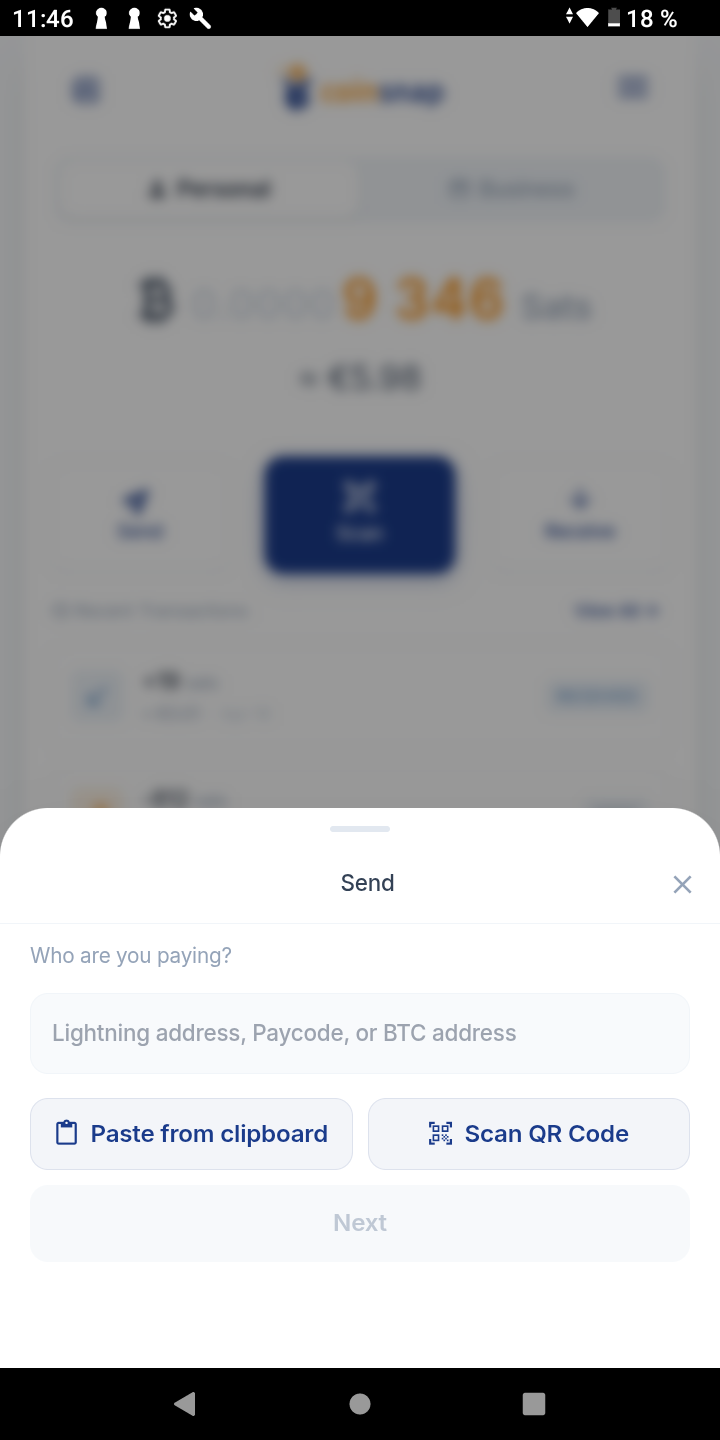
Sending Bitcoin
With the Send function, you can send Bitcoin to a Lightning address, Lightning invoice, Bitcoin on-chain address, or a QR code.
In the input field, you can enter an address, paste an invoice, or scan a QR code. The app automatically detects whether it is Lightning, Onchain or Spark.
Using Personal Wallet and Business Wallet correctly
The Coinsnap Wallet deliberately provides you with two separate wallets:
- Personal Wallet for your private Bitcoin
- Business Wallet for your business and all business income
This is particularly helpful if you want to separate private and business Bitcoin, accept Bitcoin for your business, or use Coinsnap in your online shop.
10.1 Using the Business Wallet for other Coinsnap solutions
If you already use Coinsnap for an online shop, website or payment links, you can store your Business Lightning address there so customer payments are credited directly to your own self-custodial Business Wallet.
10.2 Receiving Bitcoin without PoS directly via the Business Wallet
Even without the additional PoS function, you can already receive Bitcoin in your store using the Business Wallet:
- Switch to the Business Wallet
- Click Receive
- Select Amount / Note
- Enter the invoice amount
- Optional: add a receipt number under “Add a note”
- Click Generate Invoice
- Show the QR code to your customer
The customer scans and pays; the Bitcoin balance is credited directly to your Business Wallet. If you want to hold the received Bitcoin long-term, you can transfer it to a hardware wallet later.

Backup – absolutely essential
As soon as your wallet contains funds for the first time, you will be prompted to create a backup. This is one of the most important steps.
Why is this important? The Coinsnap Wallet is a self-custodial wallet. Only you control your Bitcoin; Coinsnap also has no access to your Bitcoin. If you lose your smartphone, you will need your backup to regain access to your funds.
11.1 How the backup works
The app creates an encrypted backup and can store it in your Apple or Google Cloud. In addition, you receive a recovery phrase with 12 words. You must write down these 12 words, store them securely, and never share them with third parties.
Only with these 12 words can you restore your wallet. Without these words, your funds are lost.
11.2 Restoring your wallet
If you later lose your smartphone, use a new device, or want to restore your wallet, select Import Existing Wallet at first startup and enter your 12 words.
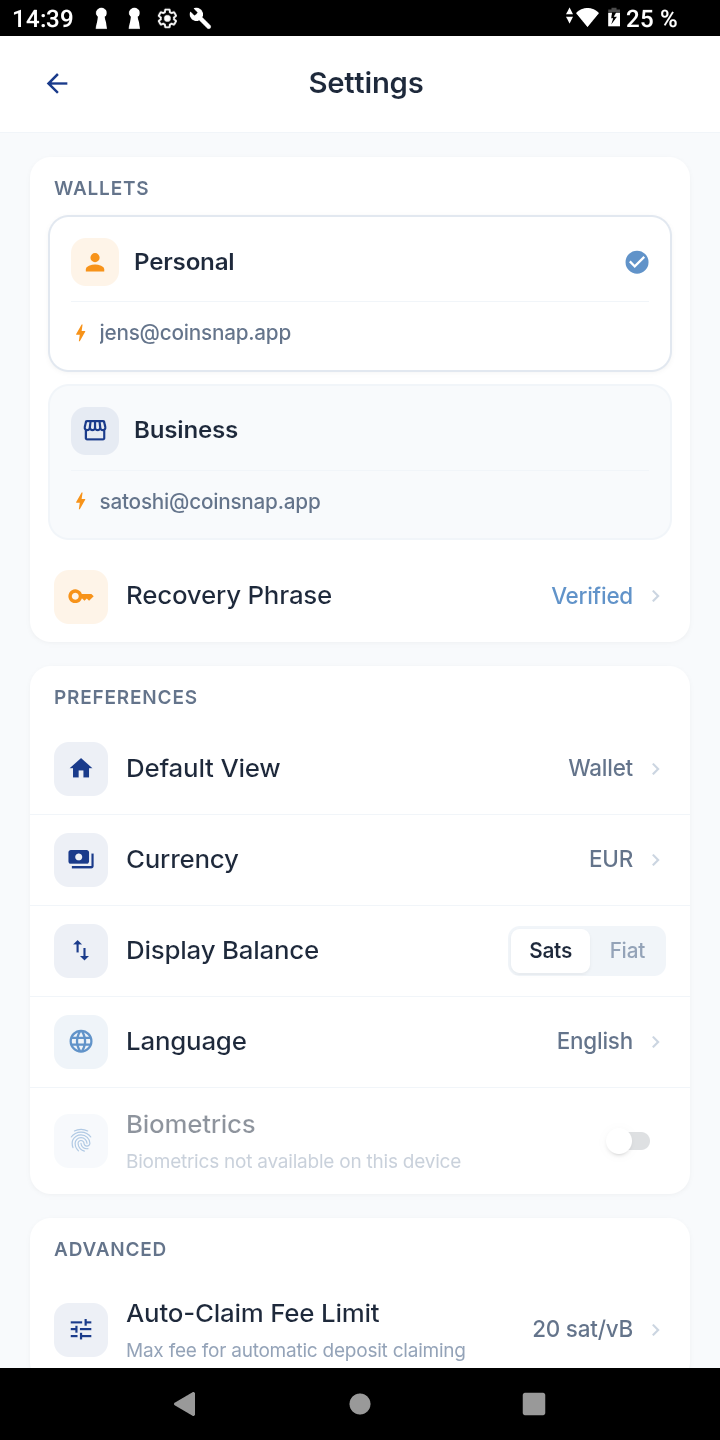
Settings
You can access the settings via the menu in the top right. There you will find important options.
- 12.1 Wallets — Personal and Business wallets and their Lightning addresses
- 12.2 Recovery Phrase — manage your backup and display your 12 words (shared for both wallets)
- 12.3 Default View — choose what opens on start: Wallet or Point of Sale
- 12.4 Currency — define your fiat currency
- 12.5 Display Balance — show Bitcoin/Sats or Fiat as main view
- 12.6 Language — choose the app language
What is the Point-of-Sale function?
The Coinsnap app is not only a wallet, but also a point-of-sale system for physical merchants. The PoS function is aimed at businesses that want more than just displaying a QR code from the wallet.
With the PoS function you can:
- allow employees to accept payments
- pay tips directly to employees
- grant Bitcoin discounts
- enter payments via keypad
- use a product catalog
- create detailed statistics and reports
Why Point of Sale offers more than just the wallet
The Business Wallet alone is sufficient to receive Bitcoin payments. The PoS function extends this with professional merchant features such as product management, cashier view, terminal management, employee pairing, tipping function, and reporting for accounting and taxes.
Create a Coinsnap account for PoS
If you want to use the PoS function as a merchant, you additionally need a Coinsnap account. For this, only an email address is required.
Important: Employees who only need to accept payments do not require their own Coinsnap account.
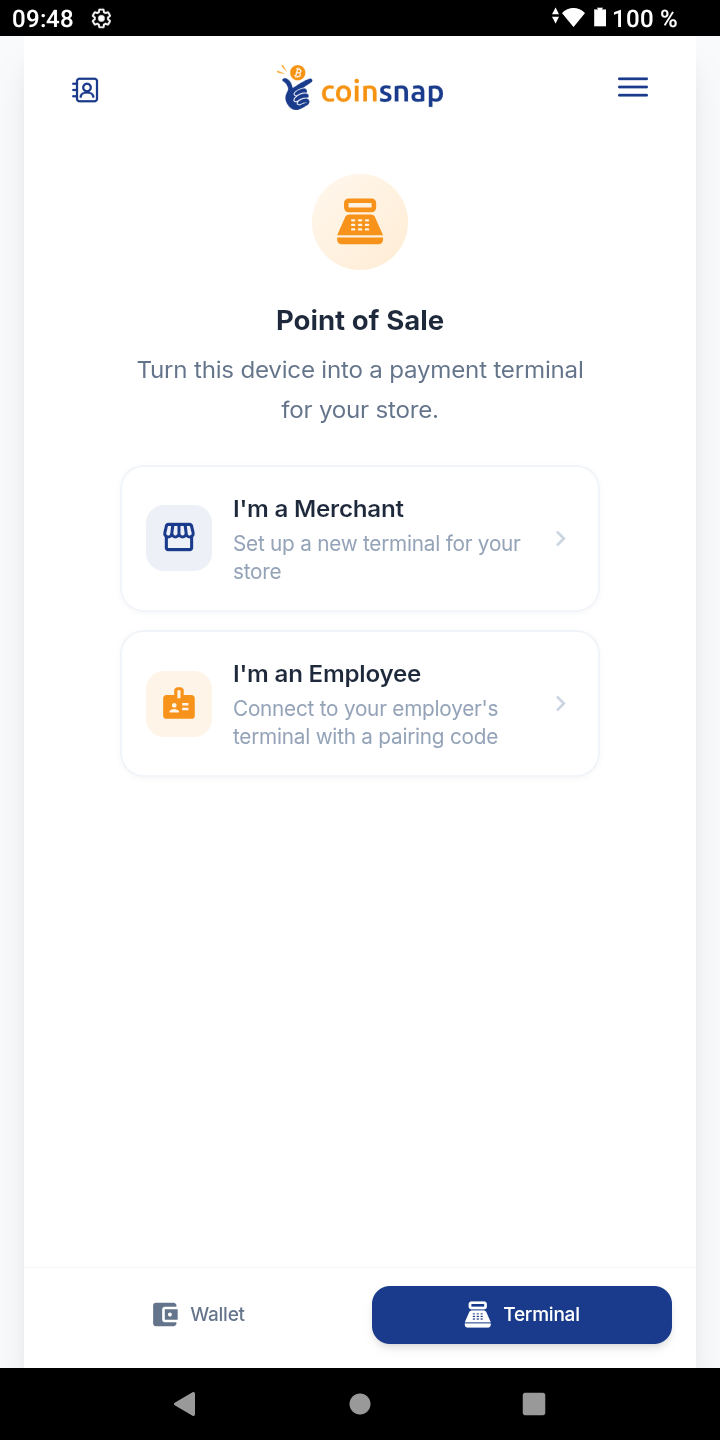
Start terminal – Merchant or Employee
If you click on Terminal (bottom right), you will see two options:
- I’m a Merchant
- I’m an Employee
Set up Point of Sale as a Merchant
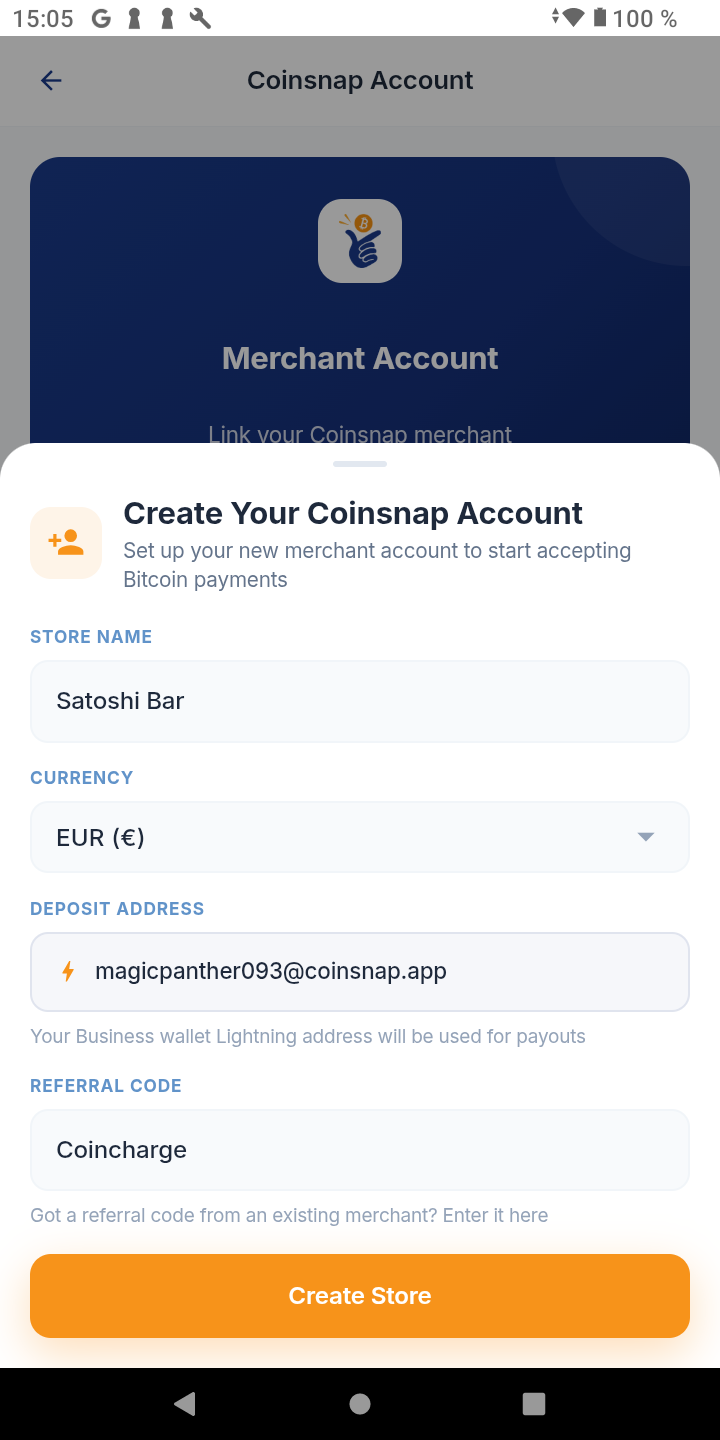
If you select I’m a Merchant, you enter your email address. You will then receive a one-time OTP code via email, which you can use to log in.
If you do not yet have a Coinsnap account, it will be created for you in the background. After that, you can optionally enter a bonus code.
17.1 Starting credit and bonus code
New Coinsnap users receive a starting credit equivalent to €5; with a bonus code an additional €5. This credit is intended to test the PoS function.
17.2 Fees
For using the Point-of-Sale solution, Coinsnap charges a fee of 1% of revenue. In addition, external costs related to network fees may occur.
If you do not need PoS functions, you can continue to receive Bitcoin free of charge directly via the Business Wallet.
What is created automatically during Merchant setup
As soon as your Coinsnap account is created or your PoS is set up, the following are automatically created in the background:
- a Store
- a PoS
- a Terminal
In addition, the PoS is filled with demo products that you can later modify, delete, rename, or replace.
What do Store, PoS and Terminal mean?
- Store — your business area or sales channel (online shop, restaurant, kiosk, food truck)
- PoS — your physical sales environment / checkout system for this store
- Terminal — a specific device or checkout access through which payments are accepted
A terminal can be an employee’s smartphone, a tablet at the checkout, or a fixed device.
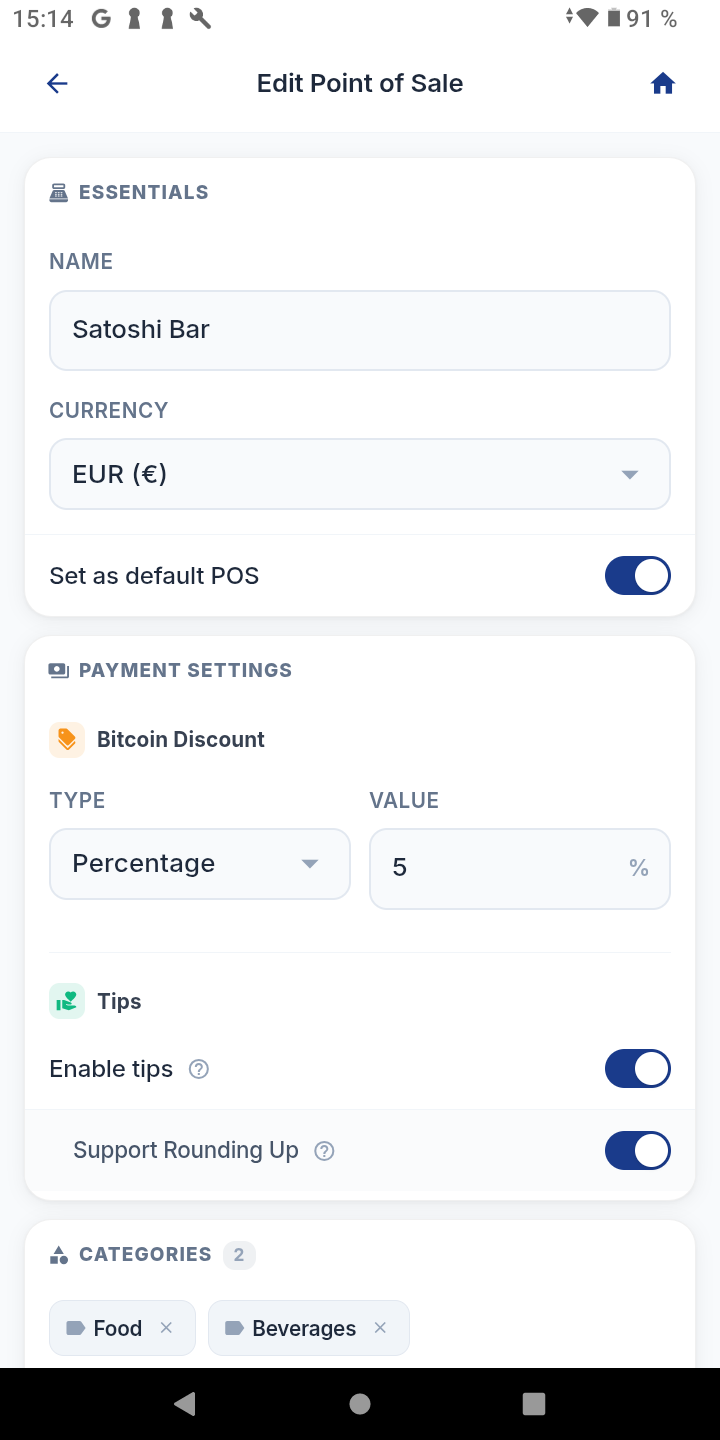
Configure Point of Sale
In the PoS, you define the most important settings:
- 20.1 Name of the business (e.g. Satoshi Bar)
- 20.2 Fiat currency (currency used to manage prices)
- 20.3 Bitcoin discount (e.g. 5% discount for Bitcoin payments)
- 20.4 Tip function (let customers leave a tip)
Keypad or product catalog
There are two typical ways to use the PoS:
21.1 Keypad
Manually enter the invoice amount (optionally with an order number). Ideal for cafés, bars and simple checkout situations.
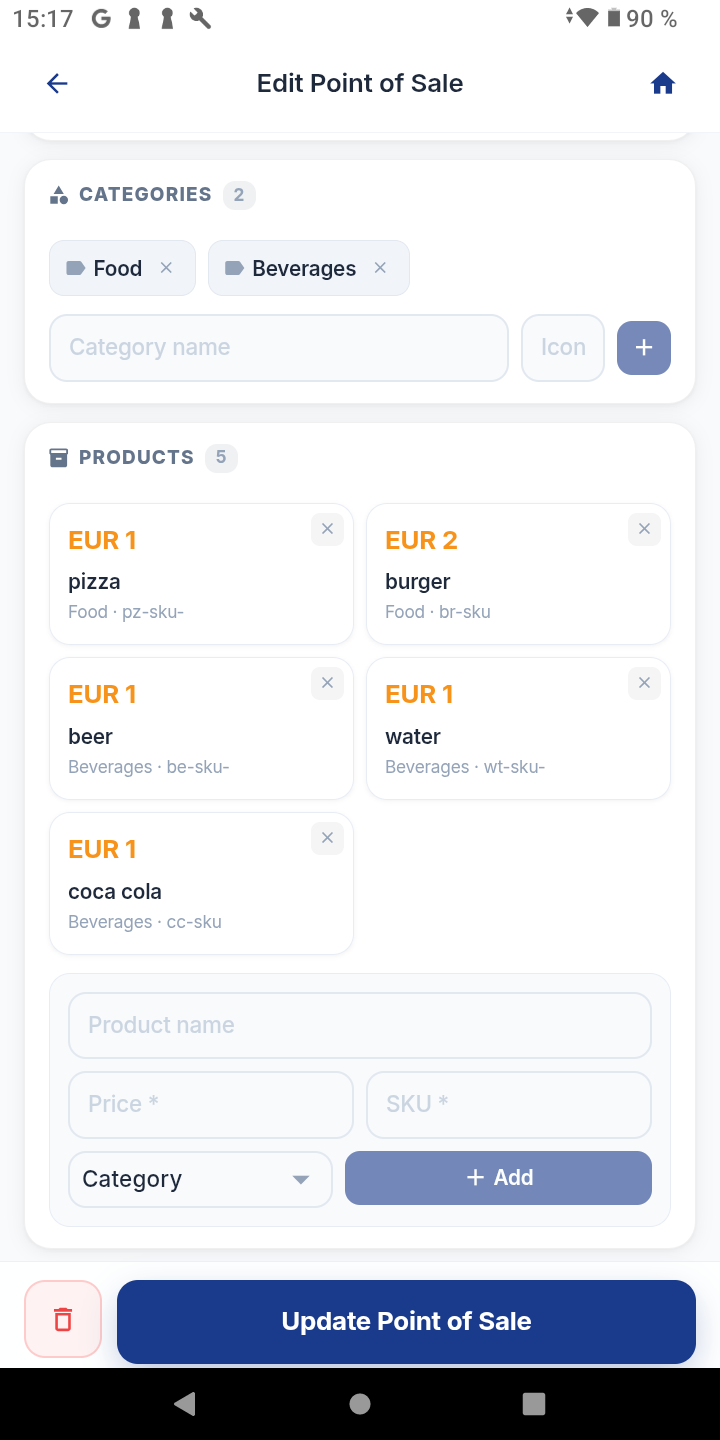
21.2 Product catalog
Create a product catalog with product name, price, SKU/item number, and category. The cashier selects products and the total amount is calculated automatically. Ideal for detailed reporting.
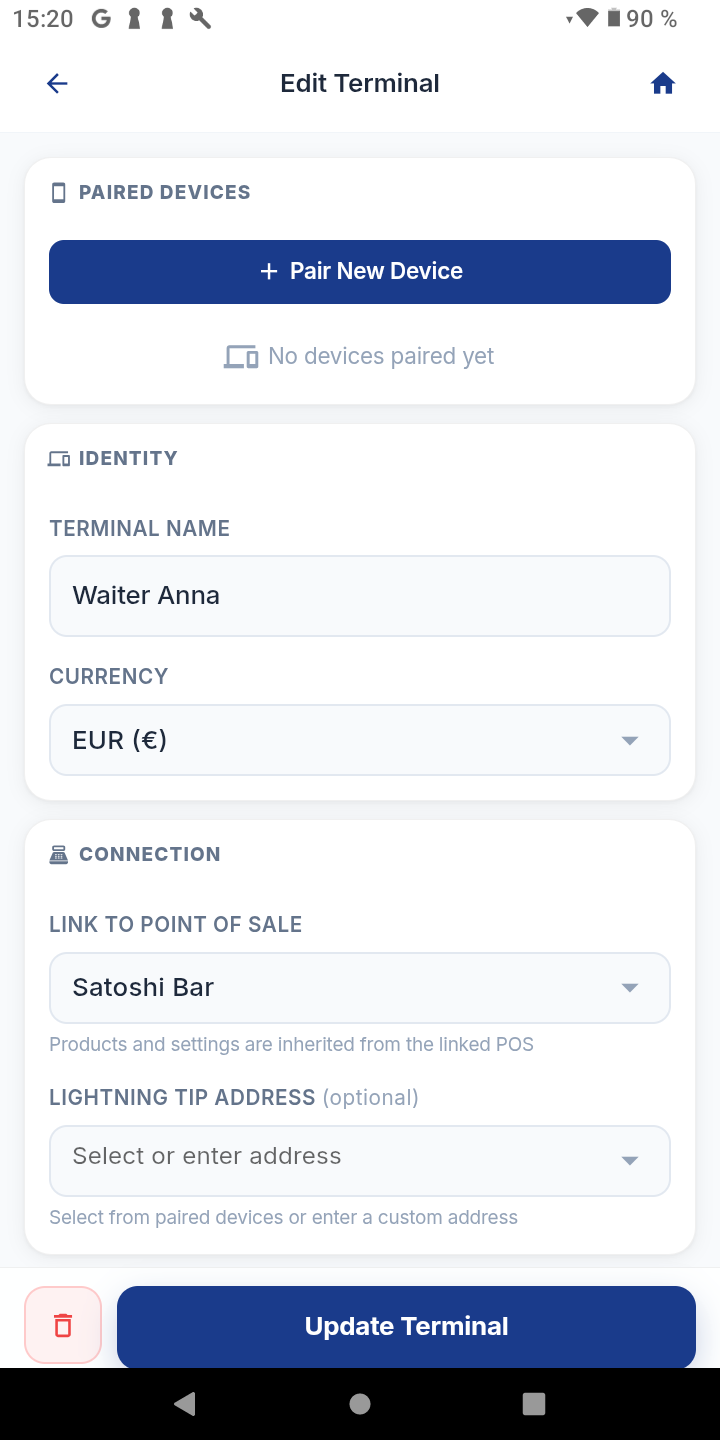
Set up terminal
Each PoS has at least one terminal. It is recommended to assign a clear internal name to the terminal, for example: Cash register 1, Waiter Anna, Bar, Reception.
If tipping is activated, you can also store the employee’s Lightning address here. Then:
- invoice amount → Business Wallet of the business
- tip → Personal Wallet of the employee

Connect terminal with the app
A terminal can be used via the following functions:
- View — opens the terminal directly (catalog view if available, otherwise keypad)
- Share — share the connection to a terminal with an employee
- Pair — display a QR code and pairing code to connect an employee’s app
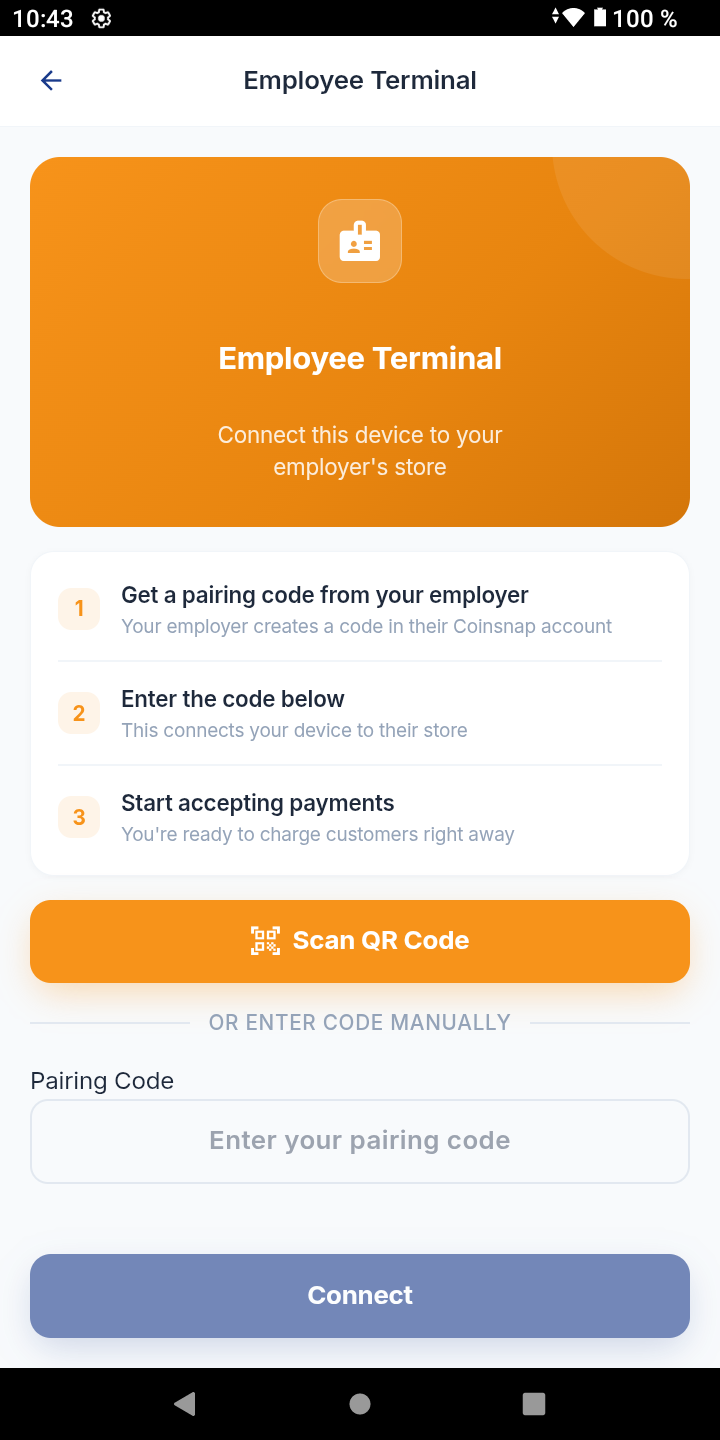
Connect employees with the business
If an employee selects the option I’m an Employee in their app under Terminal, they can connect to an existing business using a QR code or pairing code provided by the business owner.
After pairing, the employee’s app is connected to the terminal of the business and the employee can accept payments for the business.
If tipping is activated, the employee’s Personal Lightning address is also transmitted during pairing. Then for a payment:
- invoice amount → Business Wallet of the business
- tip → Wallet of the employee
Summary for beginners
If you simply want to get started with Bitcoin:
- Install the app
- Create a new wallet
- Set up Personal and Business Lightning addresses
- Use the Business Wallet for business payments
- Create a backup
If you also want to professionally accept Bitcoin in your business:
- Tap Terminal
- Select I’m a Merchant
- Enter your email address and log in via OTP
- Let the PoS be created automatically
- Configure products, discounts and tips
- Accept payments in your store
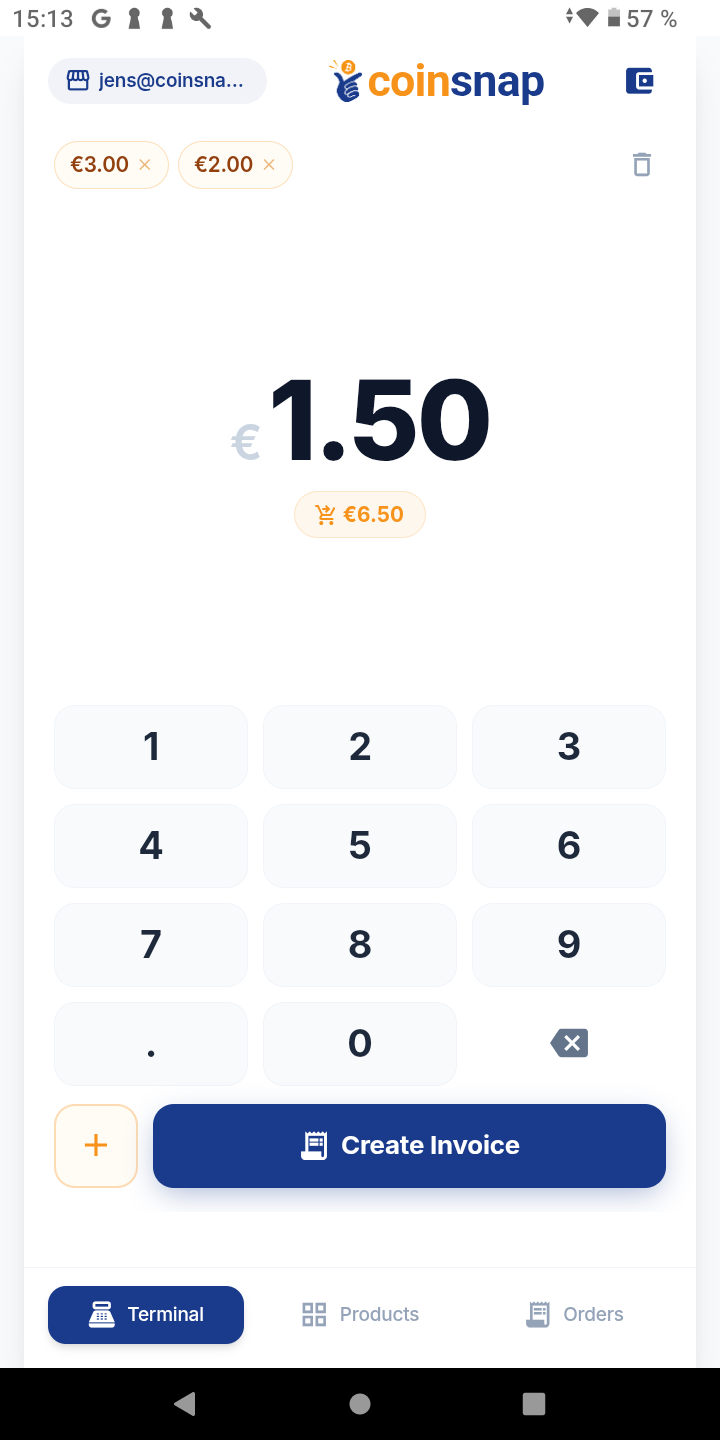
How to accept Bitcoin with the PoS Terminal
Creating an Invoice
Once you have opened the terminal as a merchant or connected an employee device, you are ready to accept Bitcoin payments.
After entering the order in your cash register, you can enter the total amount directly in the keypad.
You can either:
- enter a full amount
- or add multiple items using the plus function
In this example:
€3.00 + €2.00 + €1.50 = €6.50
The last entered amount is shown at the top, and the total amount is displayed below.
Click on "Create Invoice" to proceed.
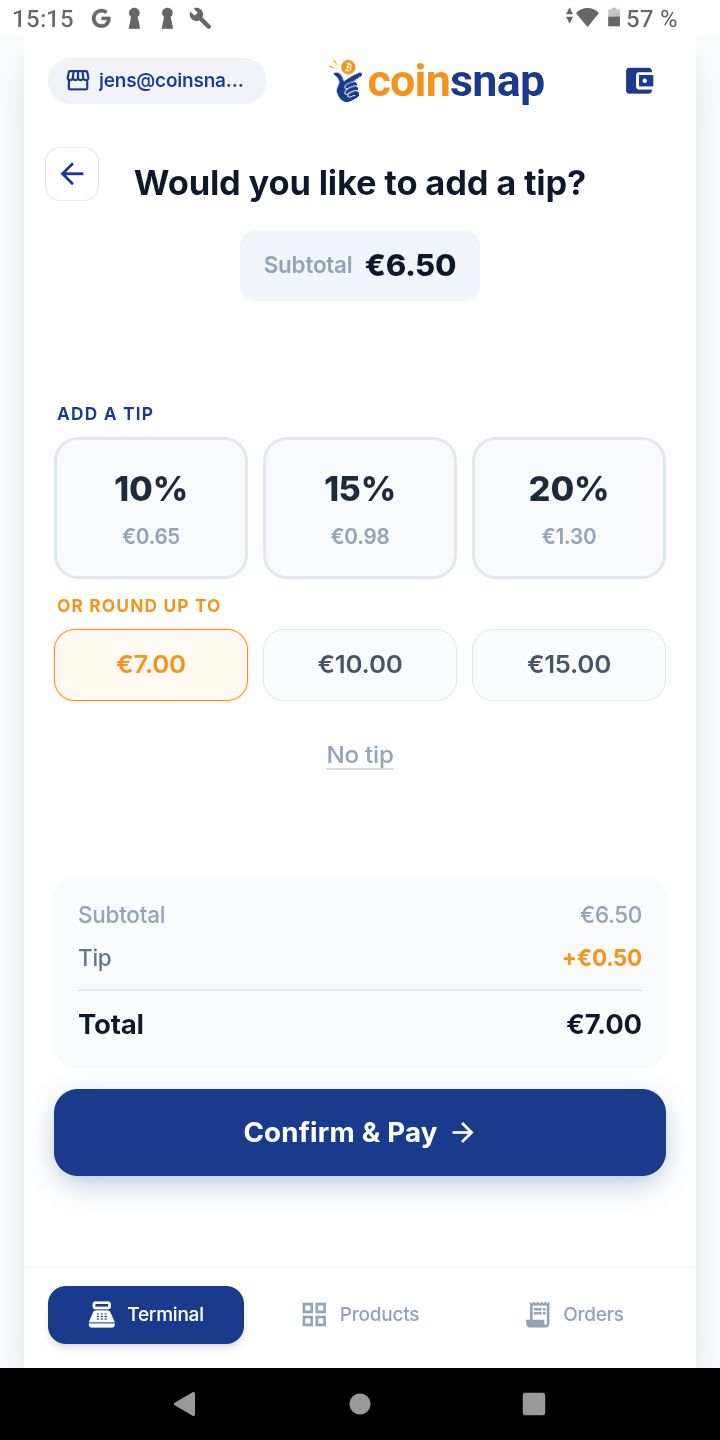
Tipping
If tipping is enabled, the customer will see the tipping screen.
The customer can choose:
- a percentage tip
- or round up the amount
In this example, the total of €6.50 is rounded up to €7.00.
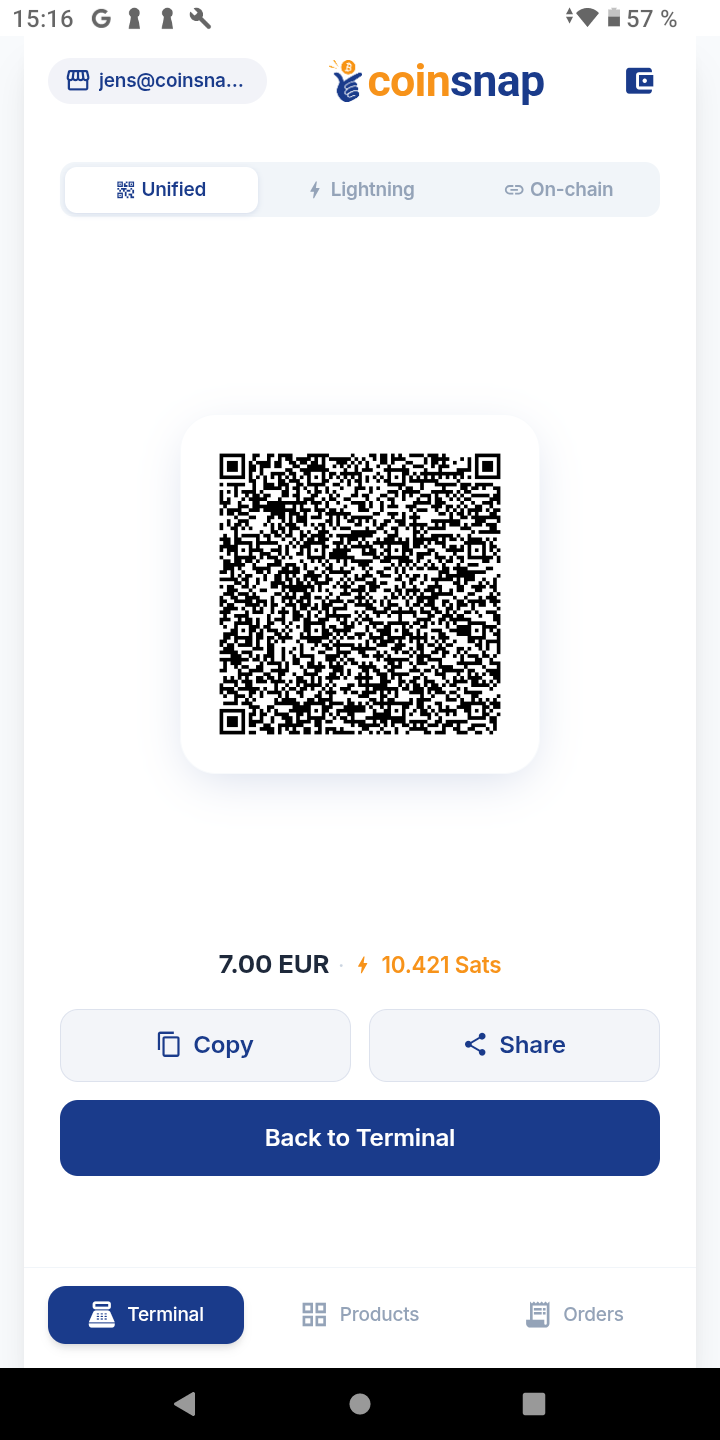
Payment QR Code
After clicking "Confirm Payment", a QR code is displayed.
The customer scans the QR code and completes the payment.
The QR code is a unified Bitcoin QR code that supports both:
- Lightning payments
- On-chain payments
If needed, you can also display separate Lightning or On-chain invoices.
Alternatively, you can:
- copy the invoice
- or share it via messaging apps
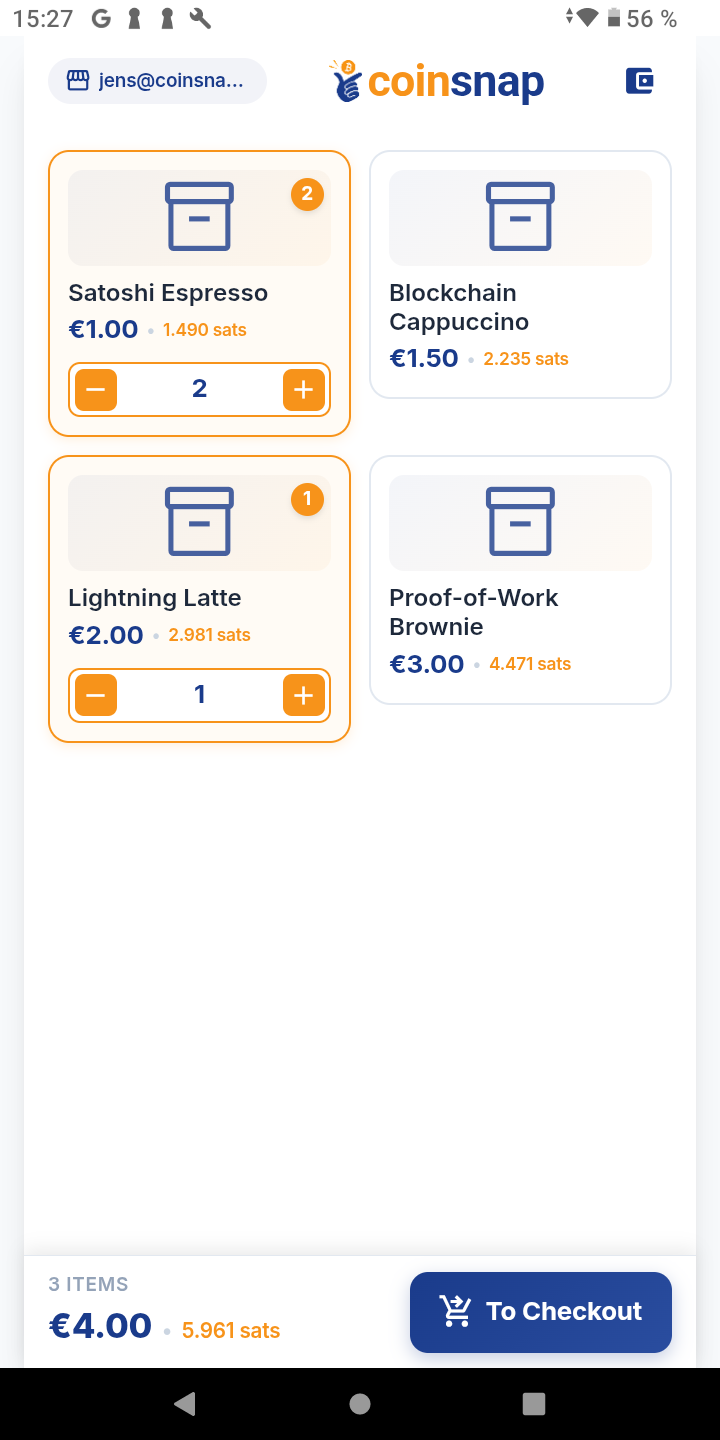
Product Catalog
Instead of using the keypad, you can also use a product catalog.
If products are predefined, you can select them via the "Products" section.
In this example:
- 2x Satoshi Espresso (€1 each)
- 1x Lightning Latte (€2)
Total: €4.00
Click "To Checkout" to continue.
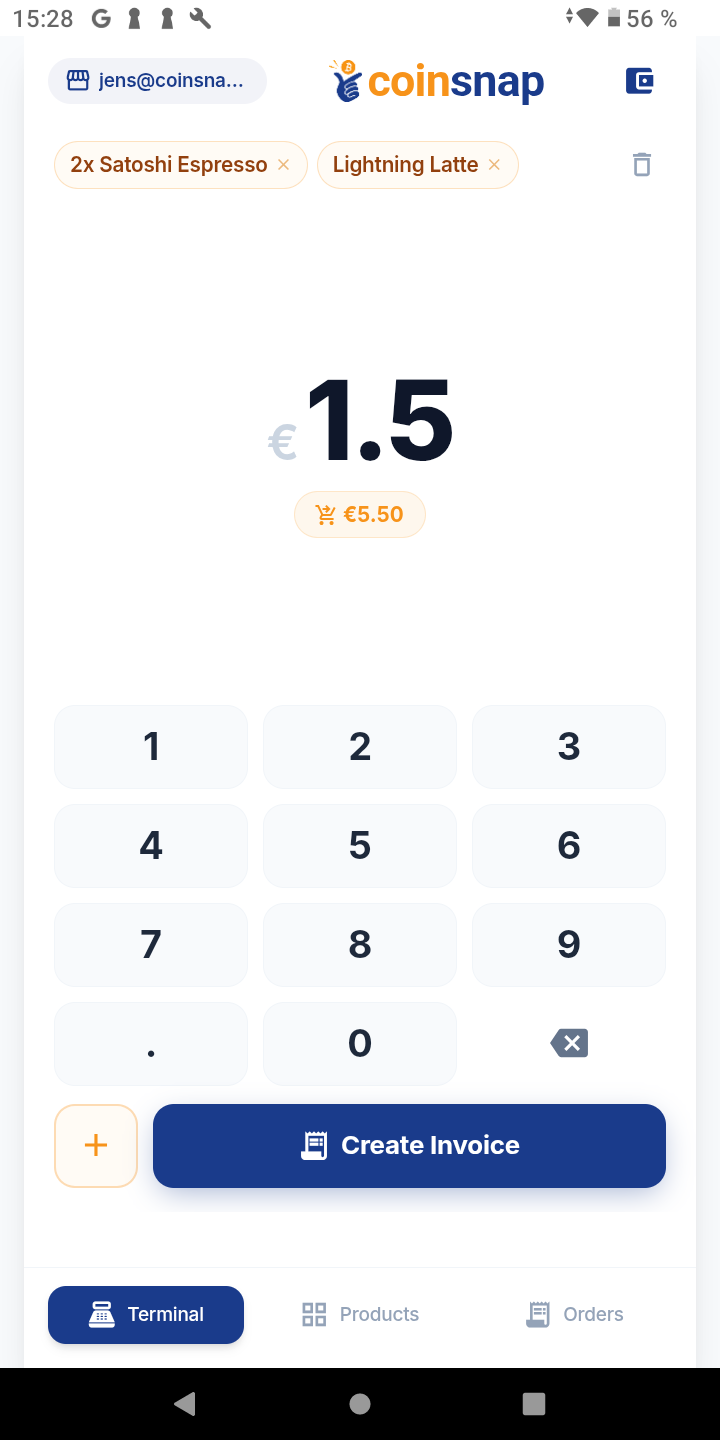
Add Additional Items
You can add additional amounts via the keypad for items not included in the catalog.
In most cases, frequently sold products are stored in the catalog, while additional items can be added manually.
In this example, an additional €1.50 is added, resulting in a total of €5.50.
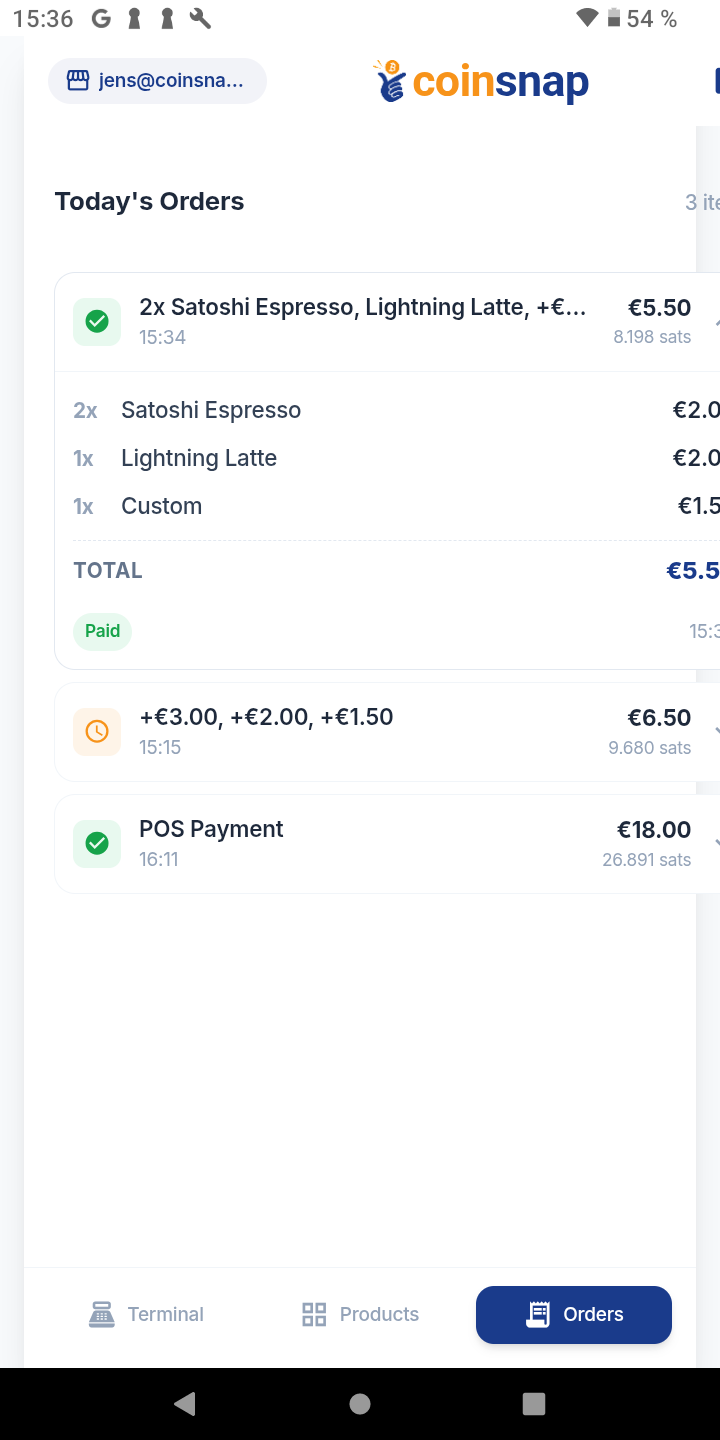
Orders Overview
In the Orders section, you will find a list of all transactions.
Orders marked with a green checkmark have been successfully paid.
Wallet Credit
All transactions are also recorded in the Coinsnap backend.
In the transaction view, all payments are listed.
The latest payment of €6.00 is shown at the top.
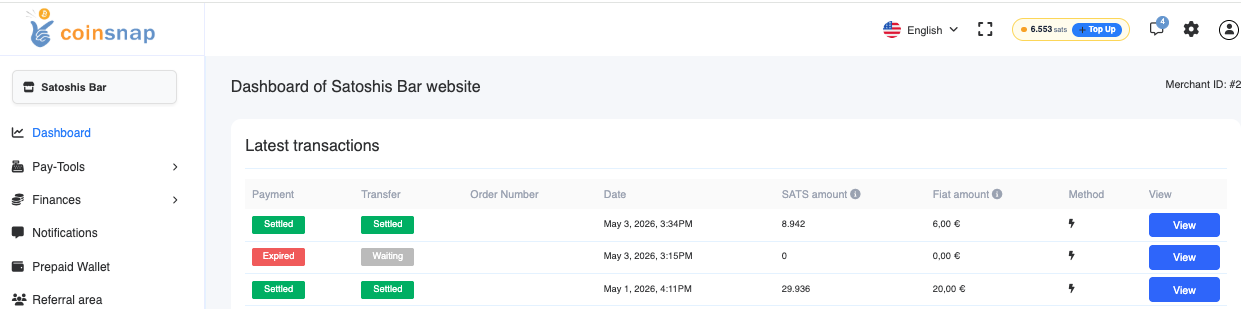
Backend Transactions
All transactions are also recorded in the Coinsnap backend.
In the transaction view, all payments are listed.
The latest payment of €6.00 is shown at the top.

Transaction Details
Click on "View" to open the transaction details.
Under "General Information", you can see the Bitcoin exchange rate at the time of payment.
This rate is important for accounting purposes.
In this example:
€67,102.40 per BTC
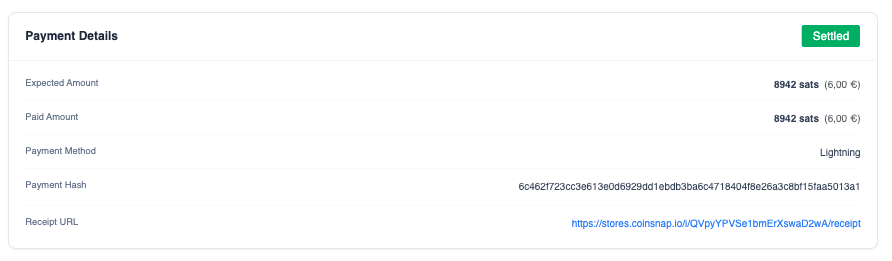
Payment Details
The Payment Details section shows:
- expected amount in sats
- actual amount paid
In this example:
8,942 sats were expected and paid.
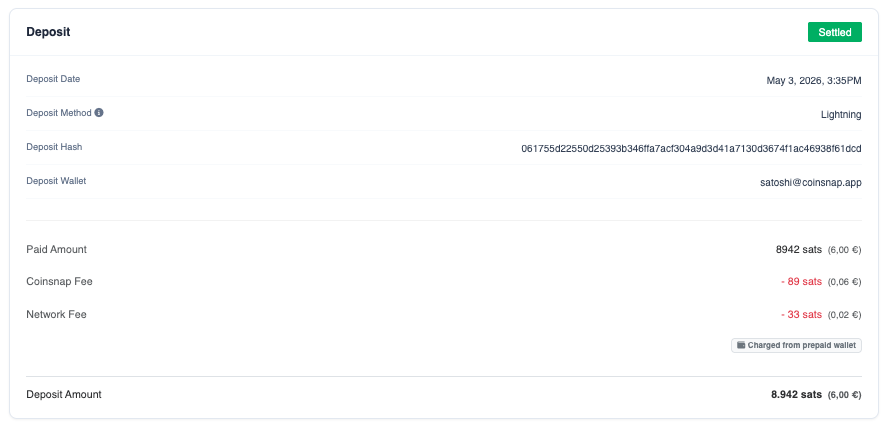
Deposit
The Deposit section shows how the payment was credited.
The payment was received via Lightning to the wallet:
satoshi@coinsnap.app
The paid amount (8,942 sats) was credited 1:1 to the wallet.
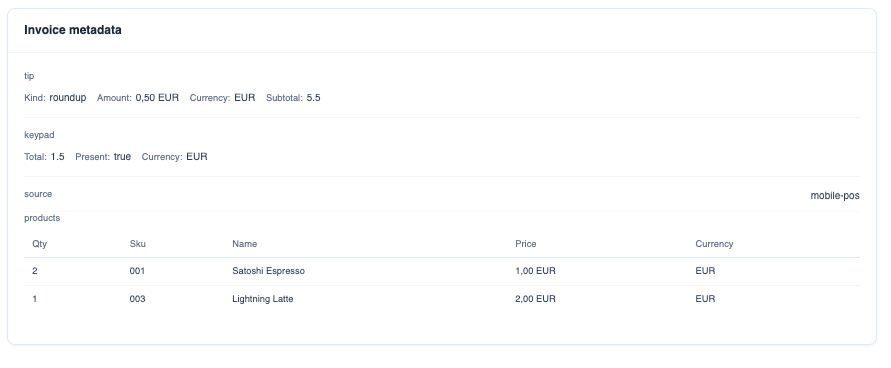
Invoice Metadata
The Invoice Metadata section includes:
- purchased products
- tipping details
- additional payment information
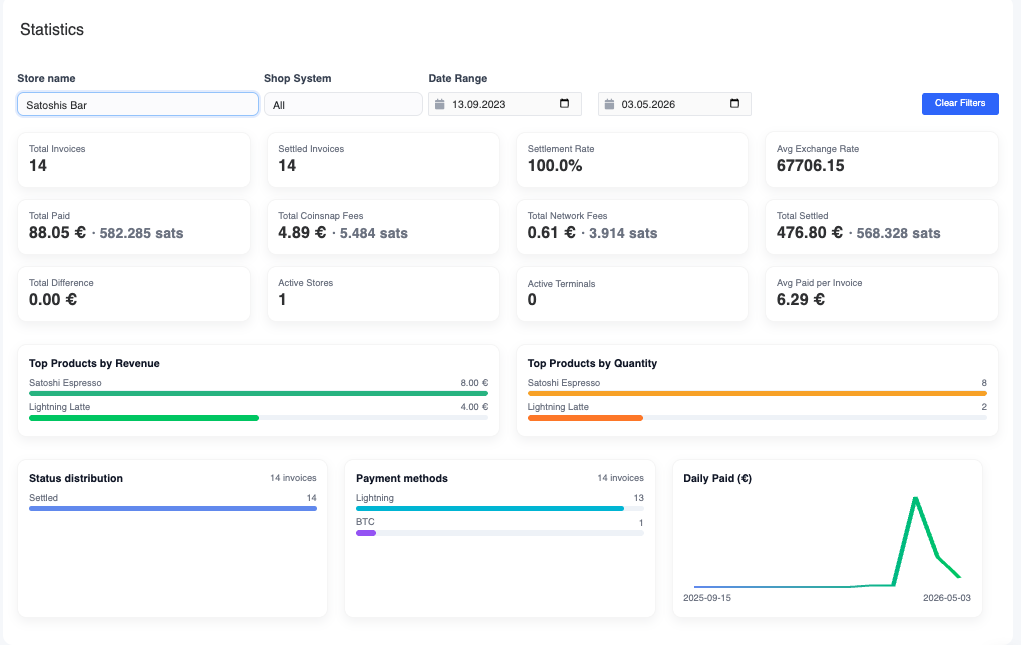
Dashboard
The dashboard provides insights into your Bitcoin revenue.
You can analyze:
- total revenue
- best-selling products
- performance by location (PoS)
- employee performance
Filters are available for:
- date ranges
- time periods
- stores and terminals
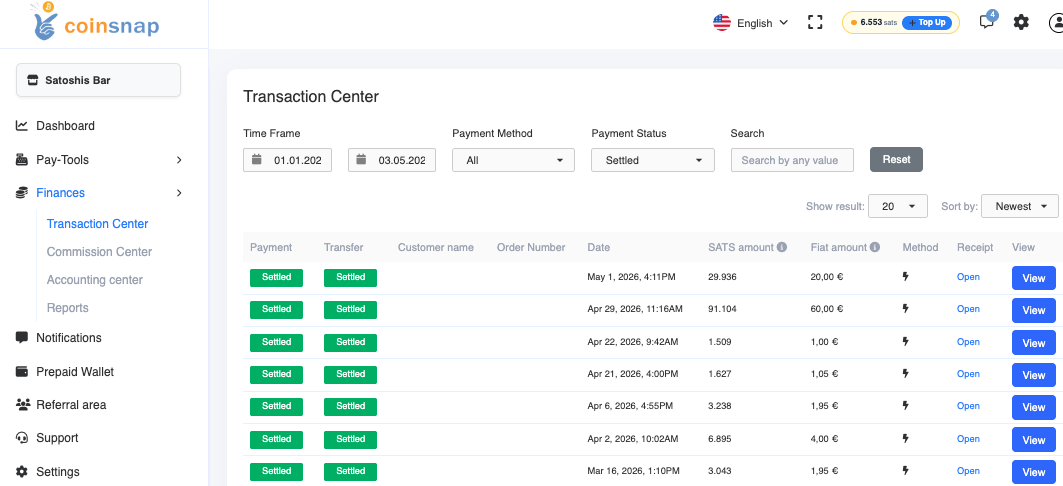
Accounting Export
In the financial section, you can export transactions as a CSV file.
This includes all relevant data for accounting.
You can also import data into common accounting systems.
This ensures that all Bitcoin payments are properly documented, including:
- wallet destination
- exchange rate at time of payment
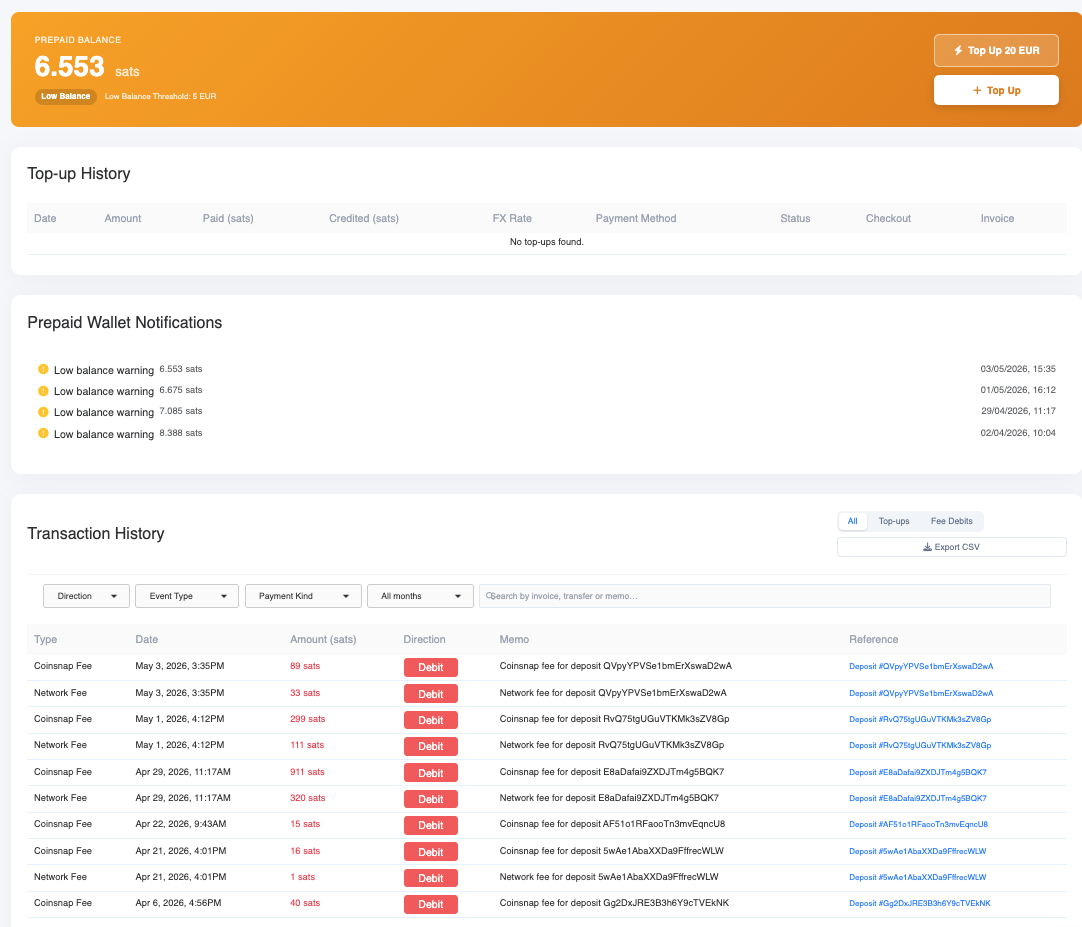
Fees
Coinsnap charges a fee of 1% for its services.
Additionally, a network fee (e.g. 33 sats) may apply.
These fees are NOT deducted from the payment amount.
Instead, they are charged separately from the merchant’s Coinsnap account.
New merchants receive a €5 welcome bonus to test the terminal.
Wallet-Only Usage
If you do not need the PoS functionality, you can still use the Coinsnap app as a Bitcoin wallet.
You can receive payments directly without using the terminal and avoid Coinsnap fees.
Product Architecture
The Coinsnap Wallet consists of two main components.
Wallet
- Send and receive Bitcoin
- Manage multiple wallets
- Receive Lightning payments
Point of Sale
- Fast in-person checkout
- QR code payments
- Retail-optimized interface
Built for Three Types of Users
Stationary Merchants
Accept Bitcoin payments in your store.
Coinsnap Merchants
Receive payouts directly in your wallet via Lightning Address.
Everyone
Use the wallet to send, receive, and manage Bitcoin.
Wallet
- The Coinsnap Wallet supports multiple payment networks.
- Lightning Network
- Spark Network
- Bitcoin on-chain
- Users can create multiple wallets within the app, such as personal, business, or event wallets, to separate funds.
- Each wallet can have a Lightning Address, for example merchant@coinsnap.app, to receive Lightning payments without generating an invoice.
Point of Sale
- The Coinsnap Point of Sale allows merchants to accept Bitcoin payments using a mobile device.
- The POS interface is designed for fast retail payments.
- Keypad payments for any amount
- Product catalog with predefined prices
- Bitcoin discounts for customers paying with Bitcoin
- Staff mode for employee devices
- Tip payments credited to the employee wallet
Merchant Tools
Payment History
Sats amount, exchange rate, fiat reference value, timestamp, and transaction ID.
Sales Statistics
Track daily and monthly Bitcoin revenue and payment counts.
Product Analytics
See which products were paid with Bitcoin.
Payment Flow
Enter amount
Merchant enters the payment amount.
Generate QR
The app generates a QR code.
Customer pays
Customer scans and pays.
Confirm
Payment confirms within seconds on Lightning.
Fees
Wallet Fees
Receiving payments
Sending payments
Point of Sale Fees
Coinsnap charges a 1% service fee for payments processed through the Coinsnap infrastructure.
Additional network-related costs may occur depending on the payment method used.
Network fees depend on external network conditions.
Security
Coinsnap Wallet is designed as a self-custodial wallet. Users control their own funds and private keys are controlled by the wallet owner.
Coinsnap provides the software infrastructure for accepting Bitcoin payments but does not control user funds.
Integration with Coinsnap
Coinsnap Wallet can be connected to the Coinsnap payment infrastructure to receive payments from Shopify stores, WooCommerce stores, payment links, and APIs.
Merchants can configure their Lightning Address in the Coinsnap backend to receive payouts directly in their wallet.
Glossary
- Lightning Network: a second-layer Bitcoin payment network designed for fast and low-cost transactions.
- Spark Network: a Bitcoin-native Layer 2 system used to enable scalable payments.
- Lightning Address: a human-readable identifier for receiving Lightning payments, for example name@coinsnap.app.
Frequently Asked Questions
No. The Coinsnap Wallet manages the technical infrastructure automatically.
Lightning payments are typically confirmed within a few seconds.
Yes. Users control their own funds and private keys.
Lightning Network, Spark Network, and Bitcoin on-chain.
Start Accepting Bitcoin
Download the Coinsnap Wallet and turn your phone into a Bitcoin Point of Sale.