WooCommerce Bitcoin User Guide
In this user guide, we’ll walk you step by step through configuring the Coinsnap for WooCommerce plugin and then show you how to enable Bitcoin & Lightning payments directly in your WooCommerce checkout. We also show you how to make a test purchase and what you should see during the checkout process to make sure everything is set up correctly.
Set up Bitcoin & Lightning payments in your WooCommerce store by following the instructions below.


Requirements
These requirements must be met for Coinsnap for WooCommerce to function correctly:
WordPress & WooCommerce
- A self-hosted WordPress website
- WooCommerce installed and activated
Coinsnap & Payments
- An active Coinsnap account –
how to set up a Coinsnap account
- A connected Bitcoin Lightning wallet (self-custodial wallet or BTCPay Server) –
how to get a Lightning address
- The installed Coinsnap for WooCommerce plugin –
How to install the plugin and connect it with your Coinsnap account or your BTCPay Server
Server & Access
- Ability to install and activate WordPress plugins
- HTTPS (SSL) enabled on the website
Store Setup
- At least one WooCommerce product created
- A working WooCommerce checkout page
Step 1 - Configure and customize the plugin
All the requirements listed above are met, and you have successfully installed the plugin and connected it to either your Coinsnap account or your BTCPay Server.
You can now start configuring and customizing the plugin to lay the foundation for enabling Bitcoin payments (on-chain and Lightning) in WooCommerce.
How to configure the plugin
Go to WooCommerce in the left sidebar of your WordPress dashboard and click Settings [1]. Then select the Coinsnap tab at the top right of the screen [2].
You will now see the following screen:
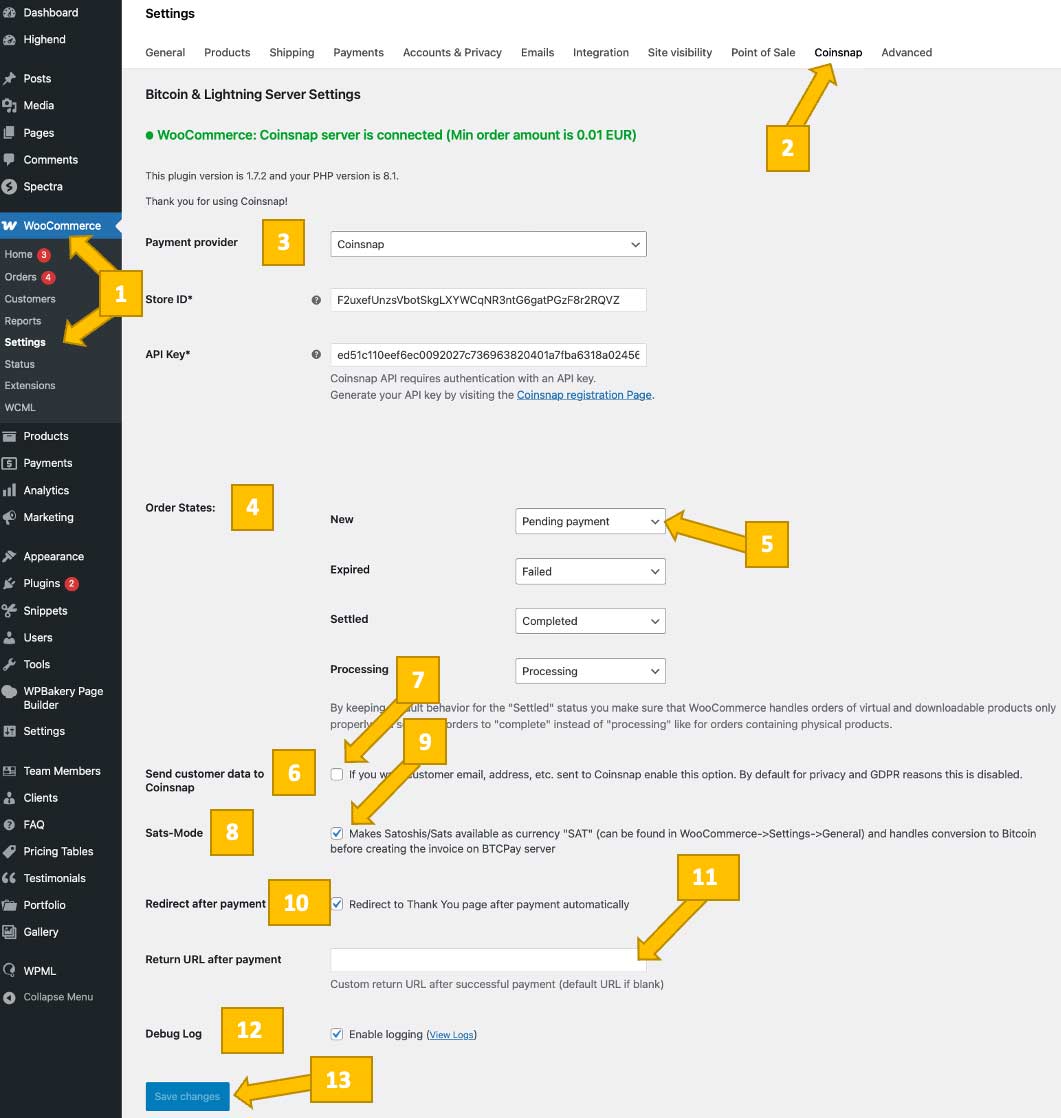
Here are the options you can customize:
Choose a payment provider [3]
If you have already installed the plugin and connected it to a payment gateway, you can leave this setting exactly as it is.
If not, you now need to choose between two payment gateways [0]: Coinsnap or your own BTCPay Server.
Coinsnap is the easiest option. Coinsnap handles the technical setup for you and connects your store to Bitcoin and Lightning payments with just a few clicks. It’s ideal if you want a quick, hassle-free solution without managing your own payment infrastructure. -> Step-by-step explanation: How to connect your Coinsnap account with your plugin
BTCPay Server is a self-hosted option for merchants who want full control. You run your own Bitcoin and Lightning payment server, manage your own wallets, and don’t rely on a third party. This option offers maximum independence but requires more technical setup and maintenance. -> Step-by-step explanation: How to connect your BTCPay Server with your plugin
Order States [4]
Your Coinsnap for WooCommerce plugin uses four order statuses. By default, these are mapped to the corresponding standard WooCommerce order statuses:
The first column shows the Coinsnap order statuses (New, Expired, Settled, Processing), while the second column shows the default corresponding WooCommerce statuses: Pending Payment, Failed, Completed, Processing.
If your business processes differ and you prefer a different mapping, click into field [5] and select the appropriate status from the drop-down menu. This drop-down menu lets you map each Coinsnap order status to a corresponding WooCommerce order status, such as Pending payment, Processing, Completed, Cancelled, Refunded, Failed, or Draft, or leave it unchanged by selecting the default option.
In all but a very few, exceptional cases, the default mapping is the best choice and should not be changed.
Send customer data to Coinsnap [6]
Since the Coinsnap plugin is fully integrated with WooCommerce, all customer and payment data is captured and available in your WooCommerce dashboard.
By default, the plugin does not send any data to the Coinsnap dashboard. We recommend sending the data to Coinsnap, as this allows for better matching and reconciliation between the data in Coinsnap and the corresponding WooCommerce order.
If you want this information to appear in your Coinsnap dashboard, check the box [7].
Sats Mode [8]
The Sats Mode (disabled by default) allows Satoshis (sats) to be used as the currency “SAT” and automatically converts them to Bitcoin before creating the invoice. This lets customers see how many sats correspond to the checkout amount in fiat currency.
We strongly believe the Sats Mode should always be enabled, as the payer wants—and should—see the satoshi equivalent of the amount they are paying.
If you do agree and also want the sats amount to be displayed at checkout, simply uncheck box [9].
Redirect after payment [10], [11]
A redirect after [Bitcoin] payment determines where customers are sent once their payment is completed.
By default, the customer will just be sent back to the default WooCommerce thank-you page.
Alternatively, you can create your own thank-you page in WordPress (for example, myshop.com/thank-you) and redirect customers there instead.
If you want to use your own thank-you page instead of the WooCommerce default thank-you page, just enter the return URL in field [11] below.
Debug Log [12]
If checked, the system logs debug files. These can be helpful if issues occur with the plugin and you need support from Coinsnap. We therefore recommend you to check filed [12]—but the choice is yours.
Save Changes
Of course, after configuring the plugin, don’t forget to click the blue Save changes button at the bottom of the screen [13]!
Done
Your Coinsnap for WooCommerce plugin is now properly set up and configured to match your needs and business processes.
You just need to enable Bitcoin & Lightning payments in your WooCommerce settings so the payment option appears at checkout. The next section will show you how to do this.
Step 2 - Activate Bitcoin payment in your Woo Checkout
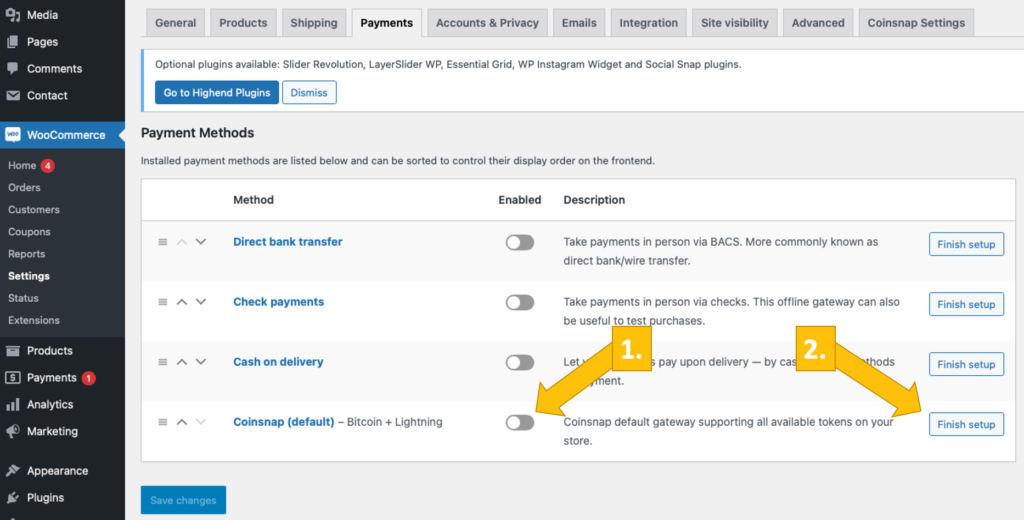
If you open the Payments tab in the WooCommerce settings, you will see a list of available payment methods.
[1] Activate Coinsnap: Activate Coinsnap as a payment option by sliding the switch to the right.
[2] Individual settings: You can customize the checkout process with Coinsnap to adapt the customer journey to your needs. To do this, click on the Finish setup or Manage button .
Step 3 - Configure the Woo Bitcoin payment checkout
After clicking on Finish setup or Manage, you will see this screen:
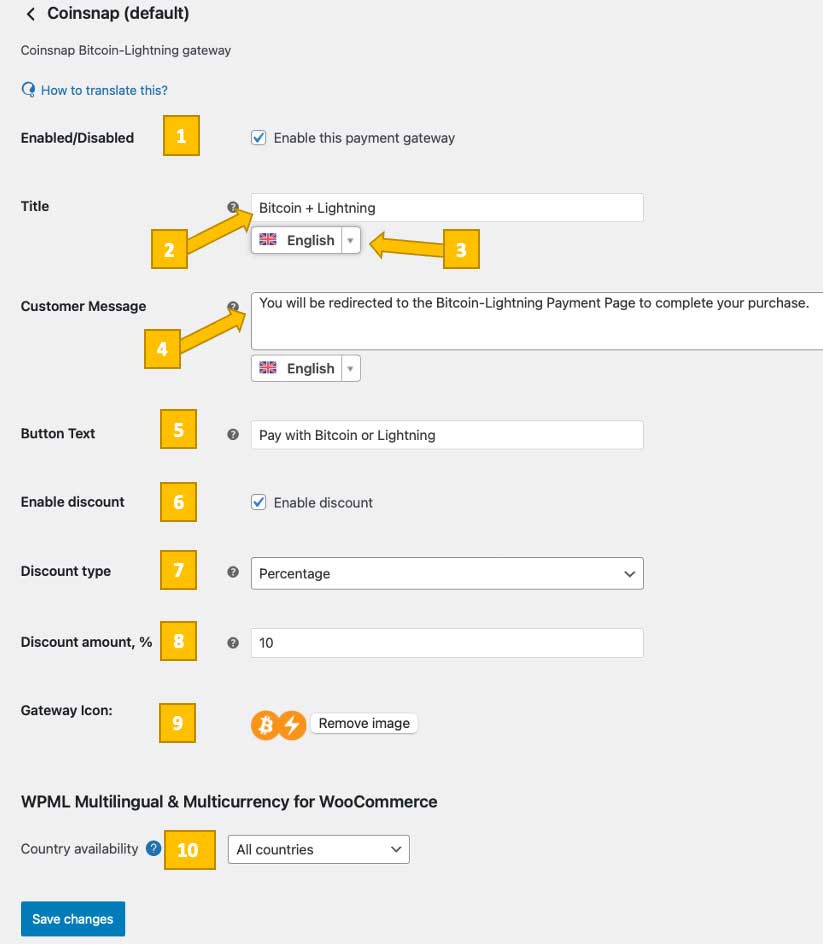
Image 1: Bitcoin payment configuration settings for the WooCommerce checkout
Enabled/Disabled
Make sure this box is checked if you want to offer Bitcoin & Lightning payments in your WooCommerce checkout.
Title and Customer Message
Here you can change the name of the Bitcoin payment method as it appears at checkout. For example, you could use “Pay with Bitcoin” or keep the default “Bitcoin + Lightning”.

Image 2: Bitcoin payment method selection displayed at checkout
The customer message shown above is set by default to You will be redirected to the Bitcoin & Lightning payment page to complete your purchase.
Feel free to change it—for example to: Pay with Bitcoin and get a 10% discount on your purchase!
Adjust the language to match the language of your shop.
(You can also upload your own icon.)
Button Text
After your customer selects Bitcoin + Lightning as the payment method, they need to click the button at the bottom right of the checkout page to initiate the payment process.
You can change the button text from the default “Pay with Bitcoin or Lightning” to anything you consider more appropriate.
Enable Discount and Discount Type
Offering a discount for Bitcoin payments is a great way to encourage Bitcoin transactions and reduce payment fees.
Enable the discount option if you want to incentivize customers to pay with Bitcoin. Then choose whether the discount should be a percentage or a fixed amount, and enter your preferred value (for example, 10% or €5).
Gateway Icon
The Bitcoin payment option is displayed with an icon by default. If you don’t like the default Bitcoin/Lightning icon, you can upload your own.
Country Availability
You can define in which countries Bitcoin payments should be available. You may offer them to all countries, exclude specific countries, or enable them only for certain countries.
Save and sell for Bitcoin
You’re now all set to accept Bitcoin and Lightning payments. Your WooCommerce checkout includes Coinsnap Bitcoin payments and is customized to match your needs.
Click Save at the bottom of the screen to activate Bitcoin payments across your WooCommerce store.
Step 3 - make a test purchase
After completing all settings, you should perform a test transaction.
Place an order in your WooCommerce cart, proceed to checkout, and select Bitcoin Lightning Payment from the available payment options.
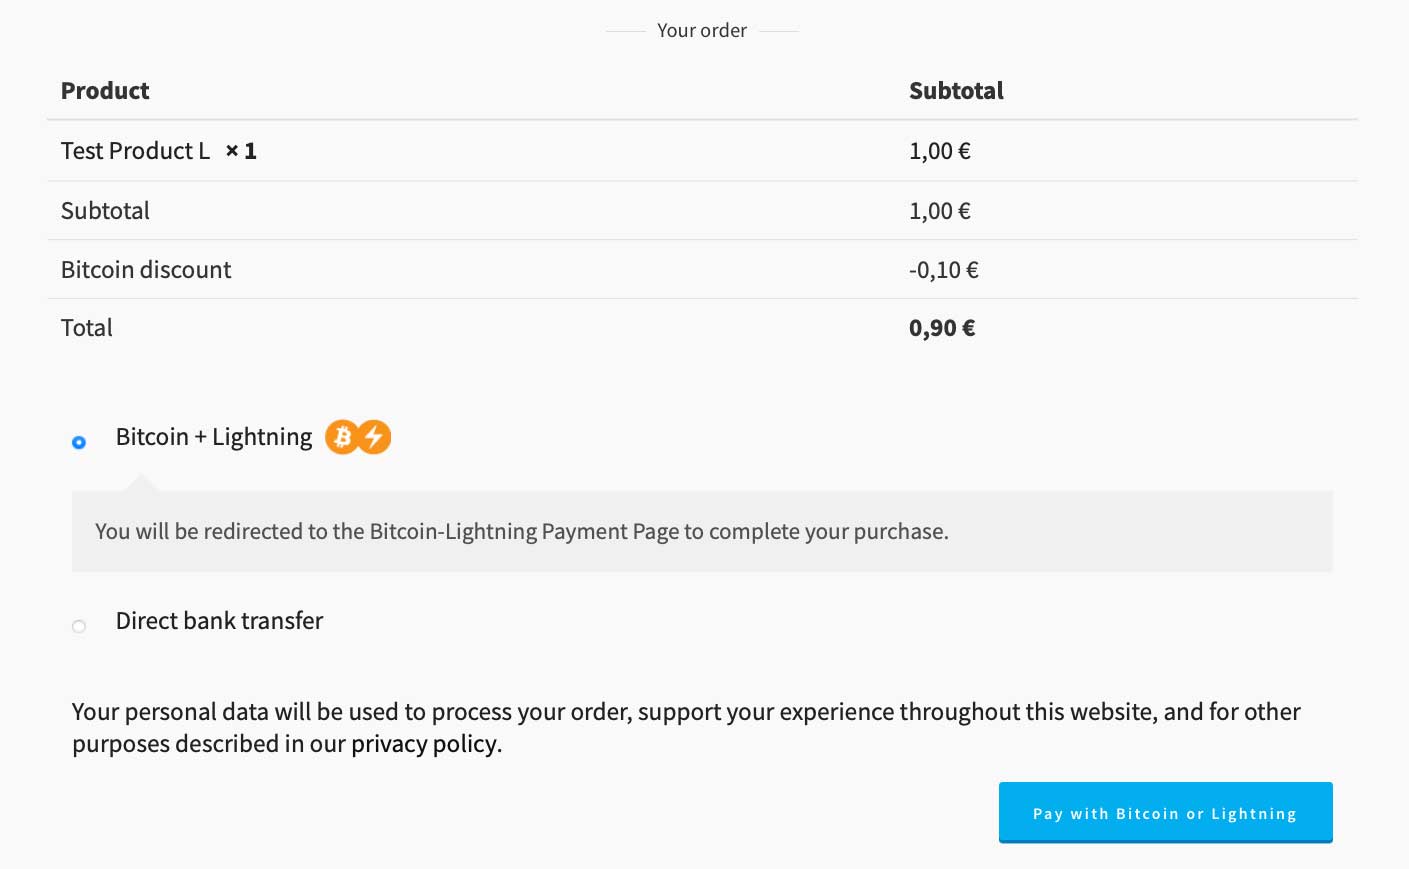
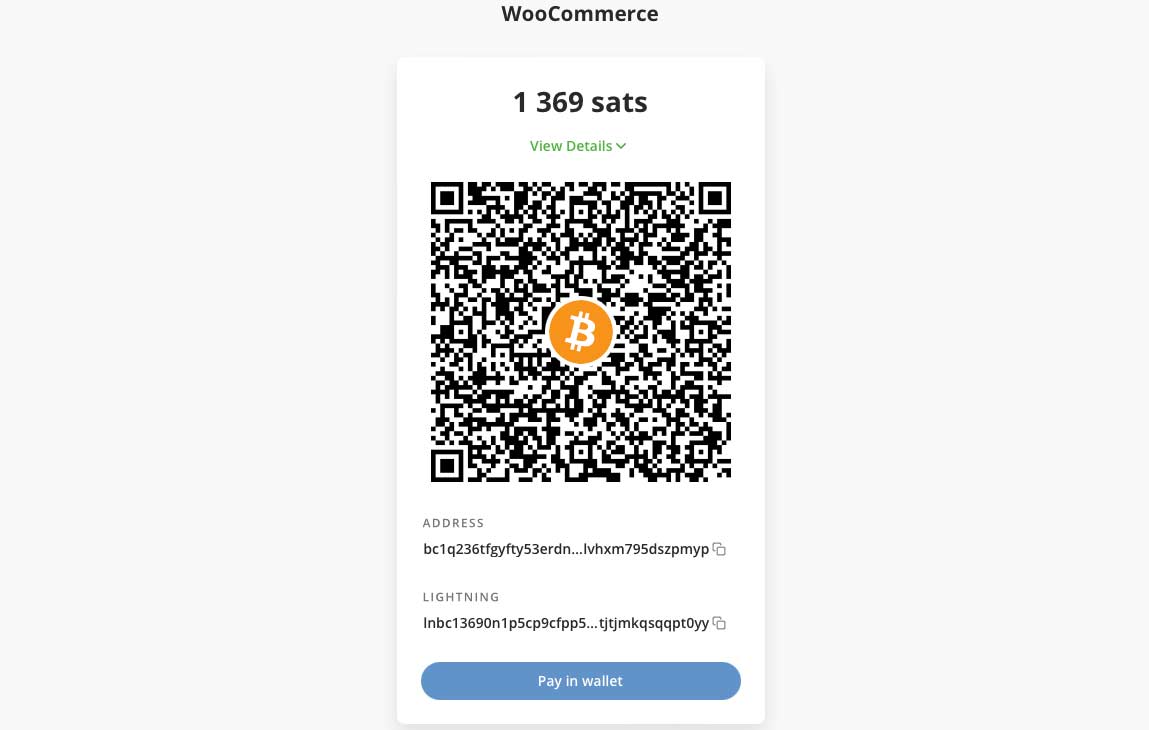
After clicking the Pay with Bitcoin or Lightning button, you will be redirected to the Bitcoin payment page to complete your purchase.
The Bitcoin payment page is displayed and allows the payer to choose between Bitcoin and Lightning. Both payment methods are integrated into the displayed QR code.
If you authorize the payment in your Lightning or on-chain wallet, a success message will be displayed.
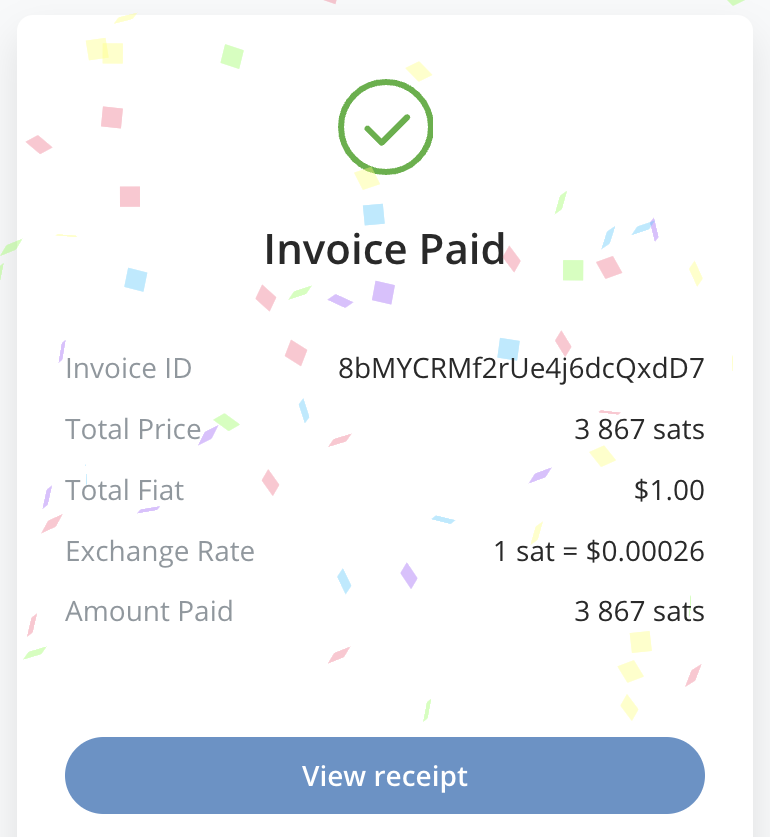
The customer will also see the dedicated payment status.
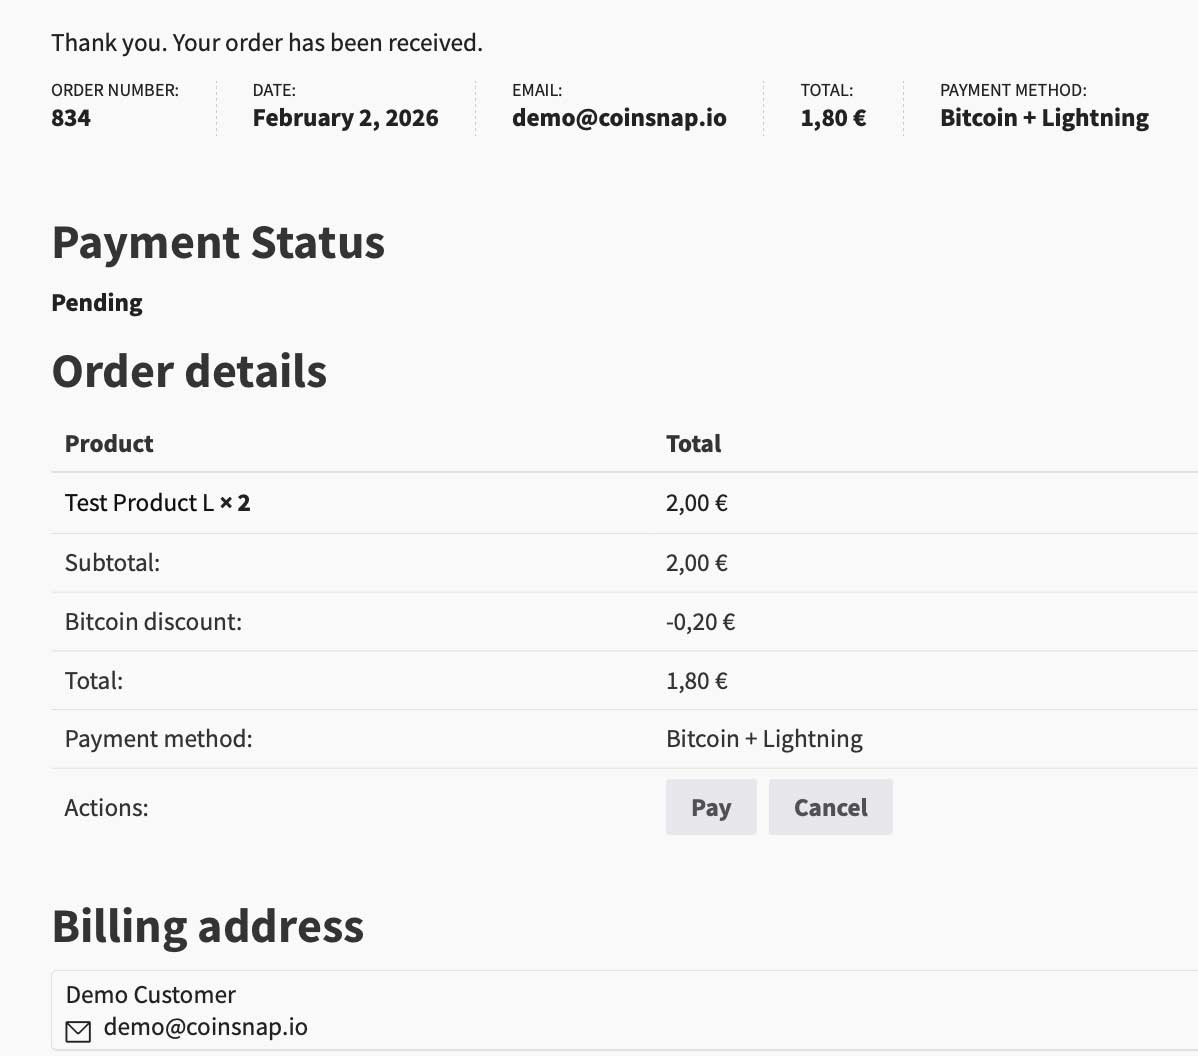
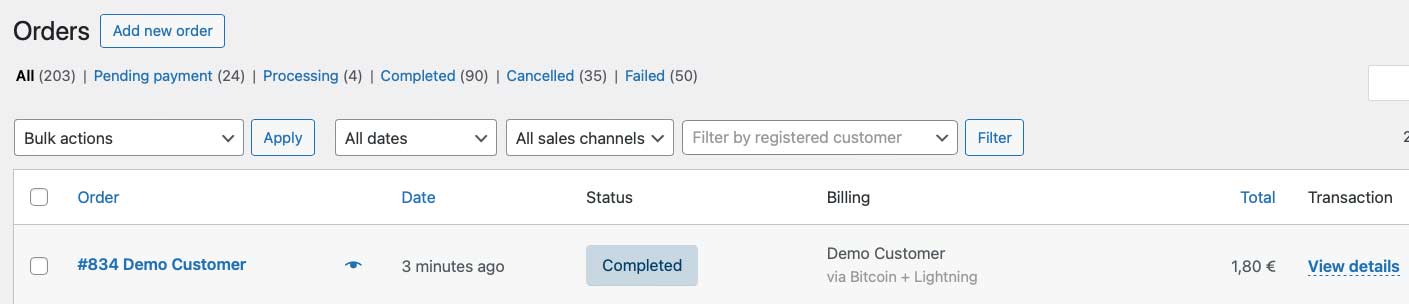
As the merchant, you can view the payment status in your WooCommerce dashboard.
Frequently Asked Questions
What Users Ask About This plugin
Do I need technical or coding skills to install Coinsnap for WooCommerce?
No. The plugin is designed for non-technical users and can be installed and configured entirely through the WordPress and WooCommerce interfaces.
Can I use Coinsnap without running my own BTCPay Server?
Yes. You can use Coinsnap as a managed payment gateway without operating your own BTCPay Server. Running your own BTCPay Server is optional and intended for advanced users who want full control.
Does the guide show how to enable Bitcoin and Lightning payments in WooCommerce checkout?
Yes. The guide explains step by step how to activate Bitcoin & Lightning payments so they appear as a payment option in your WooCommerce checkout.
Can I customize how Bitcoin payments are displayed to customers?
Yes. The guide shows how to customize payment names, descriptions, icons, languages, discounts, and other checkout-related settings.
