Contact Form 7 Bitcoin User Guide
This guide explains everything you need to know to accept Bitcoin and Lightning payments with the Contact Form 7 Bitcoin module. You’ll learn the technical requirements, how to install the Coinsnap plugin, how to connect it to your Coinsnap account or a BTCPay Server, how to configure all settings, and how to implement Bitcoin payments directly within your forms.
Accept Bitcoin & Lightning payments directly through Contact Form 7 forms.


REQUIREMENTS
These requirements must be met for Coinsnap for Contact Form 7 to function correctly:
WordPress & Contact Form 7
- A self-hosted WordPress website
- Contact Form 7 installed and activated
Coinsnap & Payments
- An active Coinsnap account
-> how to set up a Coinsnap account - A connected Bitcoin Lightning wallet (self-custodial wallet or BTCPay Server)
-> how to get a Lightning address - The installed Coinsnap for Contact Form 7 plugin
-> How to install the plugin and connect it with your Coinsnap account or your BTCPay Server
Server & Access
- Ability to install and activate WordPress plugins
- HTTPS (SSL) enabled on the website
Contact Form 7 Setup
- At least one Contact Form 7 form created
STEP 1 - CONFIGURE AND CUSTOMIZE THE PLUGIN
All the requirements listed above are met, and you have successfully installed the plugin in your WordPress. If not, here is a Step-by-step: How to install a Coinsnap plugin in WordPress guide to help you install the plugin.
You will soon be able to accept Bitcoin payments (on-chain and Lightning) directly from within your Contact Forms 7 — without the need for a complex shop system like WooCommerce or traditional payment providers such as credit cards or PayPal. But before you can do that, you need to configure Bitcoin payments in your Contact Forms 7 plugin.
HOW TO CONFIGURE THE PLUGIN
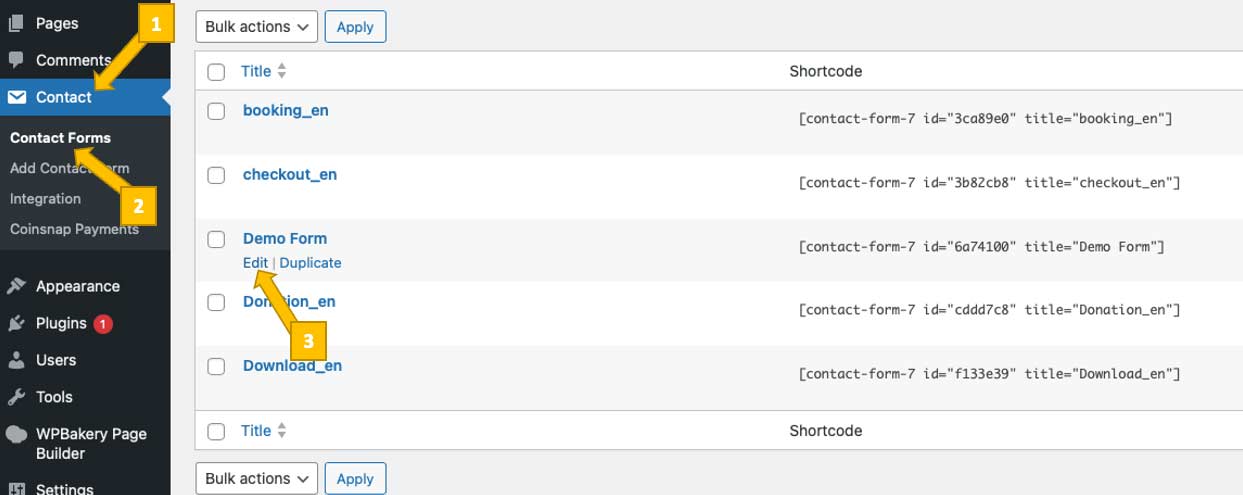
Go to Contact [1] in the left sidebar of your WordPress dashboard and click Contact Forms [2]. Then select the contact form to which you want to add Bitcoin payment and click Edit [3].
You will now see the following screen when you click the Coinsnap tab in the top-right corner:
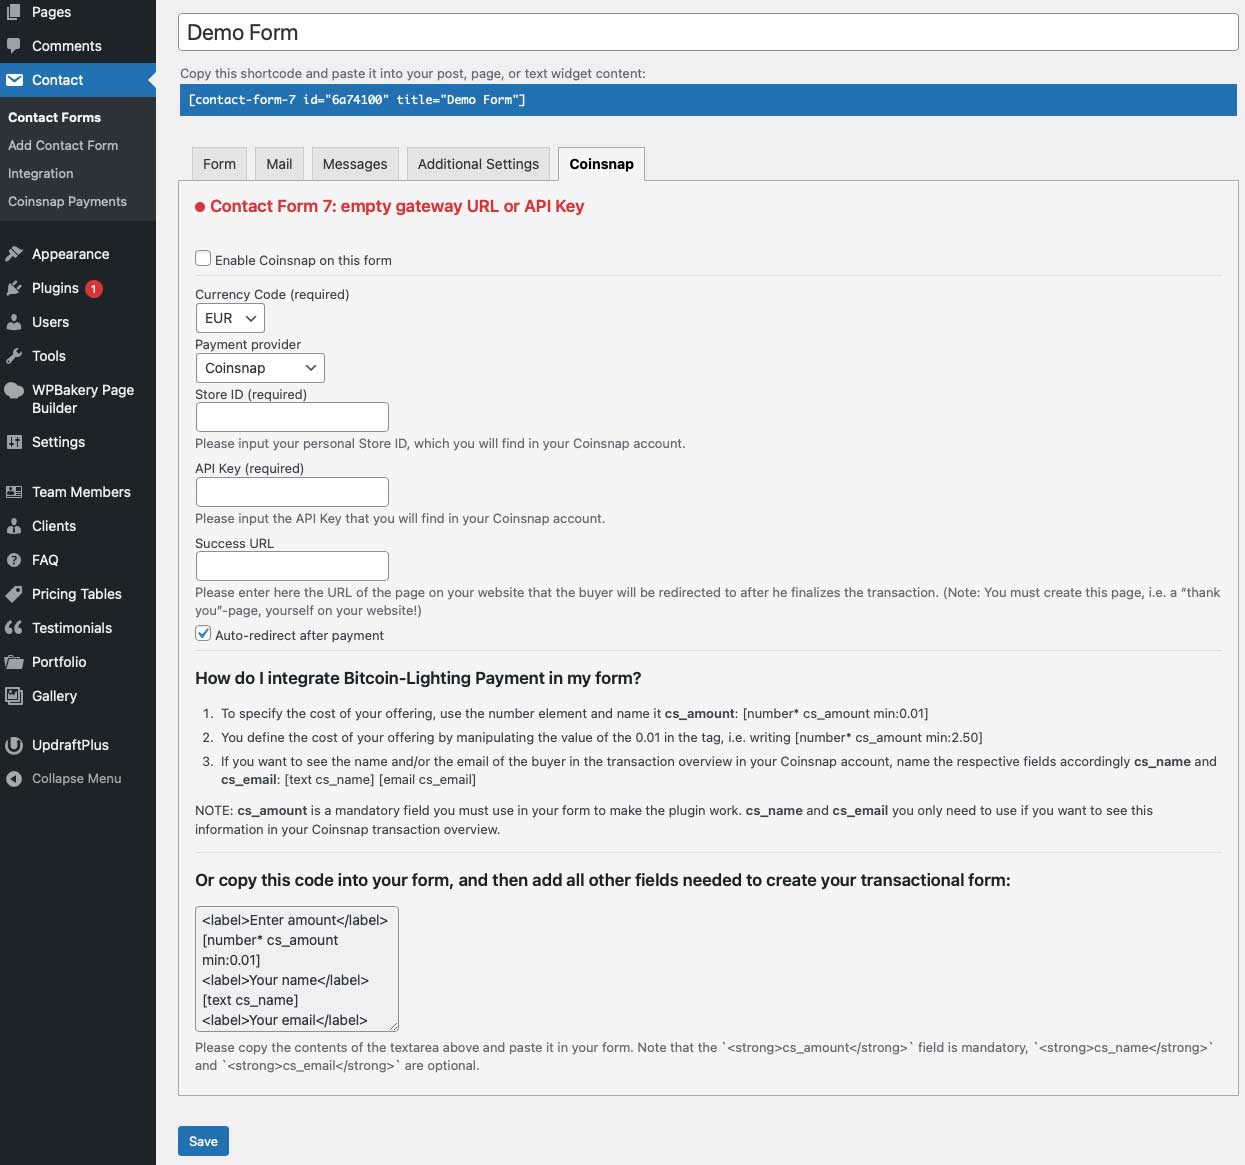
There are four options you need to configure. We’ll now walk you through each one step by step—and explain what it does and why it matters.
1. Enable Bitcoin payments for this form
![]()
Check the box to enable Bitcoin payments for this form.
2. Choose the fiat currency most commonly used by your customers

Choose the fiat currency most commonly used by your customers from the drop-down menu.
3. Choose and set up your payment provider
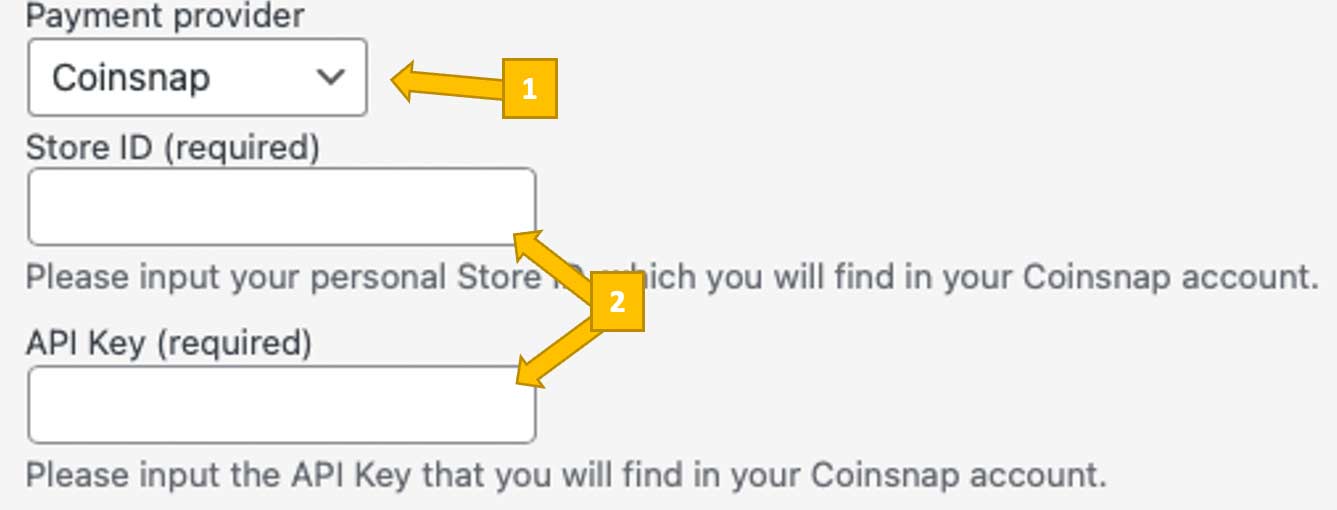
You now need to choose between two payment gateways [1]: Coinsnap or your own BTCPay Server, and to enter your Store ID and API Key [2].
Coinsnap
Coinsnap is the easiest option. Coinsnap handles the technical setup for you and connects your store to Bitcoin and Lightning payments with just a few clicks. It’s ideal if you want a quick, hassle-free solution without managing your own payment infrastructure.
Learn here how to retrieve your Coinsnap Store ID and API Key:
-> Step-by-step explanation: How to connect your Coinsnap account with your plugin
BTCPay Server
BTCPay Server is a self-hosted option for merchants who want full control. You run your own Bitcoin and Lightning payment server, manage your own wallets, and don’t rely on a third party. This option offers maximum independence but requires more technical setup and maintenance.
Learn how to retrieve your Store ID and API Key using our BTCPay Server wizard here:
-> Step-by-step explanation: How to connect your BTCPay Server with your plugin
4. Select the page customers should be redirected to after a successful payment

The Success URL determines where customers are sent once their payment is completed.
By default, the customer will just be sent back to the Contact Form 7.
Alternatively, you can create your own thank-you page in WordPress (for example, myshop.com/thank-you) and redirect customers there instead.
If you want to use your own thank-you page instead of the WooCommerce default thank-you page, just enter the return URL in field Success URL [1].
Save your settings
Click the Save button at the bottom of the screen, and you will see the following confirmation:
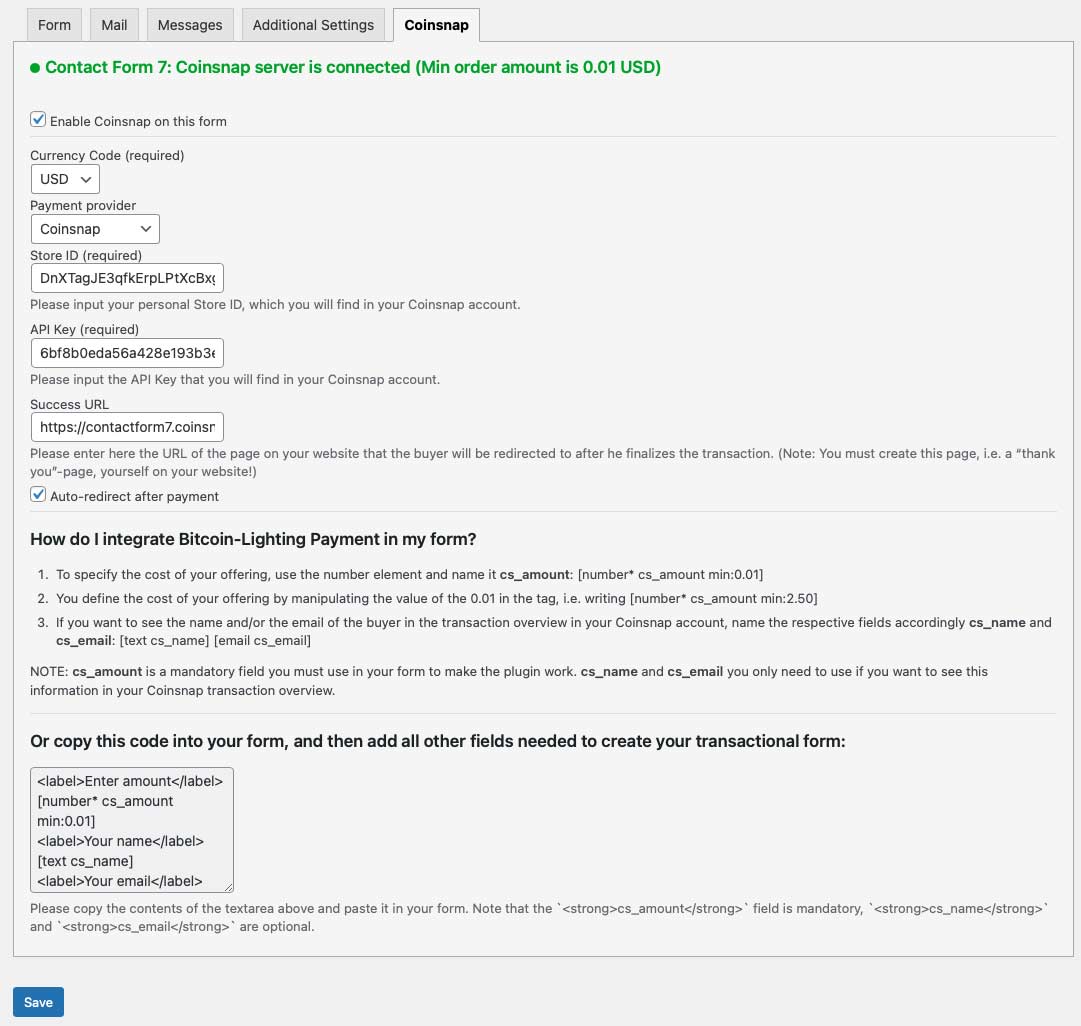
You are now ready to add the Bitcoin payment option to the form’s front end so your users can see the payment option and the price. We’ll show you how to do that in the next section.
Step 2 - Set pricing and include Bitcoin payment in your form
How do I integrate Bitcoin-Lighting Payment in my form?
- To specify the cost of your offering, use the number element and name it cs_amount: [number* cs_amount min:0.01]
- You define the cost of your offering by manipulating the value of the 0.01 in the tag, i.e. writing [number* cs_amount min:2.50]
- If you want to see the name and/or the email of the buyer in the transaction overview in your Coinsnap account, name the respective fields accordingly cs_name and cs_email: [text cs_name] [email cs_email]
NOTE: cs_amount is a mandatory field you must use in your form to make the plugin work. cs_name and cs_email you only need to use if you want to see this information in your Coinsnap transaction overview.
Or copy this code into your form, and then add all other fields needed to create your transactional form:
<label>Enter amount</label>
[number* cs_amount min:0.01]
<label>Your name</label>
[text cs_name]
<label>Your email</label>
[email cs_email]
Please copy the contents of the textarea above and paste it in your form. Note that the `cs_amount` field is mandatory, `cs_name` and `cs_email` are optional.
Of course, feel free to customize the form to meet your needs. You can add any number of fields and text elements as you like, as long as you ensure that all inputs related to the Bitcoin-Lightning payment include the cs_ tag.
Step 3 — Make a test payment to ensure everything works correctly
After completing all settings, you should perform a test transaction.
Fill out the Contact Form 7 form you just created and click the blue button to start the Bitcoin payment.
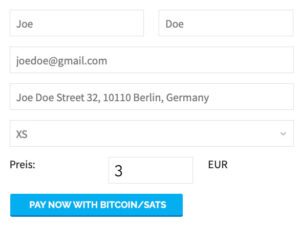
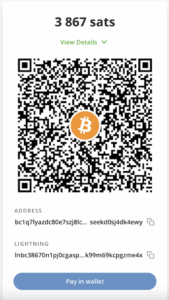
You will now be redirected to the Bitcoin payment page to complete the payment.
The Bitcoin payment page is displayed and offers the payer the option to pay with Bitcoin or Lightning. Both payment methods are integrated into the displayed QR code.
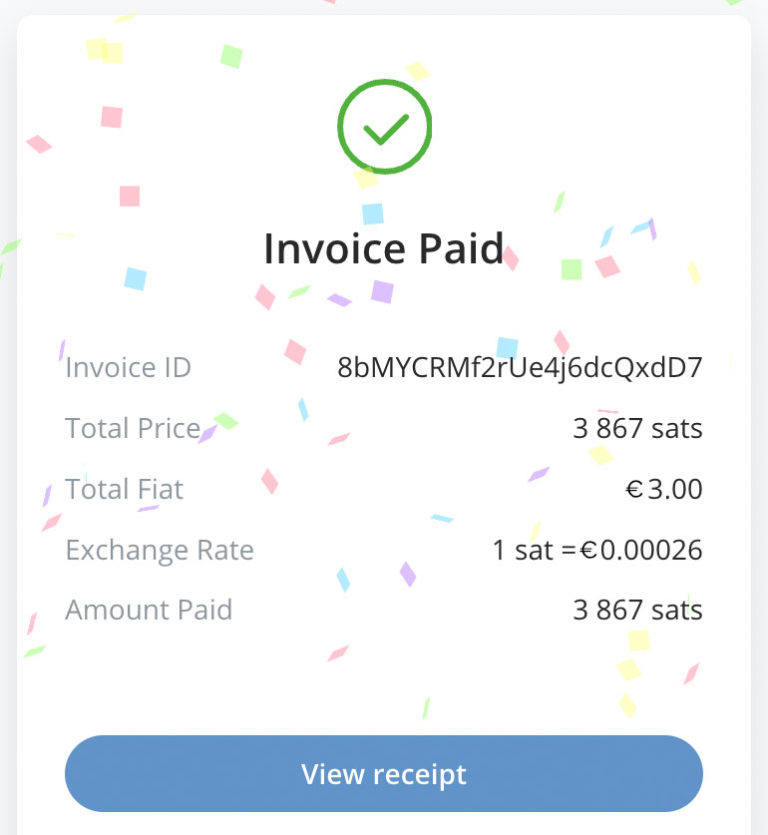
After a successful payment, the invoice can be viewed in detail.
Frequently Asked Questions
What Users Ask About This plugin
Can I create multiple, different forms with Bitcoin payment?
You can create multiple payment forms with different amounts.
Can I set dynamic payment amounts in Contact Form 7?
Yes. You can pull amounts from form inputs and pass them to the Coinsnap tag.
Does the user receive a confirmation email automatically?
Yes. Contact Form 7 will send your normal email template after payment is completed.
