WordPress Bitcoin Voting User Guide
This user guide shows you how to accept Bitcoin and Lightning–based votes on your WordPress website using the Coinsnap Bitcoin Voting plugin for WordPress. It walks you through the technical requirements, plugin installation, connecting the plugin to your Coinsnap Bitcoin gateway or your BTCPay Server, configuring all relevant settings, and enabling paid Bitcoin voting directly on your pages.
Allow voting on your website for a fee payable in Bitcoin.


Requirements
THESE REQUIREMENTS MUST BE MET FOR BITCOIN VOTING TO FUNCTION CORRECTLY:
WordPress & Bitcoin Voting
- A self-hosted WordPress website
- Bitcoin Voting installed and activated
Coinsnap & Payments
For this plugin, you need either a Coinsnap account with a Lightning address or your own BTCPay Server.
- An active Coinsnap account
-> How to set up a Coinsnap account
- A connected Bitcoin Lightning wallet (self-custodial wallet or BTCPay Server)
-> How to get a Lightning address
- The installed Coinsnap Bitcoin Voting plugin
->How to install the plugin and connect it with your Coinsnap account or your BTCPay Server
Server & Access
- Ability to install and activate WordPress plugins
- HTTPS (SSL) enabled on the website
Bitcoin Voting Setup
- At least one Bitcoin poll created (to enable a test payment)
STEP 1 - CONFIGURE AND CUSTOMIZE THE PLUGIN
All the requirements listed above are met, and you have successfully installed the plugin in your WordPress. If not, here is a Step-by-step: How to install a Coinsnap plugin in WordPress guide to help you install the plugin.
You will soon be able to accept Bitcoin payments (on-chain and Lightning) for a vote anywhere on your website — without the need for a complex shop system like WooCommerce or traditional payment providers such as credit cards or PayPal. But before you can do that, you need to configure Bitcoin payments in your Bitcoin Voting plugin.
HOW TO CONFIGURE THE PLUGIN
1. Choose and set up your payment provider
After installing and activating the Bitcoin Voting plugin, you need to configure a Bitcoin payment gateway connection, either with Coinsnap or with a BTCPay Server.
In the WordPress admin dashboard, go to Coinsnap Bitcoin Voting → Settings in the left-hand sidebar.
You will now see the following screen:
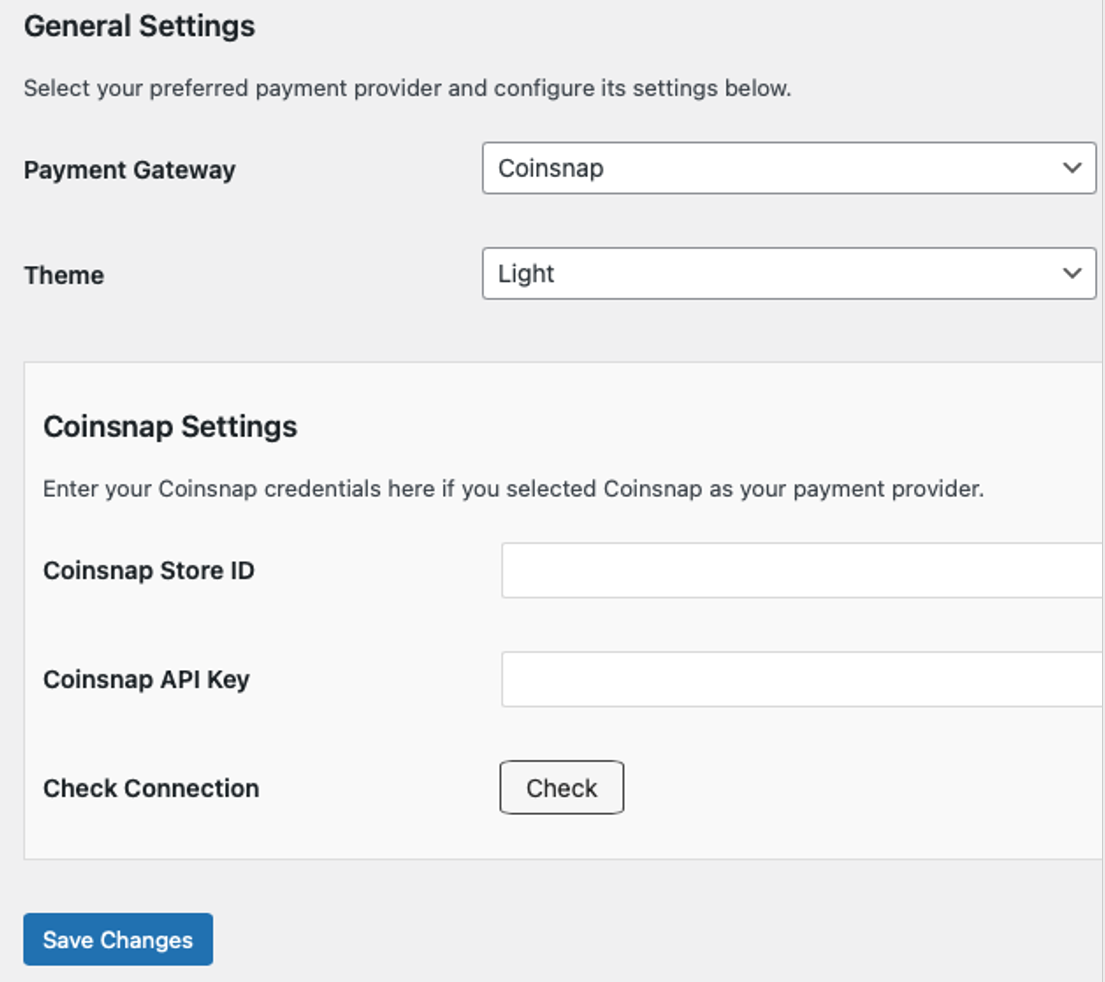
You now need to choose between two payment gateways: Coinsnap or your own BTCPay Server, and to enter your Store ID and API Key.
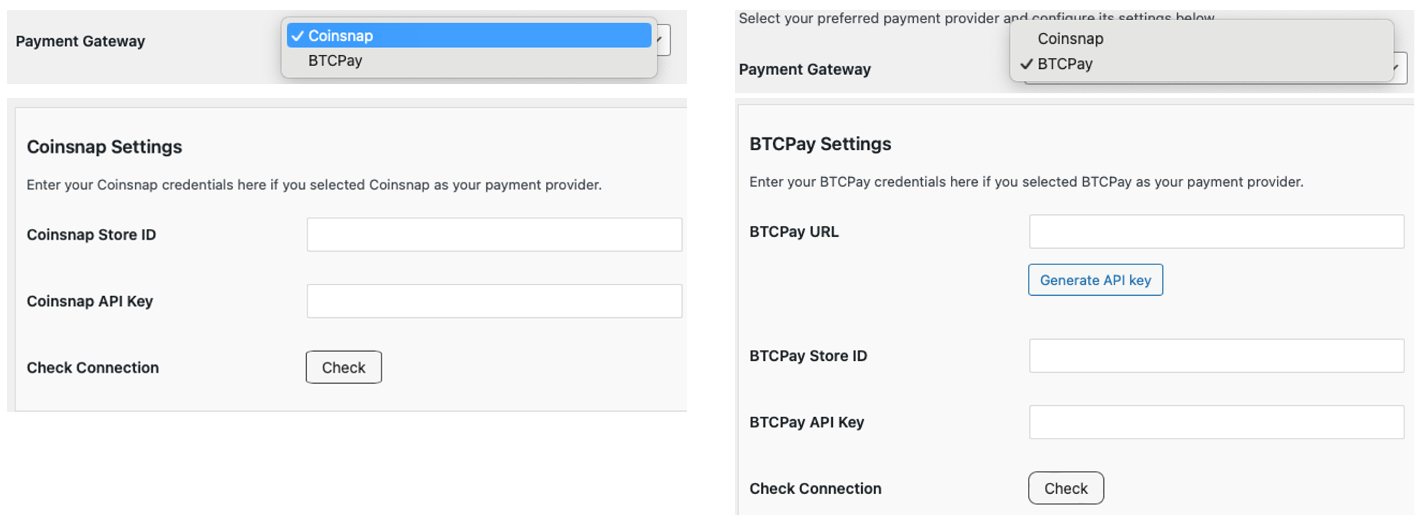
Coinsnap
Coinsnap is the easiest option. Coinsnap handles the technical setup for you and connects your store to Bitcoin and Lightning payments with just a few clicks. It’s ideal if you want a quick, hassle-free solution without managing your own payment infrastructure.
Learn here how to retrieve your Coinsnap Store ID and API Key:
-> Step-by-step explanation: How to connect your Coinsnap account with your plugin
BTCPay Server
BTCPay Server is a self-hosted option for merchants who want full control. You run your own Bitcoin and Lightning payment server, manage your own wallets, and don’t rely on a third party. This option offers maximum independence but requires more technical setup and maintenance.
Learn how to retrieve your Store ID and API Key using our BTCPay Server wizard here:
-> Step-by-step explanation: How to connect your BTCPay Server with your plugin
Check Connection
Whichever gateway you’ve set up, once you’re done, click the check button.
![]()
If everything went well, you should now see something like this at the top of the settings screen:
![]()
2. Choose a theme
You can also choose the color scheme for your Bitcoin donation forms — light or dark — to match the design and style of your website.

STEP 2 - CREATE A BITCOIN VOTING FORM
After installing and activating the Coinsnap Bitcoin Voting plugin, you can create a new paid voting poll by going to Coinsnap Bitcoin Voting → Polls in the left sidebar of your WordPress dashboard. Then click Add New Poll on the top of the screen. You’ll see this interface:
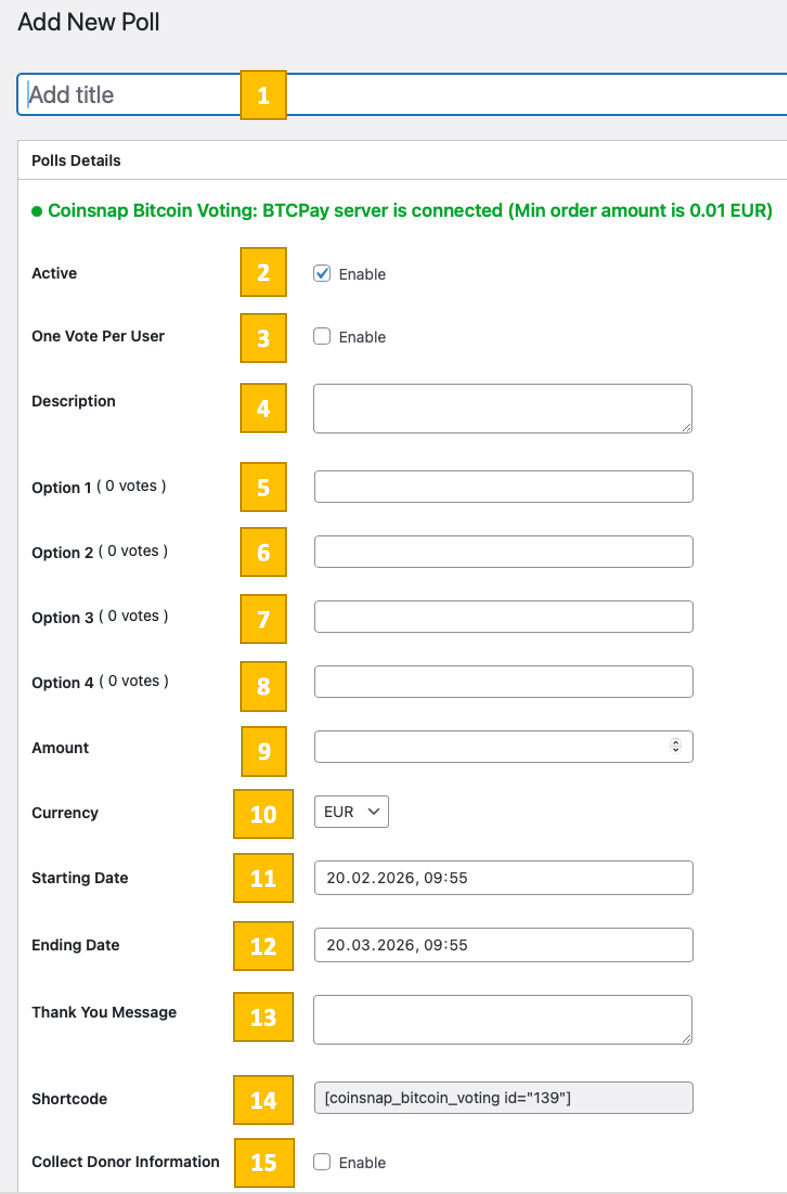
You’ll need to configure 15 parameters to match your needs:
[1] Poll Title
Defines the internal name of your voting poll and helps you identify it in the WordPress dashboard.
[2] Poll Status (Active)
Enables or disables the voting poll. Only active polls can accept paid Bitcoin votes.
[3] One Vote Per User
Restricts each user to a single paid vote for this poll when enabled.
[4] Poll Description
Explains the purpose of the poll and is shown to users above the voting options. It should be phrased as a clear question that directly refers to the available choices, for example: “Which Lightning wallet is the best?” with options such as WoS, Blink, Blue, or Misty Breeze.
[5-8] Voting Options 1, 2, 3, and 4
You can create voting polls with up to four selectable choices by simply entering them into the provided fields. Each voter pays only once per vote and can select one single option only from the available choices, not multiple options.
[9] Price per Vote (Amount)
Sets the amount users must pay in the selected currency to submit a single vote.
[10] Pricing Currency
Defines the fiat currency used to calculate the Bitcoin or Lightning amount. You can choose from these supported currencies: Euro (EUR), United States Dollar (USD), Satoshis (SATS), Bitcoin (BTC), Canadian Dollar (CAD), Japanese Yen (JPY), British Pound Sterling (GBP), Swiss Franc (CHF) and Russian Ruble (RUB).
[11] Voting Start Date
Specifies when the poll becomes available for paid voting.
[12] Voting End Date
Specifies when the poll stops accepting paid votes.
[13] Thank You Message
Message displayed after a vote has been successfully paid and submitted.
[14] Voting Shortcode
This is the shortcode you need to place wherever you want to display the voting poll on your WordPress website.
[15] Collect Voter Information
Enables the collection of additional voter details during the payment process. When enabled, the following settings will appear:

Here, the webmaster can control which voter information is requested during the payment process and how strict the input requirements are.
For each available field—such as first name, last name, email address, postal address, or a custom field—you decide whether the field is hidden, optional, or mandatory. Hidden fields are not shown to voters at all. Optional fields are displayed but can be left empty. Mandatory fields must be completed before the Bitcoin or Lightning payment can be submitted.
This allows the voting process to be kept as minimal and privacy-friendly as possible, or extended with additional data collection if voter information is required for the specific use case.
Save Changes
Click Save Changes to store your settings — the voting poll is now created, configured, and ready to be used on your website.
STEP 3 – PLACING THE BITCOIN VOTING ON YOUR WORDPRESS WEBSITE
To place the donation form anywhere on your website, simply copy the provided shortcode [coinsnap_bitcoin_voting id=”12″] and paste it at the position where you want the donation form to appear. You can insert the shortcode directly into the content of a page or post to display the form within or below your text. You’ll find the shortcode in the Bitcoin Voting settings (see above).
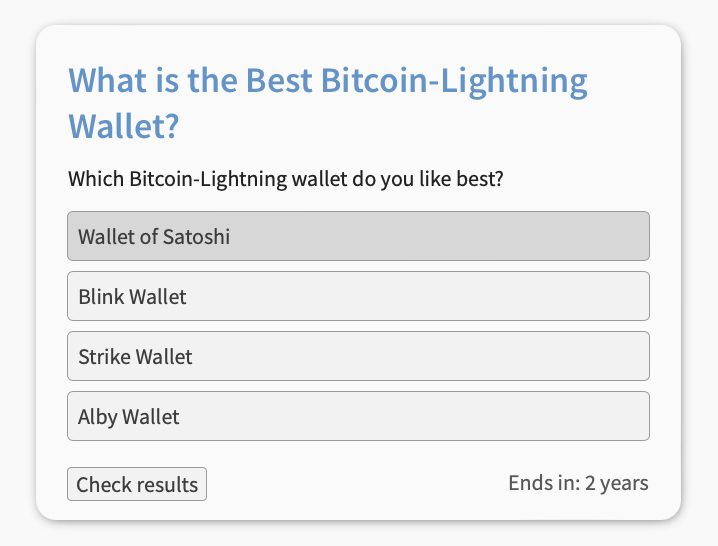
On your website, your visitors will then see something like this:
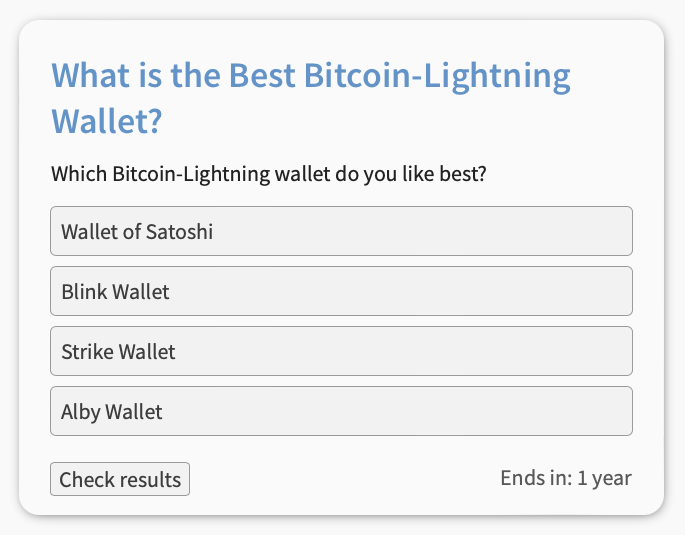
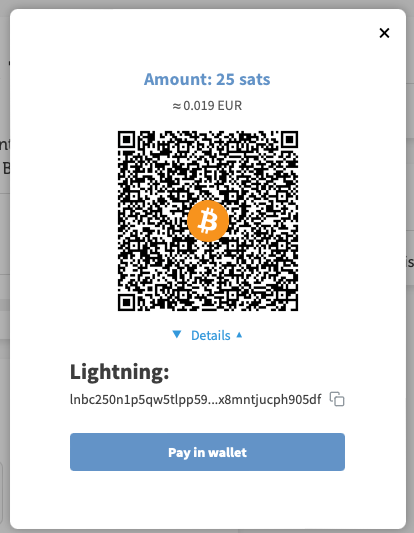
As soon as a vote is cast and the Bitcoin payment is completed successfully, the voter will see something like this:
STEP 4 — MAKE A TEST PAYMENT TO ENSURE EVERYTHING WORKS CORRECTLY
After all settings have been made, a test transaction should be carried out. First, cast a vote in a Coinsnap Bitcoin Voting poll box that you placed on your website by clicking on your choice. Then provide the required information.

Now, the payment interface will appear with a QR code. Scan it with your Bitcoin Lightning wallet and authorize the payment. The 21 sats will be immediately credited to your business Bitcoin Lightning wallet.
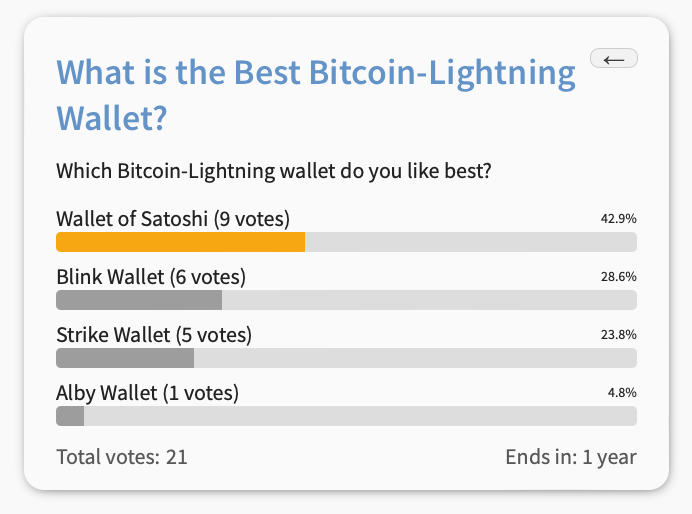
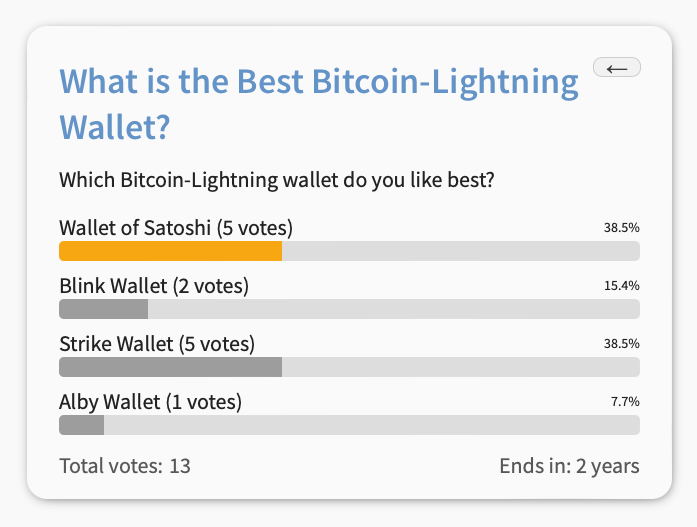
After a successful payment, within a few seconds you will see the poll box again, now showing the voting results so far.
Frequently Asked Questions
What Users Ask About This plugin
Can I run multiple simultaneous polls?
Yes — you can create unlimited voting campaigns, each with its own price and settings.
Do users need an account to vote?
-
No — Bitcoin voting works without user registration unless you choose to enable user tracking.
Do users need a Bitcoin or Lightning wallet to vote?
Yes. To submit a vote, users must complete a Bitcoin or Lightning payment using a compatible wallet.
Can I allow free voting instead of paid voting?
No. The Bitcoin Voting plugin is designed for paid voting only. Each vote is submitted through a Bitcoin or Lightning payment.
Can a user vote more than once?
Yes, unless you enable the One Vote Per User option. When enabled, each user is restricted to a single paid vote.
How many voting options can a poll have?
Each poll can contain up to four selectable voting options.
Can I change the price per vote after the poll is published?
Yes. You can edit the poll at any time and adjust the voting amount or currency. Changes apply to all future votes.
What happens after a successful payment?
After a successful Bitcoin or Lightning payment, the vote is counted automatically and the voter sees your predefined thank-you message.
Where can I display the voting poll?
You can place the poll anywhere on your WordPress website by inserting the generated shortcode into a page, post, or widget.
