How to install a Blink wallet and get a Lightning address to accept Bitcoin


In this blog, we explain what the Blink Wallet is and why it is particularly suitable for merchants who sell their offerings for Bitcoin but do not want to hold the Bitcoin for the long term, but need its equivalent value for ongoing operations.
In this article, you will learn how to install and set up a Blink Wallet and create a personal Lightning address. We’ll also explain how to choose the right account type for your business needs and how to set the wallet to your national fiat currency.
With the step-by-step guide, you can create a business-ready Bitcoin Lightning wallet in just a few minutes and start marketing your Bitcoin offering.
What is the Blink Wallet?
The Blink Wallet is a custodial Bitcoin Lightning Wallet that contains two balance accounts – one for Bitcoin, the other for US dollars (Stablesats). “Custodial” means that your funds are held by Blink. (You should therefore regularly transfer your earnings to your Bitcoin hardware wallet).
The two different balance accounts give you the choice of participating in changes in the price of Bitcoin against the dollar (Bitcoin account) or excluding the volatility risk (dollar account), see below.
And – very important – with the Blink Wallet you will also receive a Lightning address, which you can name yourself (and thus e.g. “brand”), see below. You can use this Lightning address for your Coinsnap account – so that all your incoming payments will be credited there!
Another important feature of the Blink Wallet is that you can receive (and of course make) payments with Lightning or on-chain, depending on your needs and wishes. Lightning payments are ideal for amounts under around €1,000, as Lightning payments are lightning fast and particularly cheap. If you need to receive larger amounts, we recommend the on-chain payment method, which takes a little longer and is slightly more expensive but can also process large amounts for which Lightning is not suitable.
We will show you below how to install the Blink Wallet, set up your Lightning address, select your preferred credit type and your local currency.
Install and set up a Blink Wallet
You can find the Blink Wallet in your app store for both Android and iPhones. We will now install Blink for iPhones.
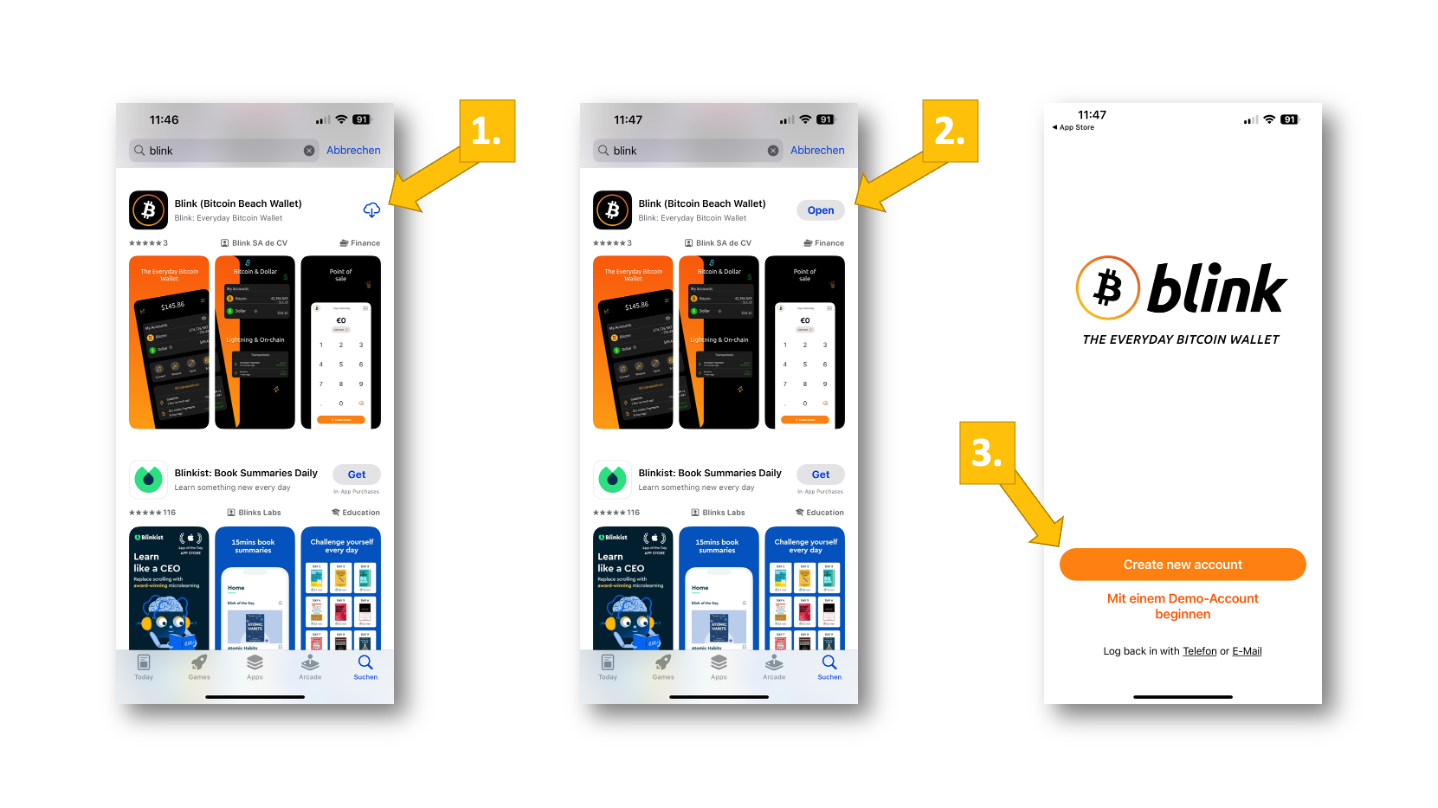
To do that, go to the app store, search for “Blink” and select the “Blink (Bitcoin Beach Wallet)” App [1]. Once she has been downloaded, click on “open” [2] and then on “create new account” [3] on the app’s home screen.
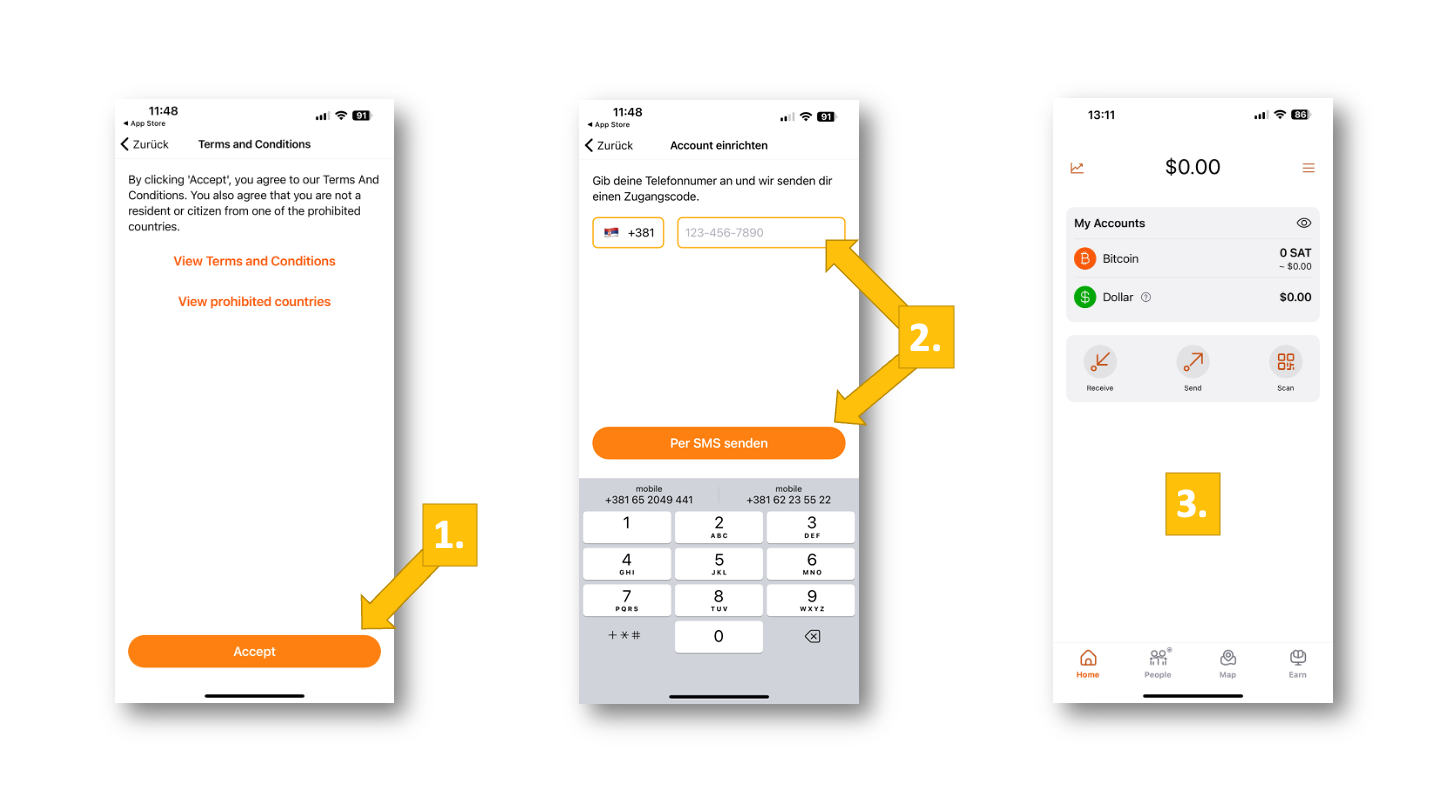
Now you have to accept the terms and conditions [1], enter your phone number and click on “Send by SMS” [2]. You will then receive a code via SMS, which you enter in the next window. You will then be in your Blink Bitcoin Lightning Wallet for the first time [3].
You have now installed Blink and set up an account. To be able to work with Blink – or to use the Blink wallet to register with Coinsnap – you still need to do two things: First, to set up your Lightning address, then to select the default account. We will show you how to do this in the following two paragraphs.
Create your branded Lightning address
Without your personal Lightning address, you cannot receive or make Bitcoin Lightning payments. In particular, you need your Lightning address so that your customers’ payments can be credited to you. Blink makes it easy for you to create a personalized or branded Lightning address.
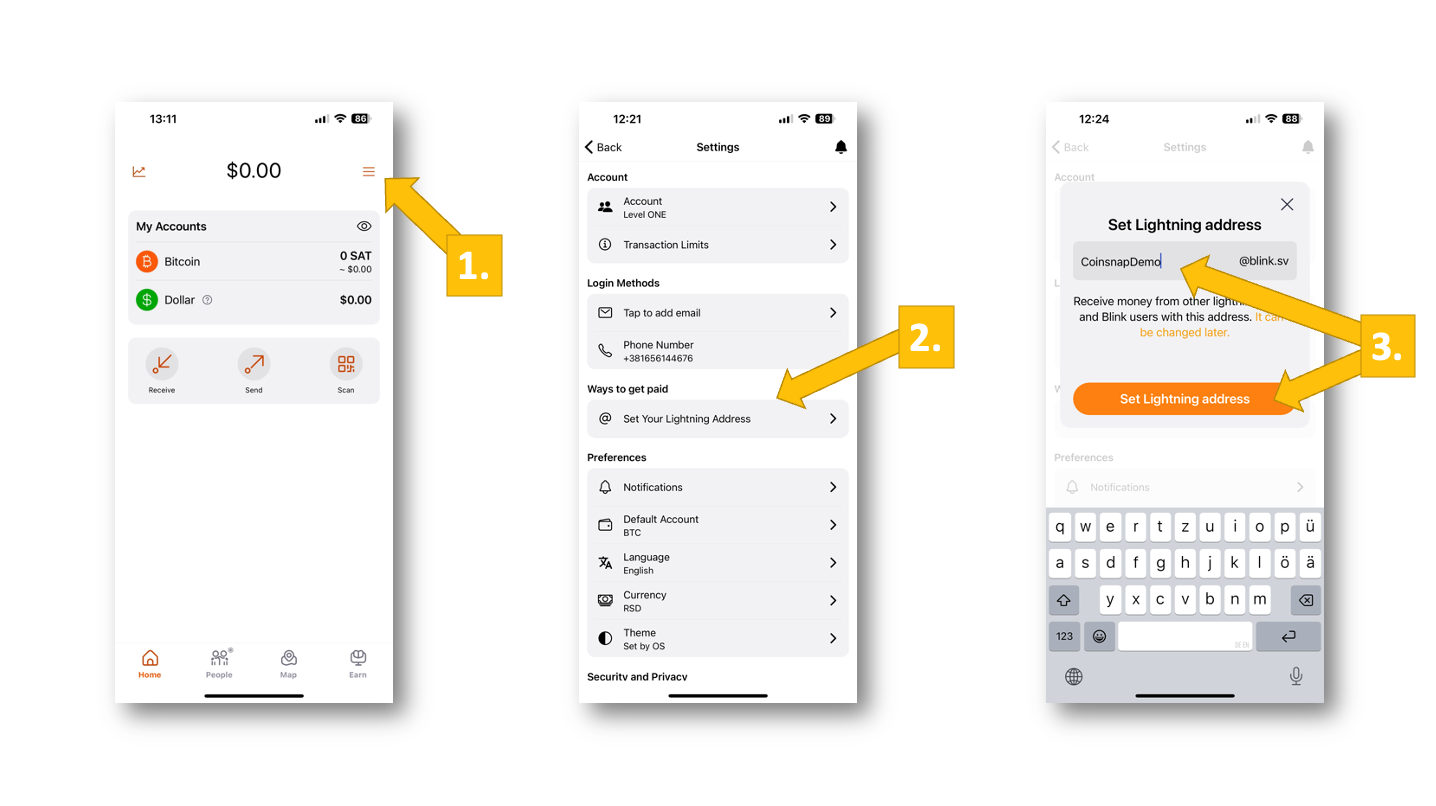
To do that, go to the menu [1] and click on “Set Your Lightning Address” [2] under “Ways to get paid” on the next screen. In the pop-up, enter the name of your address, we’ll enter “CoinsnapDemo” here, and then click on “Set Lighting address” [3].
Now you have a fully-fledged, personal Lightning address (in our case “CoinsnapDemo@blink.sv” ) – and you’re ready to accept Bitcoin payments from customers from all over the world!
Select your preferred account type (Bitcoin or Stablesats/USD)
Now all you have to do is select your preferred account type. This is important, as the Bitcoin price is subject to constant fluctuations, which can be quite significant.
If you believe in the long-term growth of the Bitcoin price and do not want to spend your Bitcoin immediately or transfer it to your company bank account in your local currency, you should choose Bitcoin as your default balance type. If you want to play it safe or realize your earnings 1-to-1, you are better off with the dollar account.
To choose your preferred account type, go to “Default Account” [1] under “Preferences”. On the next screen, you can now select “Bitcoin” or “Stablesats (USD)” [2]. (In our case, we have selected “Bitcoin”.)
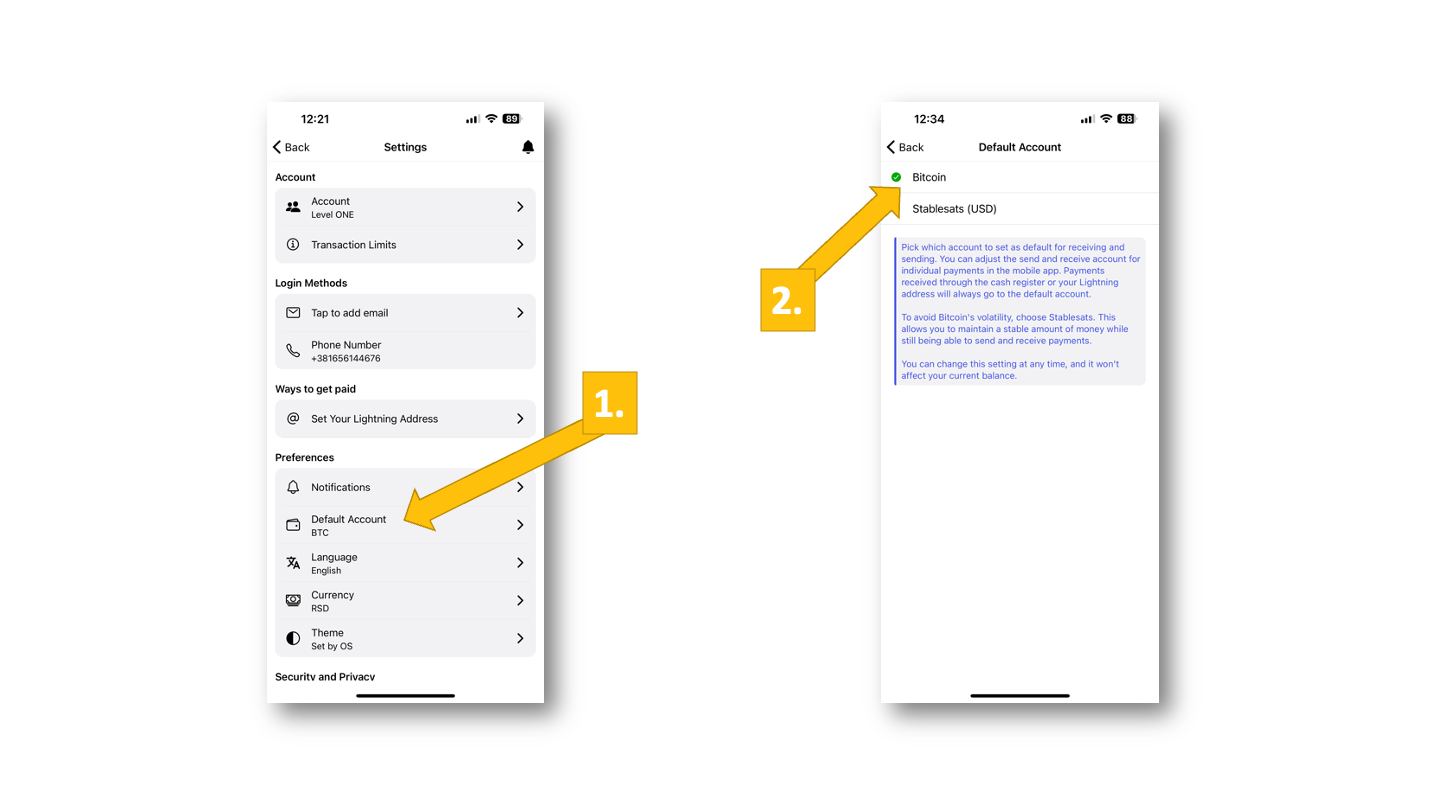
Depending on what you have selected, you will now receive your earnings either on the Bitcoin account, where their value can increase (or decrease), or on the dollar account, where – regardless of the Bitcoin exchange rate – your exact sales value will be kept (in US dollars).
Select local currency
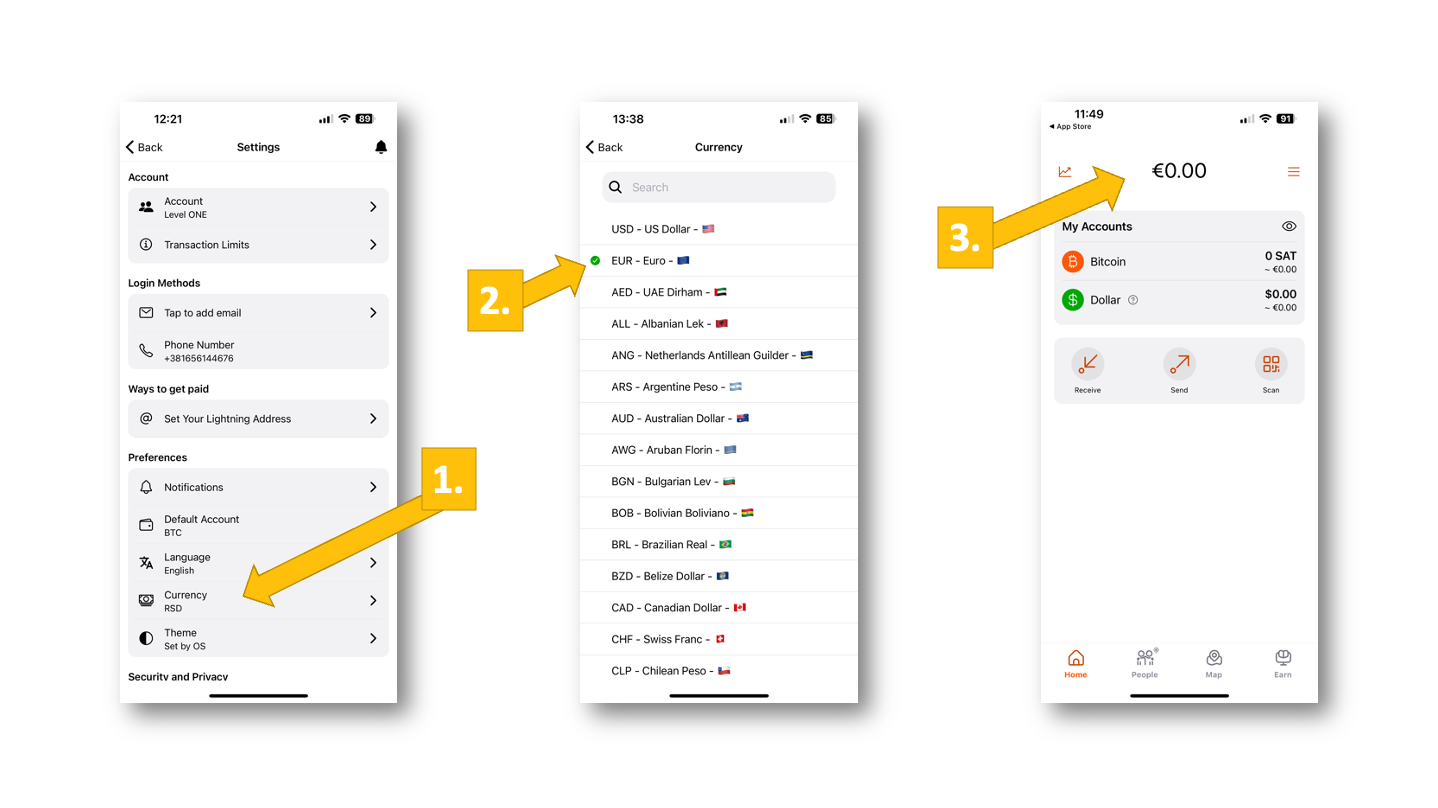
Last but not least, you should select your local currency so that you can see your balances in the currency you are selling your listings for. This is just as easy as selecting the default account.
Simply go to “Currency” [1] in the menu under “Preferences” and select your local currency from the following drop-down menu [2]. Now your home screen is switched to euros [3] and you don’t have to convert your account balances every time to know what you own (in euro-equivalent credit)!
Conclusion
The Blink wallet is quick and easy to install and is characterized by its simple operation.
The offer of a Stablesats dollar account is particularly interesting for merchants who want to act at short notice to pay invoices, for example. With the dollar account, they hedge against short-term fluctuations in the Bitcoin exchange rate and can realize their sales at the actual sales price.
The Blink wallet is therefore ideal for entrepreneurs to be credited with Bitcoin sales from their online store.
If you are unsure whether Blink is the right wallet for you, here are some other wallets that are supported by Coinsnap and that we recommend.

