


Introduction
Once you have installed and set up your Coinsnap Bitcoin Wallet, you are ready to send and receive Bitcoin directly from the app – either over the Lightning Network for fast everyday payments or via the Bitcoin blockchain.
In this guide, we’ll show you how to send and receive Bitcoin with the Coinsnap Wallet, step by step. You’ll learn how to scan a Bitcoin or Lightning QR code, review and confirm a payment, receive Bitcoin from someone else, and find completed payments in your transaction history.
We’ll use real payment examples throughout the guide, so you can see exactly what happens on your screen when you send or receive Bitcoin.
If you haven’t installed your wallet yet, start with our guide How to Download, Install and Set Up the Coinsnap Bitcoin Wallet in Minutes. Once your wallet is ready, you can follow the steps below. Once you have completed these steps, you’ll know exactly how to send and receive Bitcoin with your Coinsnap Wallet in everyday situations.
To send Bitcoin with the Coinsnap Wallet, scan the recipient’s Bitcoin or Lightning QR code, review the payment details, and confirm the transaction.
To receive Bitcoin, tap Receive in your wallet and share your QR code, Bitcoin address, or Lightning Address with the sender.You do not need to run your own Bitcoin or Lightning node or synchronize the blockchain. The Coinsnap Wallet handles the payment process directly in the app.
SEND BITCOIN WITH YOUR COINSNAP WALLET
Now that your Coinsnap Bitcoin Wallet is set up, you can send and receive Bitcoin directly from the app. Let’s start by sending a Bitcoin payment.
The easiest way to pay a Bitcoin or Lightning payment request is by scanning its QR code. In the following example, we’ll use the Coinsnap Wallet to make a small Bitcoin donation.
Step 1: Open Your Personal Wallet
Open the Coinsnap Wallet and make sure Personal is selected at the top of the screen.
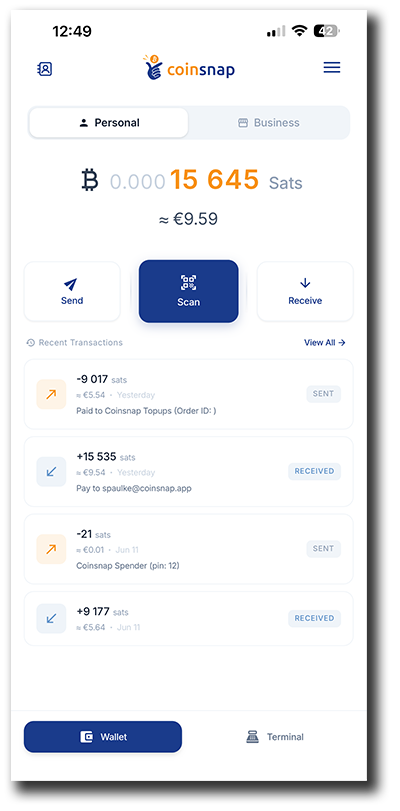
Here you can see your current Bitcoin balance as well as your recent transactions. Below your balance, you will find the three main wallet functions: Send, Scan, and Receive.
For a payment presented as a QR code, tap Scan.
Step 2: Generate the Bitcoin Payment Request
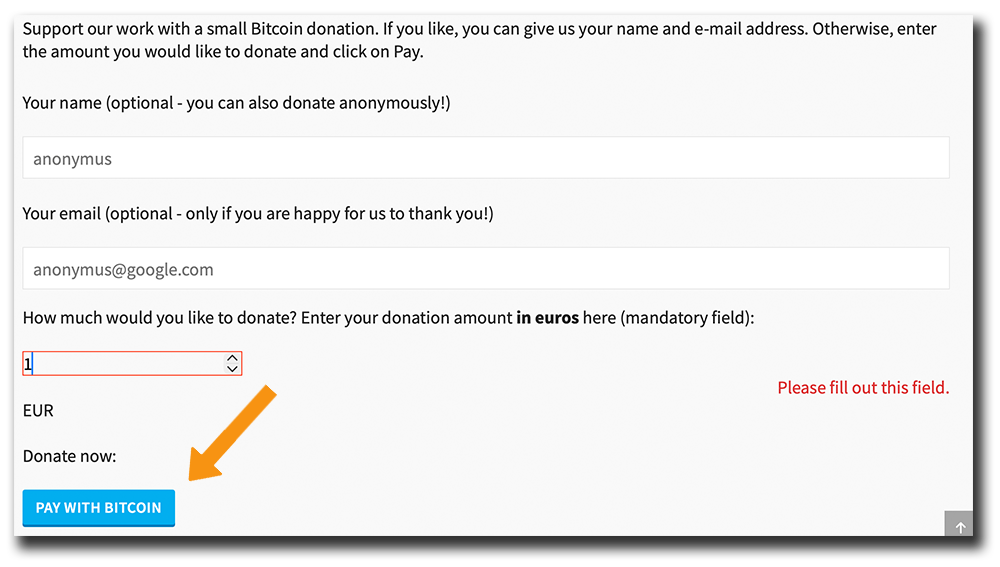
At checkout, the merchant, website, or payment recipient will usually provide a Bitcoin payment request. In our example, we enter a €1 donation and click Pay with Bitcoin.
Step 3: Find the Bitcoin Payment QR Code
The payment page now displays a QR code containing the payment information. In this example, the €1 donation corresponds to 1,393 sats.
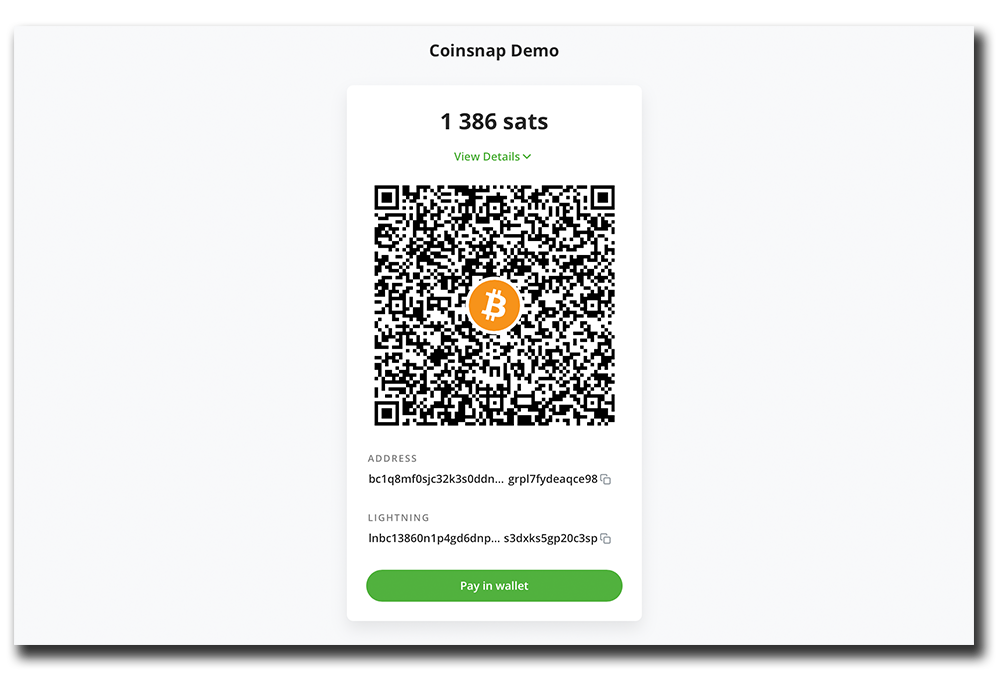
You do not need to copy the Bitcoin address or Lightning invoice manually. Simply leave the QR code visible on the screen and scan it with your Coinsnap Wallet.
Step 4: Scan the QR Code
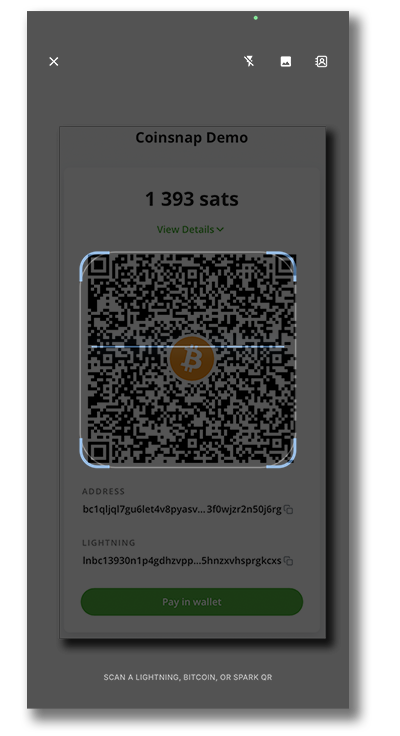
Back in your Coinsnap Wallet, tap Scan to open the QR code scanner.
Point your smartphone camera at the payment QR code. The wallet automatically recognizes the Bitcoin or Lightning payment information contained in the code.
Step 5: Review and Confirm the Payment
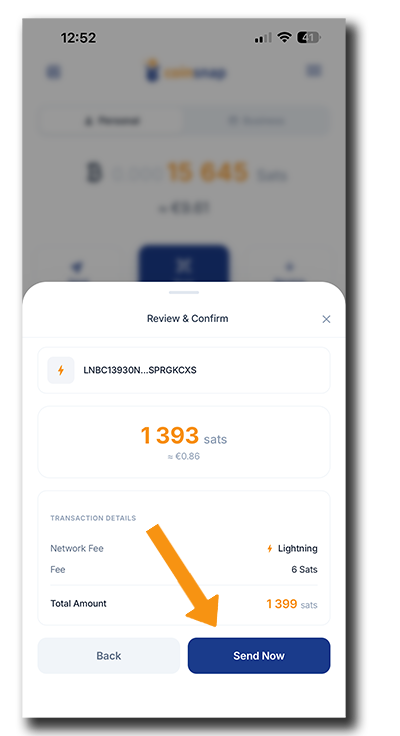
Once the QR code has been scanned, the wallet displays the payment details before anything is sent.
Check the payment amount and network fee. In our example, the payment is 1,393 sats, with a 6 sats Lightning fee, resulting in a total of 1,399 sats.
If everything is correct, tap Send Now.
Step 6: Payment Sent
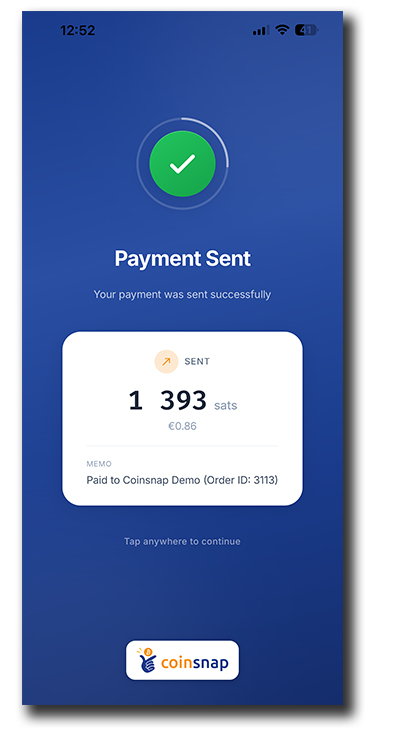
That’s it. The Coinsnap Wallet confirms that your payment was sent successfully.
Lightning payments are generally completed within seconds, so there is normally no need to wait for blockchain confirmations.
Step 7: The Recipient Confirms the Payment
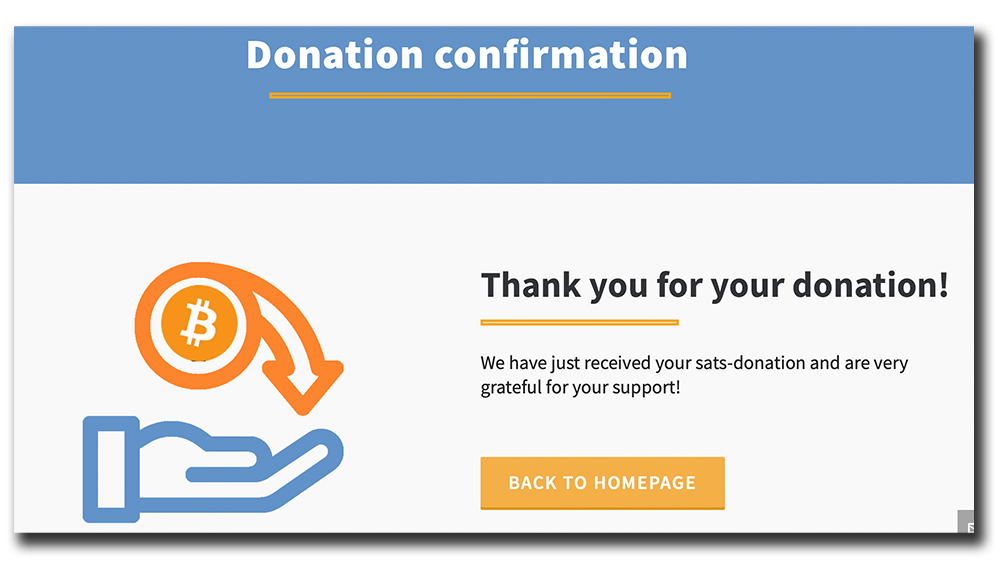
The recipient’s website can immediately recognize the successful payment. In our example, the donation page displays its confirmation as soon as the Lightning payment arrives.
Step 8: Check Your Updated Wallet Balance
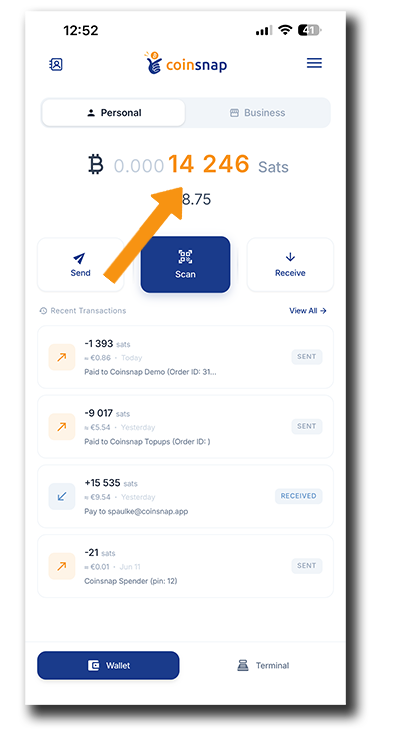
Return to your Coinsnap Wallet and you will see the payment in your recent transactions. Your Bitcoin balance has been reduced by the payment amount plus the applicable Lightning network fee.
The transaction is now part of your wallet history, so you can always review your sent and received payments directly in the app.
Your first Bitcoin payment – as simple as a scan and a few taps
As you can see, paying with Bitcoin is as simple as scanning a QR code and confirming the payment with a few taps. There are no bank details to enter, no card numbers to type in, and no complicated technical steps. With Lightning, the payment reaches the recipient within seconds – and your Coinsnap Wallet immediately shows the completed transaction.
RECEIVE BITCOIN WITH YOUR COINSNAP WALLET
The Coinsnap Wallet makes it easy to send and receive Bitcoin. After sending a payment in the first part of this guide, let’s now look at how to accept one.
You can create a payment request directly in the app and let the sender scan your QR code, or simply share your Lightning Address. In the following steps, we’ll show you how to accept Bitcoin with your Coinsnap Wallet and see the incoming payment appear in your wallet.
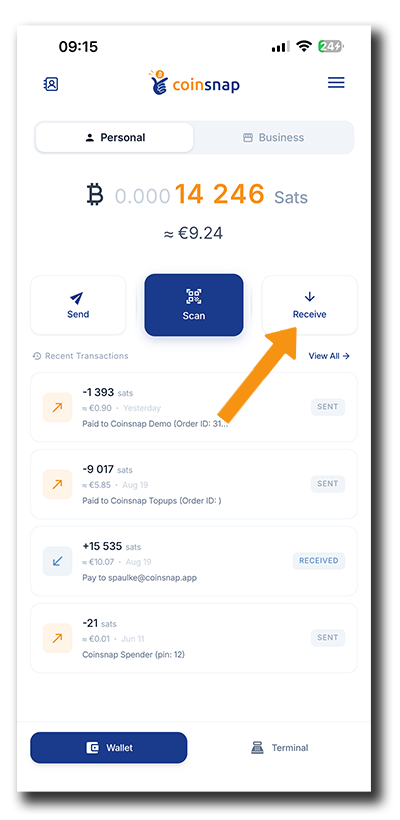
Step 1: Tap Receive
Open your Coinsnap Wallet and select the Personal or Business account you want to receive the Bitcoin payment with. Then tap Receive below your wallet balance.
Step 2: Set the Amount and Payment Reference
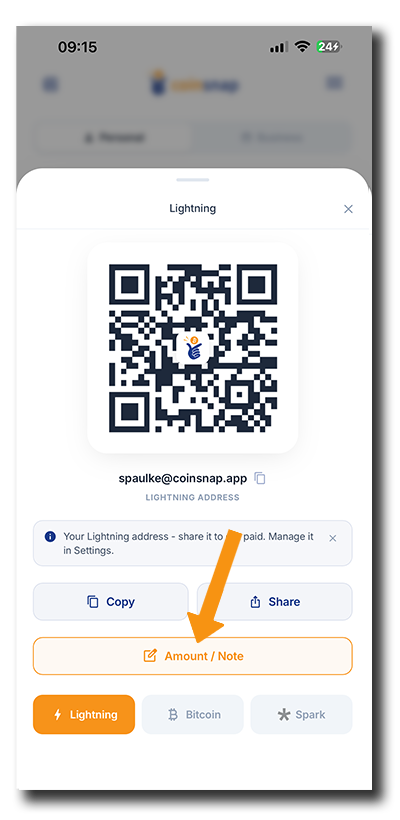
Your Lightning receive screen opens and displays your Lightning Address and QR code. If you simply want someone to send Bitcoin to your Lightning Address, you can share this QR code directly.
To request a specific amount, tap Amount / Note, enter the amount and, if desired, a payment reference, then tap Generate Invoice.
Step 3: Enter the Amount and Payment Reference
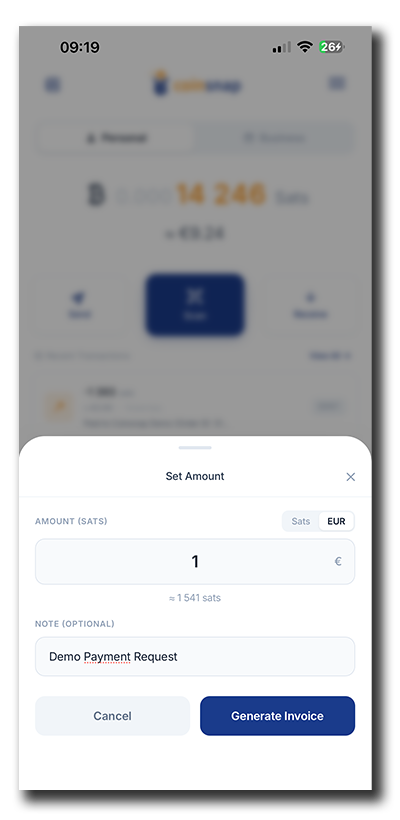
Enter the amount you want to receive. You can choose whether to enter the amount in sats or EUR – the wallet automatically displays the corresponding value in the other currency.
Optionally, enter a payment reference so you can identify the payment later in your transaction history.
When everything is correct, tap Generate Invoice to create the Lightning payment request.
Step 4: Share the Payment Request
Your Coinsnap Wallet now generates a Lightning payment request for the amount you entered. The amount, its current value in sats, and your payment reference are displayed above the QR code.
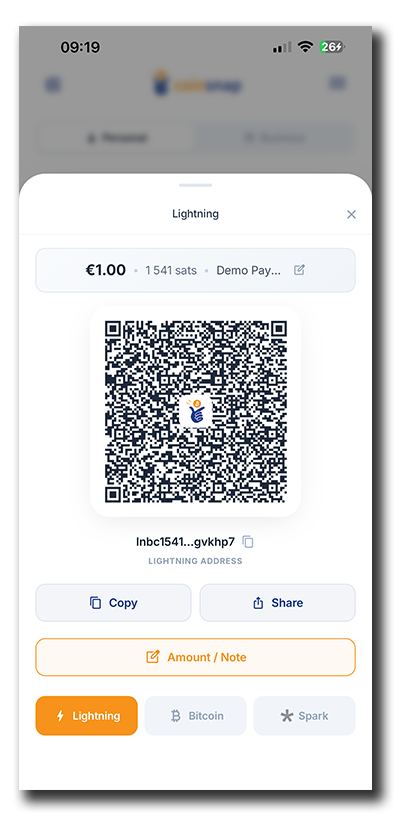
To receive the payment, you now have three ways to share the payment request with the payer:
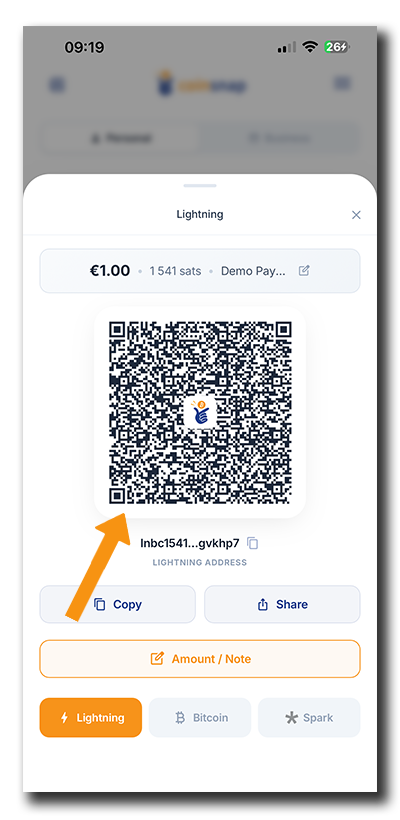
Show the QR code
If the payer is with you, simply show them the QR code on your screen. They can scan it directly with their Bitcoin or Lightning wallet and make the payment.
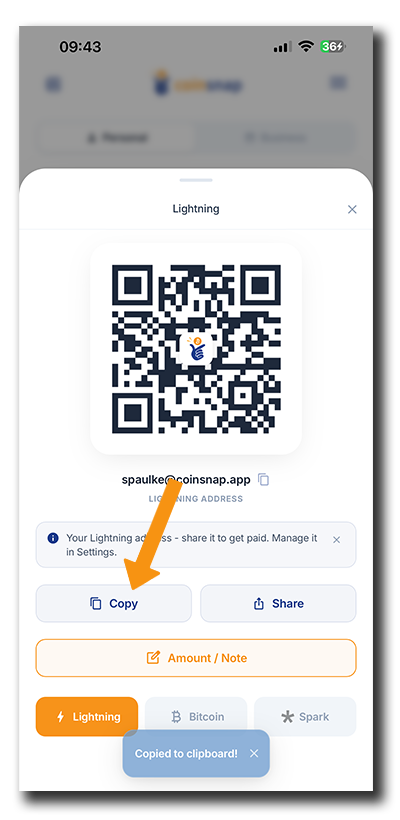
Copy the payment request
If the payer is somewhere else, tap Copy to copy the Lightning payment request. You can then paste and send it using email, a messaging app, or any other communication method you prefer.
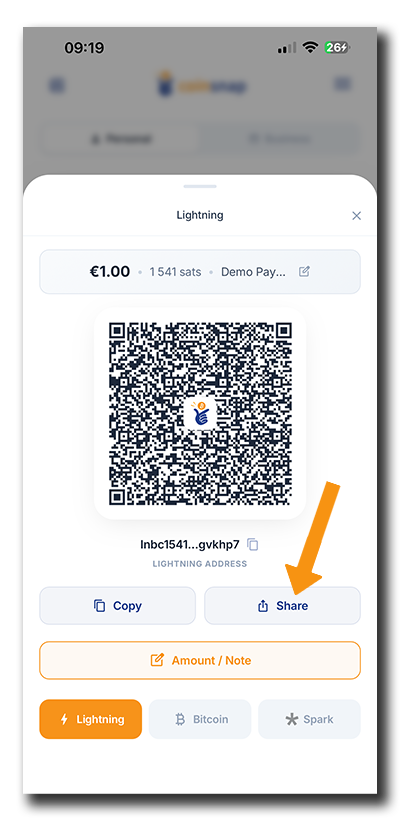
Share the payment request
Tap Share to open your smartphone’s sharing options and send the payment request directly using the available messaging, social media, email, or other sharing apps.
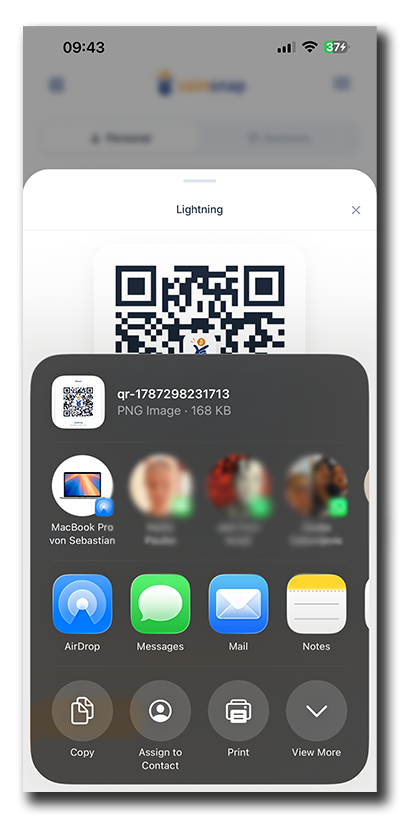
After tapping Share, your smartphone’s standard sharing menu opens. The payment QR code is prepared as an image and can now be sent directly to the payer using any of the sharing options available on your phone.
Simply select the app or contact you want to use – for example Messages, Mail, AirDrop, or another installed messaging or social media app. The payer receives the QR code and can scan it with their Bitcoin wallet to complete the payment.
As soon as the sender scans the QR code you’ve shown or sent them and approves the payment, the requested Bitcoin will be credited to your Coinsnap Wallet.
SEND AND RECEIVE BITCOIN – IT REALLY IS THAT SIMPLE
As you’ve seen, you can send and receive Bitcoin with the Coinsnap Wallet without any technical Bitcoin knowledge. To pay, scan a QR code, check the amount, and confirm. To get paid, create a payment request and show, copy, or share it with the payer.
With Lightning, payments arrive within seconds, while your wallet keeps your balance and transaction history right at your fingertips. No bank details, card numbers, Lightning node, or complicated configuration are required.
Whether you’re sending Bitcoin to someone or accepting a payment yourself, the Coinsnap Wallet turns everyday Bitcoin payments into what they should be: quick, convenient, and easy to use.
FREQUENTLY ASKED QUESTIONS ABOUT SENDING AND RECEIVING BITCOIN
To send and receive Bitcoin with the Coinsnap Wallet, you can scan a Bitcoin or Lightning QR code to make a payment or create your own payment request to receive one. The Coinsnap Wallet supports both Bitcoin and Lightning payments directly in the app.
To send Bitcoin, open your Coinsnap Wallet and tap Scan to scan the recipient’s Bitcoin or Lightning payment QR code. Review the amount and applicable network fee, then tap Send Now to confirm the payment.
Tap Receive in your Personal or Business wallet. You can share your Lightning Address directly or enter a specific amount and payment reference to generate a Lightning payment request. The payer can then scan the QR code or receive the payment request from you digitally.
Yes. Your Coinsnap Wallet provides you with a Lightning Address that works similarly to an email address. You can share this address with someone who wants to send you Bitcoin over the Lightning Network.
Yes. QR codes are one of the easiest ways to send and receive Bitcoin. To pay, scan the recipient’s payment QR code with your Coinsnap Wallet. To receive a payment, show or share the QR code generated by your wallet with the payer.
Lightning payments are typically completed within seconds. Once the payment has been successfully processed, it appears in your Coinsnap Wallet and transaction history.
No. You do not need to run your own Lightning node or synchronize the Bitcoin blockchain to send and receive Bitcoin with the Coinsnap Wallet. The wallet lets you make and receive Bitcoin and Lightning payments directly from the app.
Yes. The Coinsnap Wallet provides separate Personal and Business accounts. You can use your Personal wallet for private Bitcoin payments and your Business wallet for payments related to your business.
The Complete Coinsnap Bitcoin Wallet Guide
Everything you need to get started with the Coinsnap Bitcoin Wallet, Bitcoin POS, and the business management tools behind it is covered in our four-part Coinsnap Bitcoin Wallet Guide.
From installing your wallet and setting up your first POS and terminals to managing sales, transactions, orders, fees, accounting, and reporting, we have broken the complete process down into four practical step-by-step guides:
- Coinsnap Bitcoin Wallet Setup: Install and Set Up Your Wallet — Install your Coinsnap Wallet, create your personal and business Lightning addresses, and get ready to receive Bitcoin.
- How to Send and Receive Bitcoin with the Coinsnap Wallet — Pay for something with Bitcoin, or create a payment request for someone to pay you.
- Coinsnap Bitcoin POS Setup: How to Set Up Your POS, Terminals and Products — Create your POS, connect your terminals, and configure your product catalogue.
- Coinsnap POS Dashboard: The Cockpit of Your Bitcoin Business — Monitor your Bitcoin business, manage transactions and orders, choose how you receive your funds, and prepare the records you need for accounting and reporting.
From your first wallet setup to your first Bitcoin sale – and from that sale to your accounting records – these four guides give you everything you need to run your Bitcoin POS business with Coinsnap.