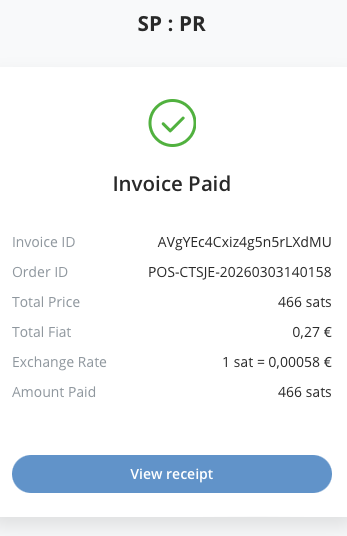
After successful payment, the terminal displays a success screen confirming that the Bitcoin transaction has been completed. The confirmation appears within seconds (especially for Lightning payments), and the transaction is automatically recorded in your Coinsnap dashboard.
Bitcoin Point of Sale User Guide
This User Guide shows you how to accept on-site Bitcoin and Lightning payments using the Coinsnap Bitcoin Point of Sale. It explains the requirements, how to create and use your Point of Sale interface, how to configure all relevant settings, and how to accept in-person Bitcoin payments instantly — without payment terminals, special hardware, or complex checkout systems.
Get paid anywhere in the real world with Bitcoin — using nothing more than an internet-connected device.

Introduction
What is the Bitcoin Point of Sale? The Coinsnap Web-PoS is a browser-based payment interface that allows you to:
- Enter a payment amount on-site
- Generate a Bitcoin & Lightning QR code instantly
- Let customers scan and pay
- Receive funds directly in your connected wallet or settlement account
- Track transactions inside your Coinsnap dashboard
The Coinsnap Bitcoin-PoS works entirely in any browser — no special hardware, no payment terminals, no infrastructure providers with monthly fees, no technical implementation, and no coding skills required.
GET STARTED – REQUIREMENTS
To use the Coinsnap Bitcoin Point of Sale, you need:
- An active Coinsnap account
- A connected Bitcoin-Lightning wallet
- A smartphone, tablet, or computer with internet access— used as your payment terminal directly in the browser
- Access to your Coinsnap dashboard
No app installation is required. The Bitcoin-PoS is configured in your Coinsnap dashboard and runs entirely in your browser.
Step 1 - create a Bitcoin Point of Sale
In your Coinsnap dashboard, navigate to Pay-tools -> PoS & Terminals [1].
You now have 3 options: Click on Quick Setup or + New PoS [2], or choose Manual Setup [3].

Since it is the simplest and fastest option, we will begin with Quick Setup: Click Quick Setup, and the following configuration screen will appear:
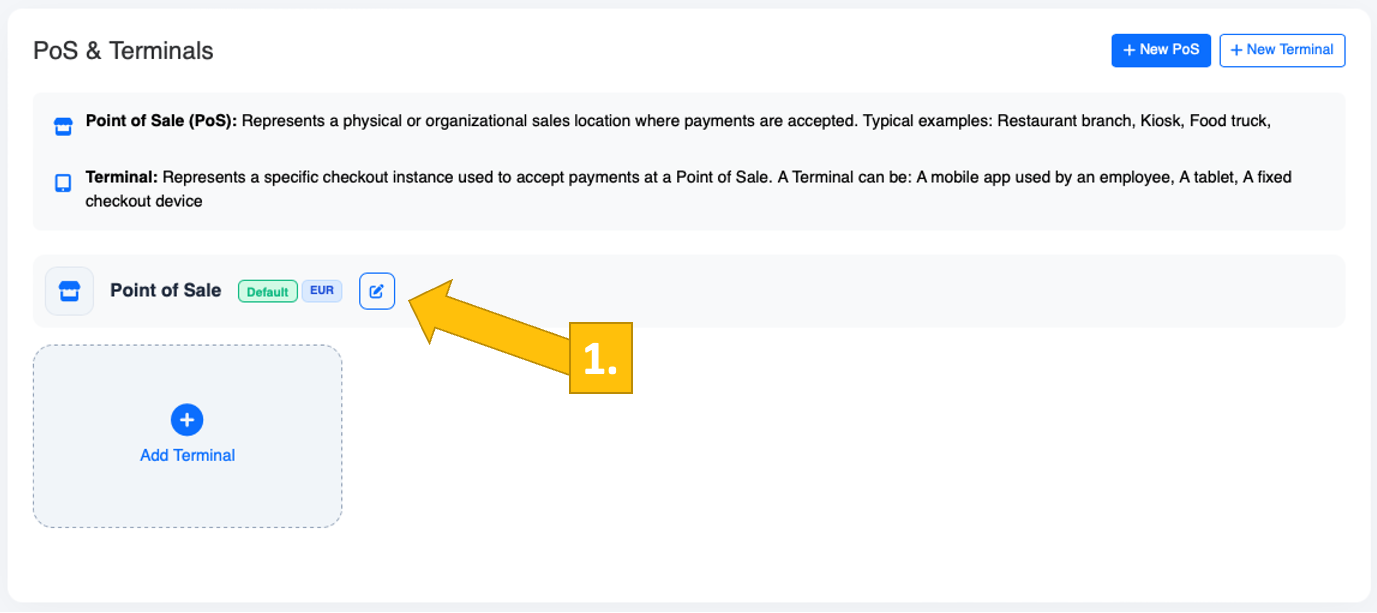
Your Bitcoin PoS has now been created.
To adjust it to your CI and branding, click the pencil icon [1] to open the configuration settings.
Step 2 - configure your Bitcoin PoS
After clicking the pencil icon, the Edit Point of Sale configuration window opens. Here you can define all relevant settings for your PoS.
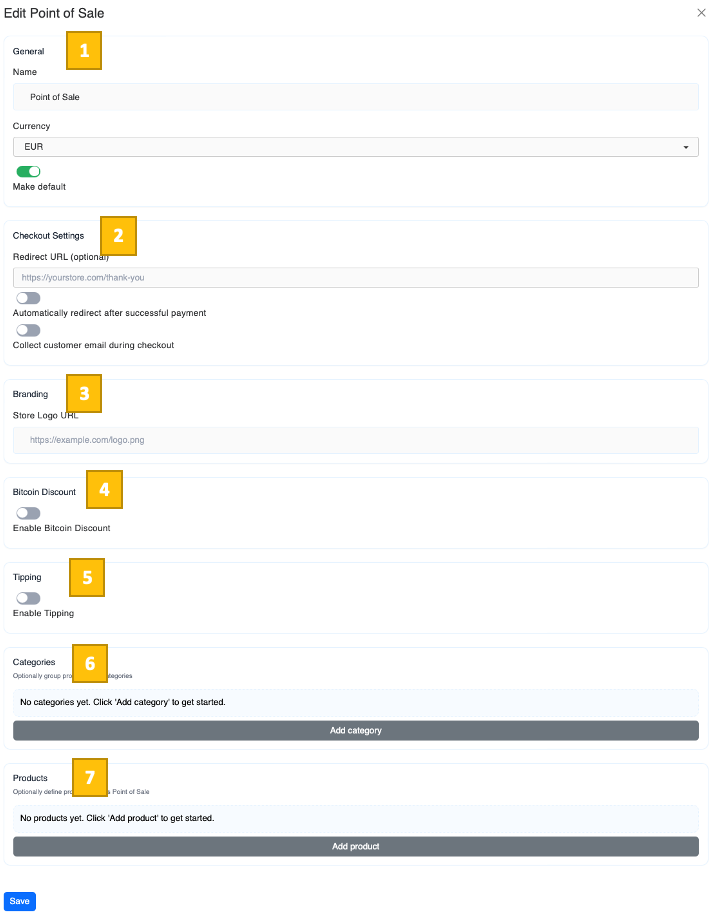
[1] General Settings
Name
Enter a name for your PoS (e.g., Main Counter, Bar Terminal, Event Booth). This helps you distinguish between multiple PoS instances in your dashboard.
Currency
Select the fiat currency in which you want to enter invoice amounts (e.g., EUR, USD, RSD). The system will automatically calculate the corresponding Bitcoin amount at the current exchange rate.
Make Default
Enable this option if this PoS should be your default terminal when opening the PoS interface.
[2] Checkout Settings
Redirect URL (optional)
Enter a custom URL (e.g., https://yourstore.com/thank-you) if customers should be redirected to a specific page after successful payment.
Automatically redirect after successful payment
Activate this toggle if customers should be redirected automatically to the defined URL after payment confirmation.
Collect customer email during checkout
Enable this option if you want to collect the customer’s email address during the payment process (e.g., for receipts or internal documentation).
[3] Branding
Store Logo URL
Enter the direct URL of your company logo (e.g., https://example.com/logo.png). This logo will be displayed on the PoS payment page to match your corporate identity.
[4] Bitcoin Discount
Enable Bitcoin Discount
Enable Bitcoin Discount to offer customers a price incentive when paying with Bitcoin. Choose the discount type (percentage or fixed amount) and define the value. This is a simple and effective way to encourage Bitcoin payments!

[5] Tipping
Enable Tipping
Activate this option to allow customers to add a voluntary tip during checkout. This is great for restaurants, cafés, and service providers.
[6] Categories
Define product categories to group similar products together in your PoS terminal. Products assigned to the same category will be displayed as clustered groups, making the interface clearer and faster to use during checkout.
[7] Products (Optional)
You can optionally define products for this PoS.
Click Add product to:
- Define product name
- Set a fixed price
- Enter the SKU
- Assign a product category

If no products are defined, you can manually enter the payment amount for each transaction.
Save Your Configuration
After completing all settings, click Save to apply your configuration.
Your Bitcoin Point of Sale is now fully configured and ready to accept Bitcoin and Lightning payments.
Step 3 - Setting up terminal(s)
To use it in the real world, open the PoS link on a smartphone or tablet by entering the URL into a browser.
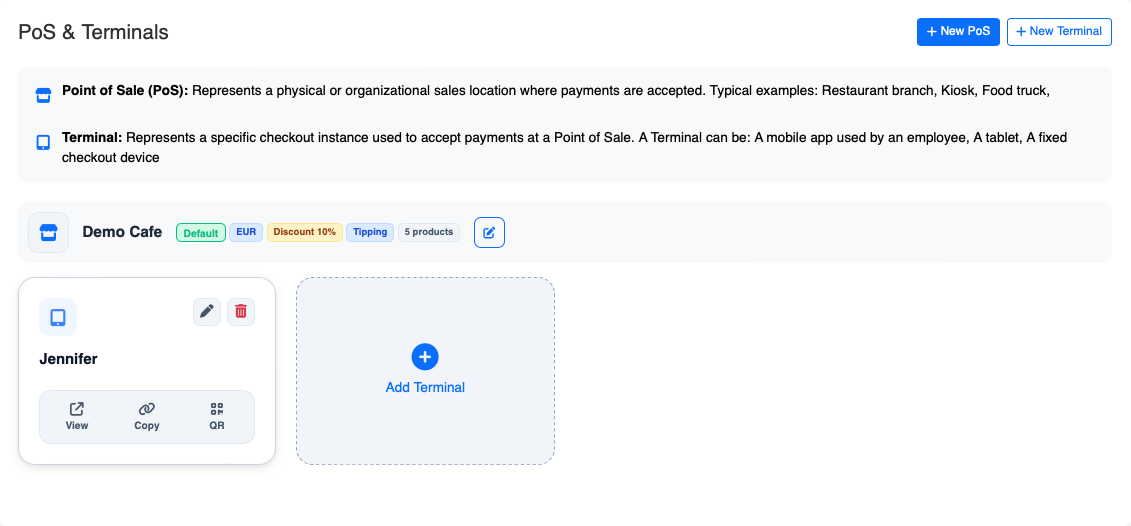
Next, we will show you how to set up one or multiple terminals for daily operation. After saving the PoS configuration, you will see the following overview screen:
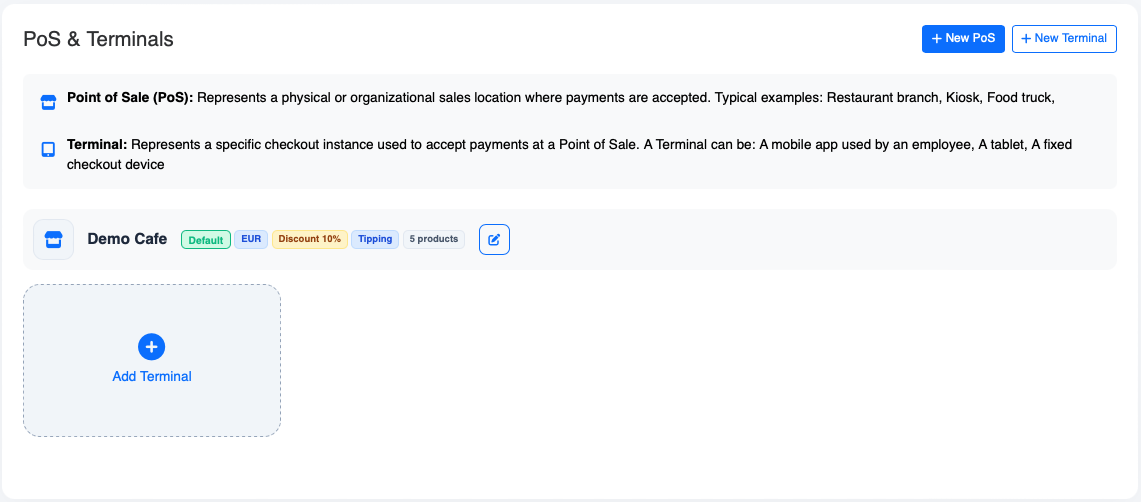
As you can see, a terminal is already created for you by default. Since this terminal defines what your customers see during payment, you should customize it to match your needs. Click on + Add Terminal to edit the terminal settings.
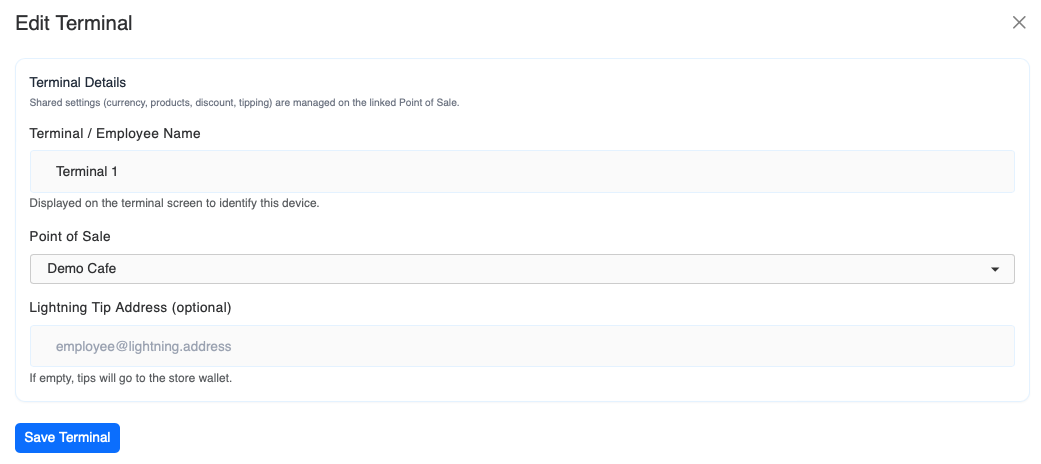
Enter the name of the terminal (e.g., Foodtruck 1) or the employee using it (e.g., Jennifer).
If you operate multiple PoS instances, select the one this terminal should be connected to.
Then enter the Lightning wallet address of the employee who should receive the tips collected through this terminal.
Click Save Terminal. You will be sent back to the Pos/Terminal overview, where you can see the customized terminal (Jennifer):
If you have additional waiters or multiple outlets, click Add Terminal and repeat the configuration process for each terminal accordingly.
Step 4 - convert a mobile device into a terminal
Turning any mobile device with a browser into a dedicated Bitcoin payment terminal is straightforward.
Click the Link icon in the terminal settings and copy the URL [1].
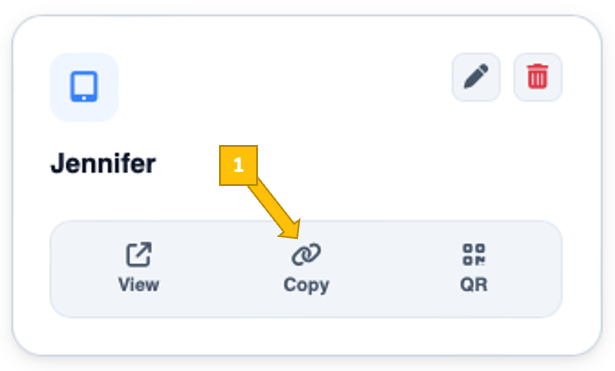
Send this link to the device you want to use, open a browser, and paste the link into the address bar. Press Enter — and the Bitcoin PoS will open instantly on that device:

Jennifer’s Bitcoin payment terminal is now open on the device, displaying the predefined product categories. She can immediately use it to charge her customers. How the payment process works is explained in the next section.
If no products were configured, the terminal will open in keypad mode, allowing the amount to be entered manually for each transaction:

Step 5 - working with your Bitcoin PoS
In practice, using the terminal for Bitcoin payments is very simple.
Let’s say Jennifer’s guest had an espresso and a donut. Jennifer simply opens the Coffee category and taps the Espresso button once. Then she opens the Pastries category and taps the Donut button:
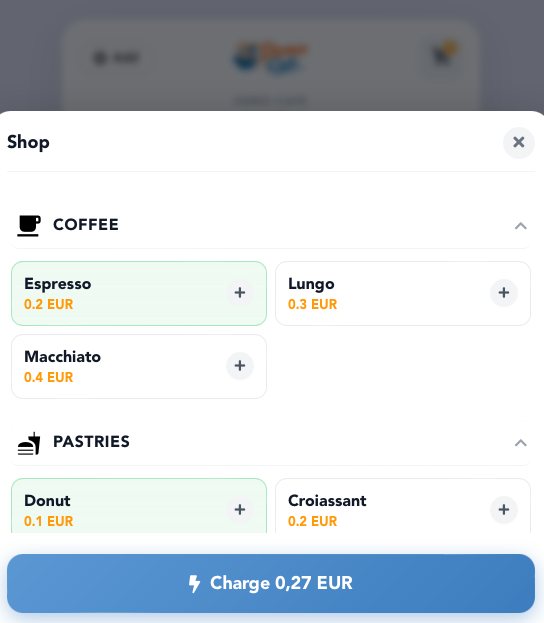
Once Jennifer has added all of the guest’s purchases, she clicks Charge to initiate the payment and shows the screen to the customer so they can optionally add a tip:
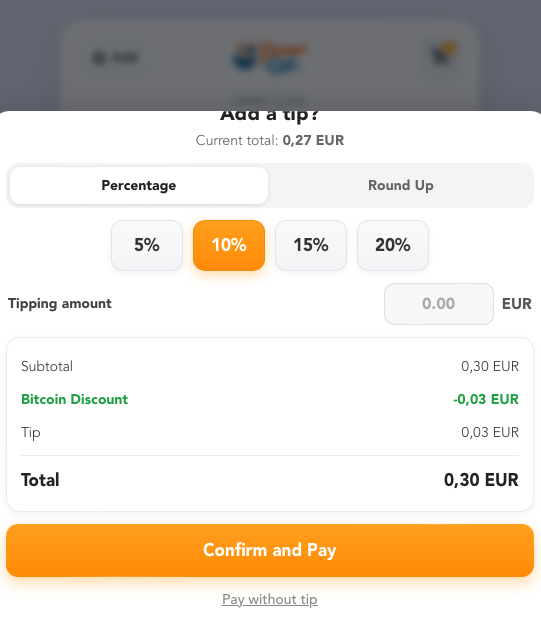
The customer can now select a predefined tip percentage, enter a custom tip amount, or simply choose to round up the bill:
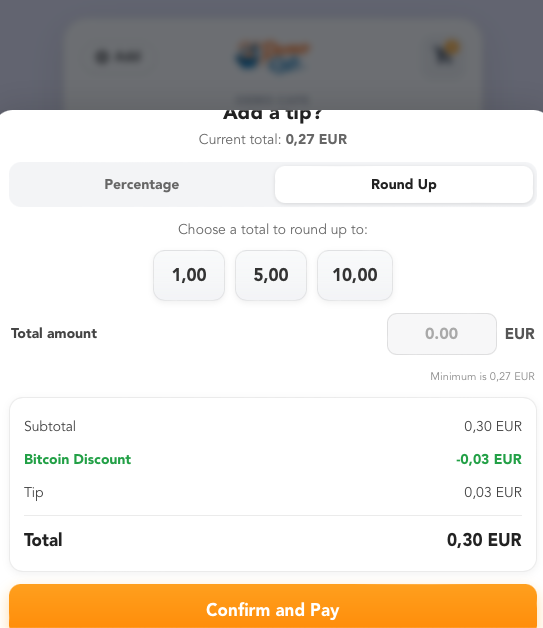
Once the customer has chosen the tip, either they or Jennifer clicks Confirm and Pay.
The terminal will then switch to the checkout view and display the total amount due, the configured Bitcoin discount (if enabled), the billed products including quantities (highlighted), the complete cart overview, and the Charge button to initiate the payment. (Depending on the device, you may need to scroll down to reach the Charge button at the bottom of the screen.)

Jennifer now shows the screen to her guest for confirmation. Once approved, she taps Charge to generate the Bitcoin payment request.
The QR code for the Bitcoin payment is now generated. It supports both Lightning and on-chain transactions.

The customer scans the QR code with their Bitcoin Lightning wallet and authorizes the payment.
Tip: Add the Bitcoin PoS Terminal as an Icon on Your Smartphone
To use the terminal like a real app, add it to your home screen. This allows you to open the Bitcoin PoS with a single tap — without entering the URL each time.
-
Open the PoS link in your mobile browser (Safari on iPhone or Chrome on Android).
-
Tap the Share icon (Safari) or the three-dot menu (Chrome).
-
Select “Add to Home Screen.”
-
Confirm the name (e.g., Foodtruck 1 or Jennifer).
-
Tap Add.
The Bitcoin PoS will now appear as an app-style icon on your home screen and can be launched instantly like a native payment terminal!
Frequently Asked Questions
What Users Ask About This plugin
Do I need special hardware?
No. Web POS runs on any browser-enabled device — smartphone, tablet, laptop, desktop.
Do customers need a specific wallet?
Customers can use any Lightning-enabled wallet or compatible Bitcoin wallet.
Can I run Web POS on multiple devices at the same time?
Yes. You can open the Web POS on as many devices as you want, which is ideal for teams or multi-counter shops.
Can I set custom amounts or currencies?
Yes. You enter the amount in your preferred fiat currency, and Coinsnap converts it automatically to BTC.
Where do the payments go?
All payments are forwarded directly to your Lightning wallet as configured in your Coinsnap merchant account.
Can employees receive their own tips?
Yes. You can assign a dedicated Lightning wallet address to each terminal for tip payments.
Can I use the PoS without predefined products?
Yes. If no products are configured, the terminal opens in keypad mode, allowing you to enter the amount manually.
Can I upload products in bulk?
Yes. Instead of adding products manually, you can upload them via CSV file. This allows you to quickly import larger product lists into your Bitcoin PoS and manage them efficiently.
