Bitcoin Payment Button User Guide
This User Guide shows you how to accept Bitcoin and Lightning payments using the Coinsnap Bitcoin Payment Button. It explains the requirements, how to create and manage payment buttons, how to configure all relevant settings, and how to embed or share payment buttons to accept Bitcoin payments instantly — without a shop system or complex checkout.
Get paid with a simple Bitcoin payment button — powered by Bitcoin (on-chain + Lightning).

INTRODUCTION
The Bitcoin Payment Button is the fastest way to add Bitcoin and Lightning payments to any online environment. Whether you operate a custom website, a landing page, a blog, a static HTML site, or a web application, you can simply generate the button in your Coinsnap dashboard and embed it using a small HTML snippet.
It is ideal for anyone who needs a simple, efficient Bitcoin payment option without implementing a full checkout system. When visitors click your button, they are instantly redirected to a Bitcoin/Lightning invoice with a QR code. From there, they complete the payment with their preferred Lightning or Bitcoin wallet. Once the payment is processed, the funds are sent directly to the Lightning address you configured in your Coinsnap account.
We will now show you how to set up a Bitcoin payment button and how to implement it on your website to sell anything you like.
Requirements
- An active Coinsnap account
- A valid email address registered with Coinsnap
- Your Coinsnap Store ID
- A connected Bitcoin / Lightning wallet to receive payments
Website & Technical Requirements
- A website of any type (Custom CMS, landing page, custom website, etc.)
- The ability to insert custom HTML code into this website
- Permission to paste the Coinsnap Bitcoin Payment Button HTML snippet at the desired location on your site
That’s it — no shop system, no coding, no additional plugin
Step 1 - Create a Bitcoin payment button
In your Coinsnap account dashboard, go to Pay-Tools → Pay-Button [1]. Then click Create a Pay-Button [2].
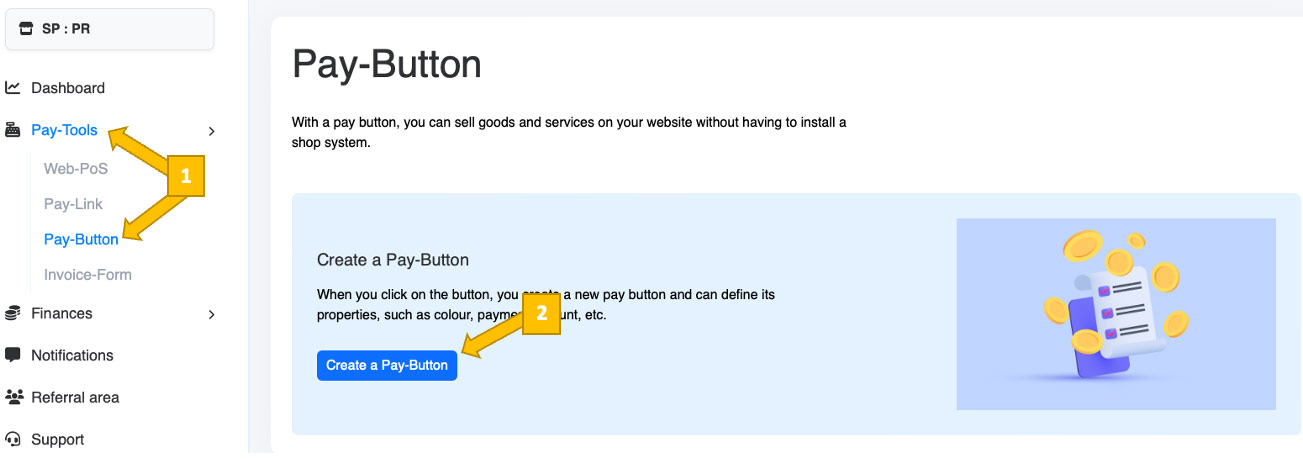
You will now get to see this:
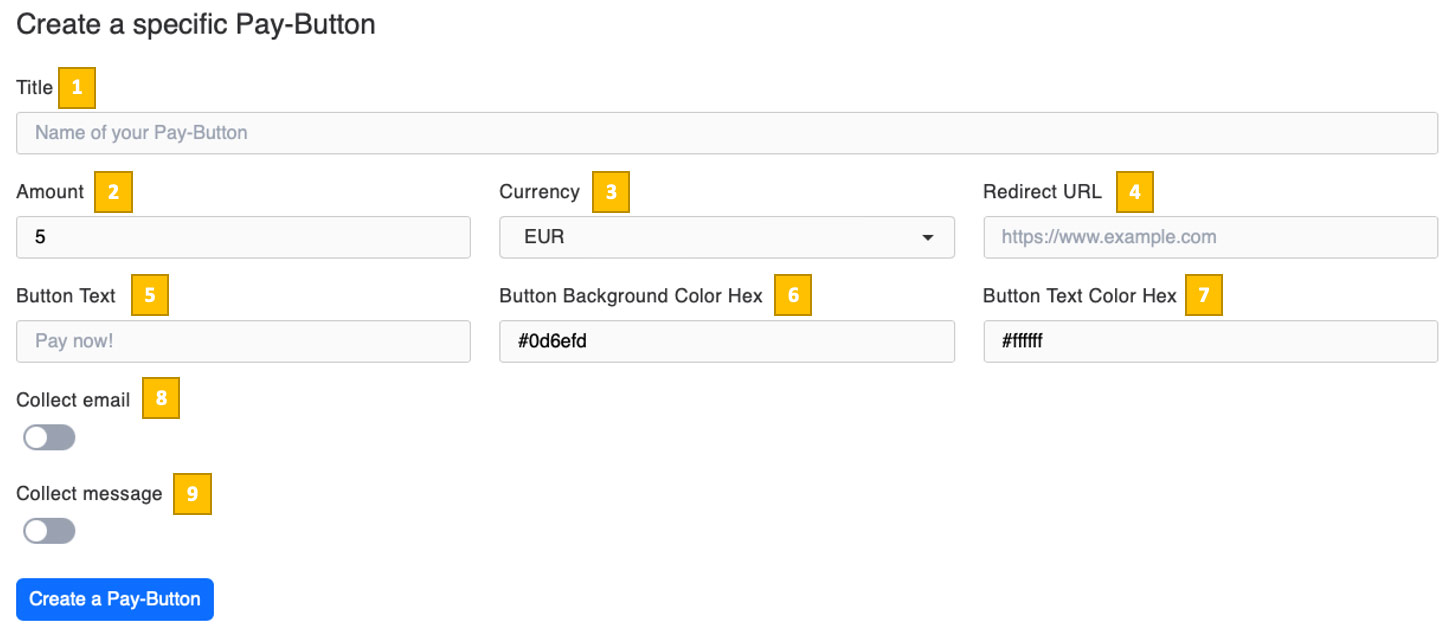
[1] Title
Enter a name for the payment button to help you identify it later in your Coinsnap dashboard. This title is also displayed at the top of the Bitcoin payment box shown to your website visitors.
[2] Amount
Define the fixed payment amount the customer must pay when clicking the button.
[3] Currency
Select the currency used to display your sales price (e.g. EUR, USD, CAD, JPY, GBP, or CHF). You can also choose BTC or SATS. If you do not select SATS, Coinsnap automatically converts the amount to SATS at payment time.
[4] Redirect URL
Optionally enter a URL where the customer should be redirected after a successful payment (for example, a thank-you or confirmation page).
[5] Button Text
Customize the text shown on the payment button (e.g. “Pay now!”, “Buy with Bitcoin”, “Pay with Lightning”).
[6] Button Background Color (Hex)
Set the background color of the payment button using a hexadecimal color code.
[7] Button Text Color (Hex)
Set the text color of the payment button using a hexadecimal color code.
[8] Collect email
Enable this option if you want to collect the payer’s email address during the payment process.
[9] Collect message
Enable this option if you want to allow the payer to leave an optional message together with the payment.
Once you have configured the payment button, click the Create a Pay-Button button to generate the Bitcoin Payment Button and its corresponding HTML snippet, which you can then embed on your website.
Step 2 - Embed your Bitcoin Payment Button
After clicking Create a Pay-Button, you will see this:
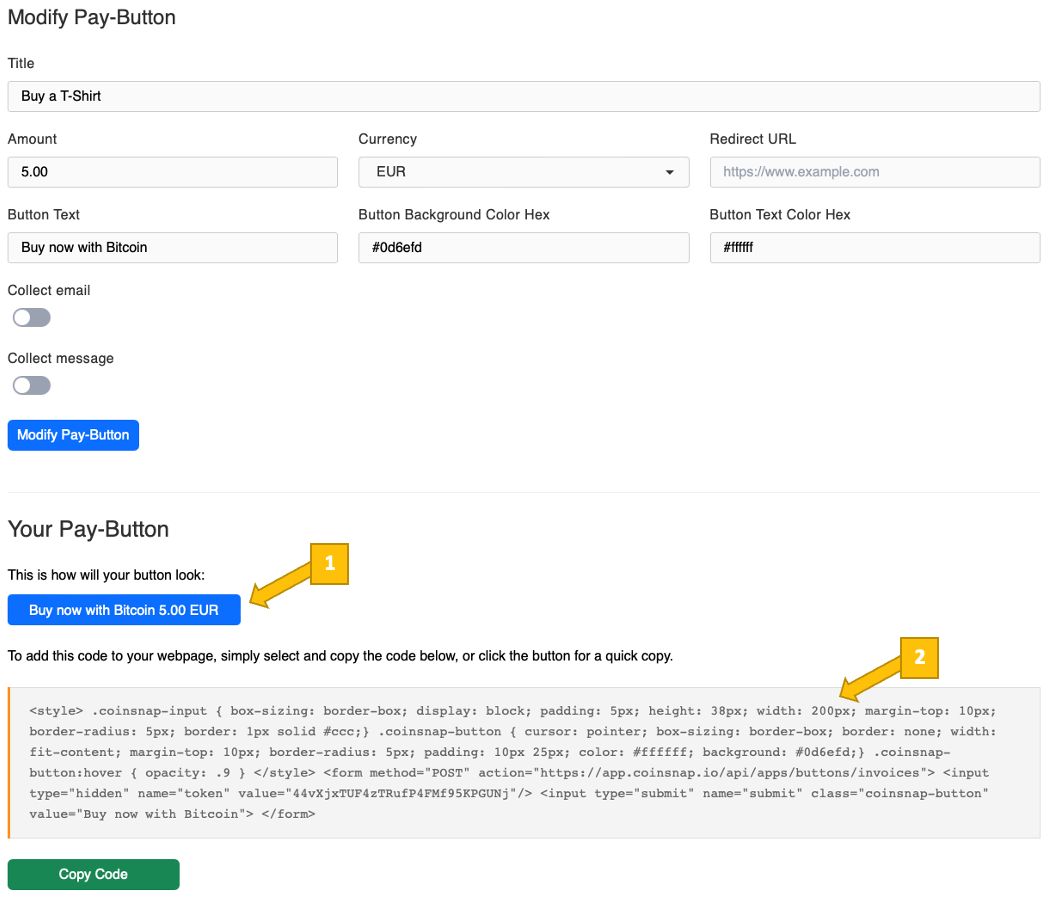
In the lower half of the screen, you will now see the Bitcoin Payment Button [1] as it will appear on your website, along with the HTML code [2].
To place the button on your website, simply paste the generated HTML code [2] at the location where you want to accept Bitcoin payments.
Frequently Asked Questions
What Users Ask About This plugin
Do I need a full shop system like WooCommerce to use the Payment Button?
No. The Payment Button is specifically designed for websites where a complete shop system would be oversized. You simply place the button under a product or service description, and customers can pay directly with Bitcoin.
Can I create more than one Payment Button?
Yes. You can create multiple buttons in the Pay-Tools → Pay button section — for different products, services, or price points — and embed each one wherever it’s needed on your site.
Can I collect the customer’s email or a message with the payment?
Yes. While creating the button, you can enable Collect Email and/or Collect Message to request these details on the payment page. This is useful for digital delivery, support, or identifying the buyer.
Will the button match my website’s design?
The preview in Coinsnap shows a generic version of the button, but in the configuration you can define both the button background color and the button text color to match your corporate identity.
Where do the funds go after a customer pays?
All Bitcoin and Lightning payments are forwarded directly to the Lightning address or wallet you configured in your Coinsnap account. Coinsnap does not hold your funds; they are credited straight to you.
