WordPress Bitcoin Shoutout Installation Guide
This installation guide shows you how to accept Bitcoin and Lightning shoutouts on your WordPress website using the Coinsnap Bitcoin Shoutout plugin for WordPress. It guides you through the technical requirements, plugin installation, connecting your site to your Coinsnap account or a BTCPay Server, configuring all relevant settings, and enabling paid Bitcoin shoutouts on your pages or via shoutout buttons.
Allow shoutouts on your website for a fee payable in Bitcoin.


Requirements
THESE REQUIREMENTS MUST BE MET FOR BITCOIN SHOUTOUTS TO FUNCTION CORRECTLY:
IMPORTANT NOTE
To offer Bitcoin Shoutouts on your website, you must install the Coinsnap Bitcoin Donation plugin!
WordPress & Bitcoin Shoutouts
- A self-hosted WordPress website
- Bitcoin Donation (!) installed and activated
Coinsnap & Payments
For this plugin, you need either a Coinsnap account with a Lightning address or your own BTCPay Server
- An active Coinsnap account
-> How to set up a Coinsnap account
- A connected Bitcoin Lightning wallet (self-custodial wallet or BTCPay Server)
-> How to get a Lightning address
- The installed Coinsnap Bitcoin Donation plugin
->How to install the plugin and connect it with your Coinsnap account or your BTCPay Server
Server & Access
- Ability to install and activate WordPress plugins
- HTTPS (SSL) enabled on the website
Bitcoin Shoutouts Setup
- At least one Bitcoin Shoutout created (to enable a test payment)
STEP 1 - CONFIGURE AND CUSTOMIZE THE PLUGIN
All the requirements listed above are met, and you have successfully installed the plugin in your WordPress. If not, here is a Step-by-step: How to install a Coinsnap plugin in WordPress guide to help you install the plugin.
You will soon be able to accept Bitcoin payments (on-chain and Lightning) directly from simple Bitcoin Donation forms anywhere on your website — without the need for a complex shop system like WooCommerce or traditional payment providers such as credit cards or PayPal. But before you can do that, you need to configure Bitcoin payments in your Bitcoin Donation plugin.
HOW TO CONFIGURE THE PLUGIN
1. Choose and set up your payment provider
After installing and activating the Bitcoin Invoice Forms plugin, you need to configure a Bitcoin payment gateway connection, either with Coinsnap or with a BTCPay Server.
In the WordPress admin dashboard, go to Coinsnap Bitcoin Donation [1] → Settings [2] in the left-hand sidebar.
You will now see the following screen:
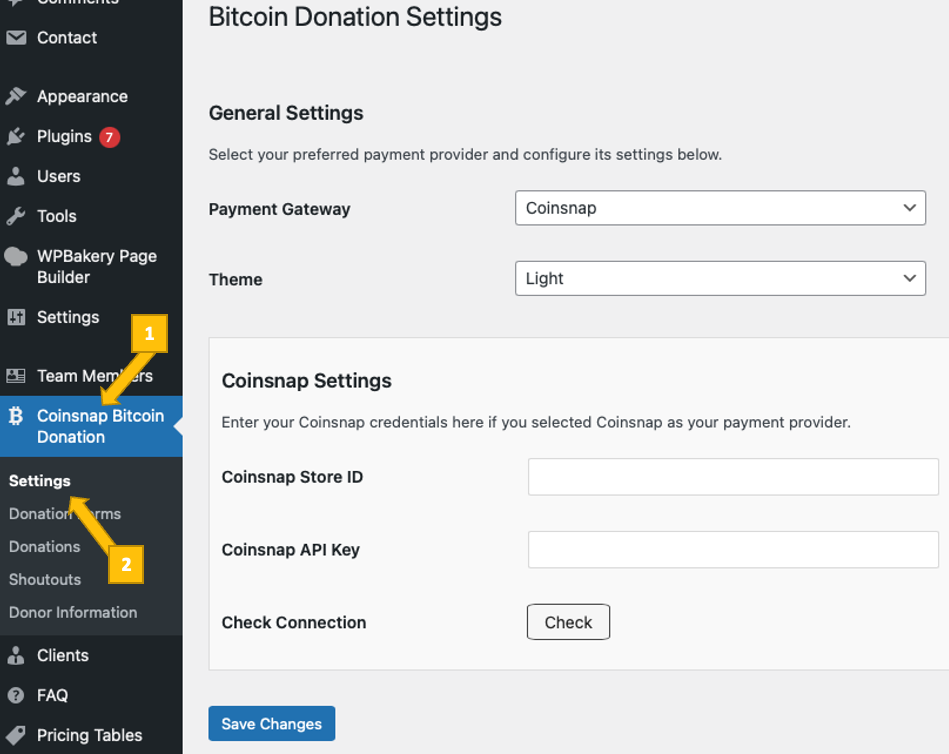
You now need to choose between two payment gateways: Coinsnap or your own BTCPay Server, and to enter your Store ID and API Key.
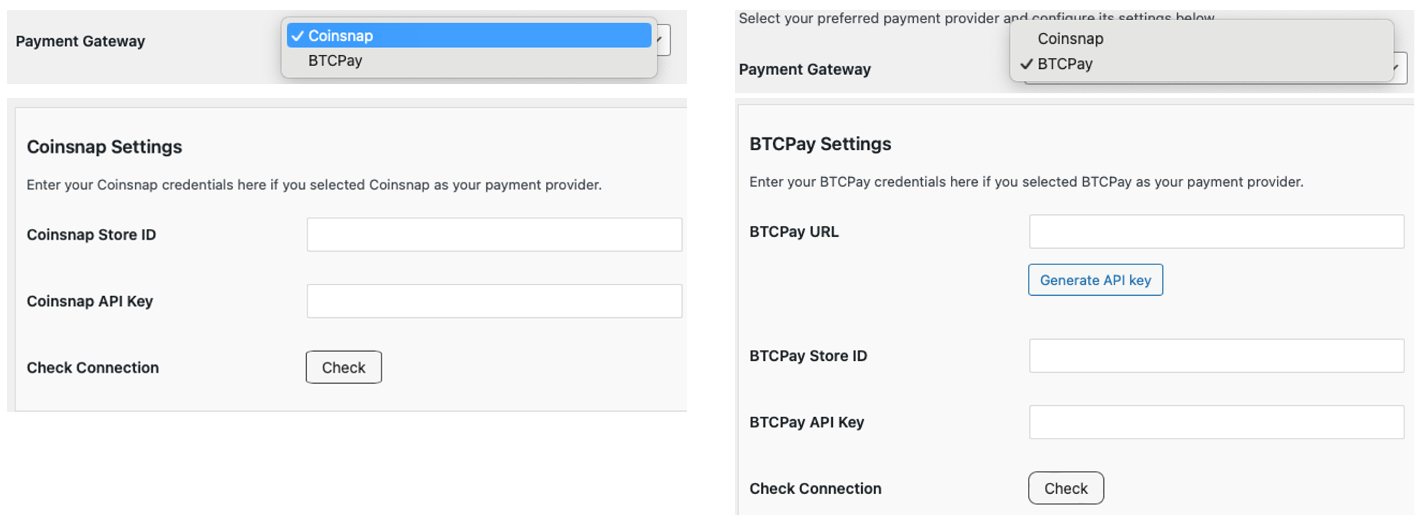
Coinsnap
Coinsnap is the easiest option. Coinsnap handles the technical setup for you and connects your store to Bitcoin and Lightning payments with just a few clicks. It’s ideal if you want a quick, hassle-free solution without managing your own payment infrastructure.
Learn here how to retrieve your Coinsnap Store ID and API Key:
-> Step-by-step explanation: How to connect your Coinsnap account with your plugin
BTCPay Server
BTCPay Server is a self-hosted option for merchants who want full control. You run your own Bitcoin and Lightning payment server, manage your own wallets, and don’t rely on a third party. This option offers maximum independence but requires more technical setup and maintenance.
Learn how to retrieve your Store ID and API Key using our BTCPay Server wizard here:
-> Step-by-step explanation: How to connect your BTCPay Server with your plugin
Check Connection
Whichever gateway you’ve set up, once you’re done, click the check button.
![]()
If everything went well, you should now see something like this at the top of the settings screen:
![]()
2. Choose a theme
You can also choose the color scheme for your Bitcoin donation forms — light or dark — to match the design and style of your website.

STEP 2 - CREATE A BITCOIN SHOUTOUT FORM
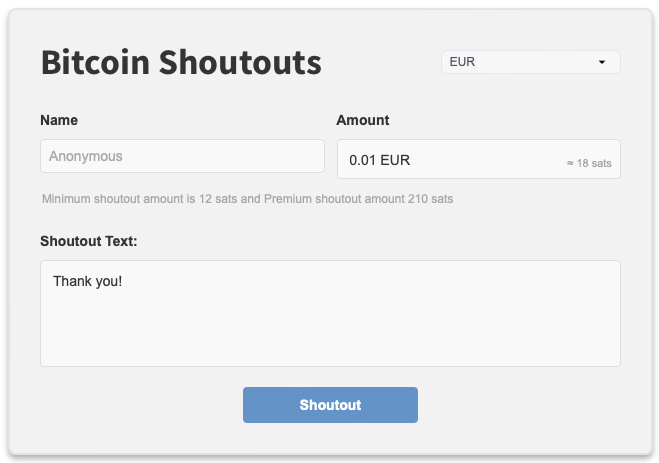
With the Coinsnap Bitcoin Shoutout plugin, you can turn any WordPress page into a paid interaction and comment system where visitors leave messages, comments, and shoutouts only after paying a small amount in Bitcoin or Lightning. Instead of free, low-quality comments and spam, you create a value-based conversation space where only users who truly care participate.
Go to Coinsnap Bitcoin Donation → Donation Forms in the left sidebar of your WordPress backend. Then open the Shoutout Donation tab on the top [1]. You’ll see this screen:
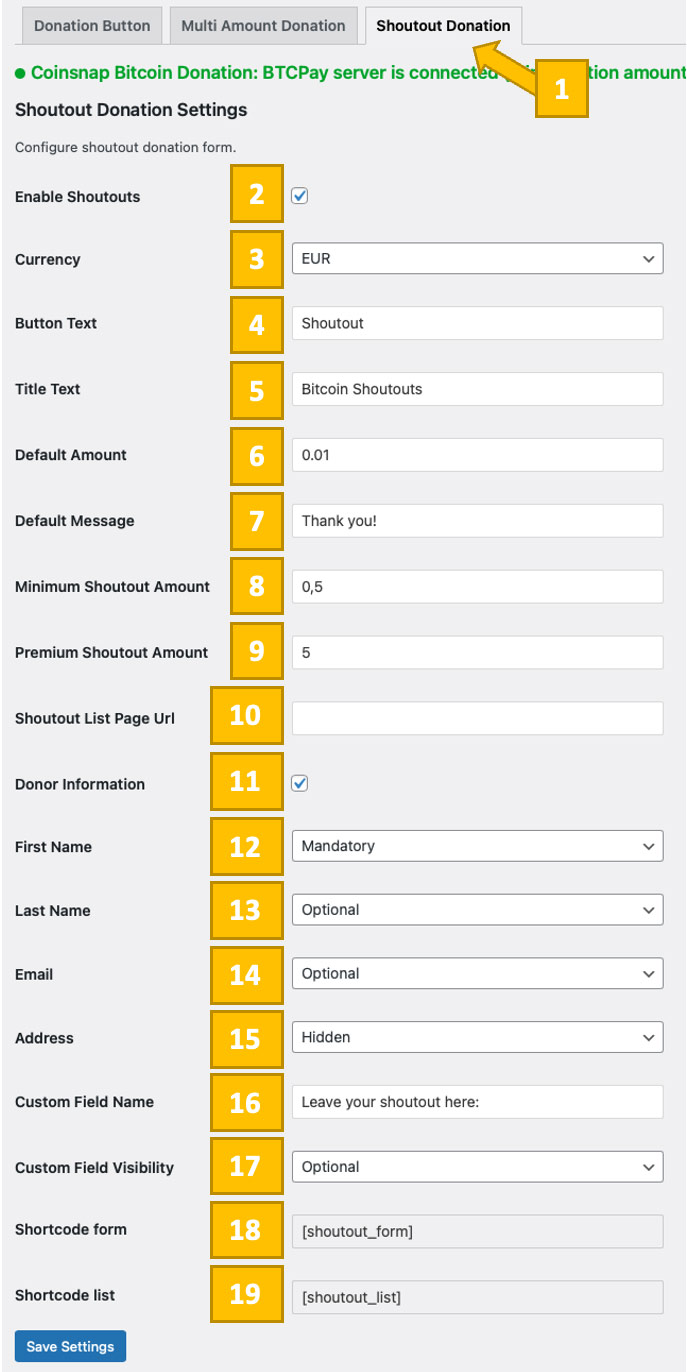
Now you’ll need to configure 18 parameters to match your needs:
[2] Active
Enables or disables the donation form. Only when this option is checked will the donation form be available on your website.
[3] Currency
Defines the fiat reference currency used for the donation amount. This currency is used to calculate the Bitcoin and Lightning equivalent shown to the donor. It is also possible to choose SATS as the default currency, which may appeal to more “hardcore” Bitcoiners.
[4] Button Text
Sets the text displayed on the donation button. This is what donors click to start the Bitcoin or Lightning donation process.
[5] Title Text
Optional headline displayed at the top of the donation form. You can use this to describe the purpose of the donation or the campaign.
[6] Default Amount
Predefines a minimum donation amount that is automatically filled in when the form is loaded. Donors can then increase this amount before paying.
[7] Default Message
Sets a predefined message or note that appears in the donation form. This can be used to thank donors or explain how the funds will be used.
[8] Minimum Shoutout Amount
The minimum shoutout amount defines the lowest amount a user must pay with Bitcoin to submit a shoutout. Shoutouts below this amount cannot be sent and will be rejected by the system.
[9] Premium Shoutout Amount
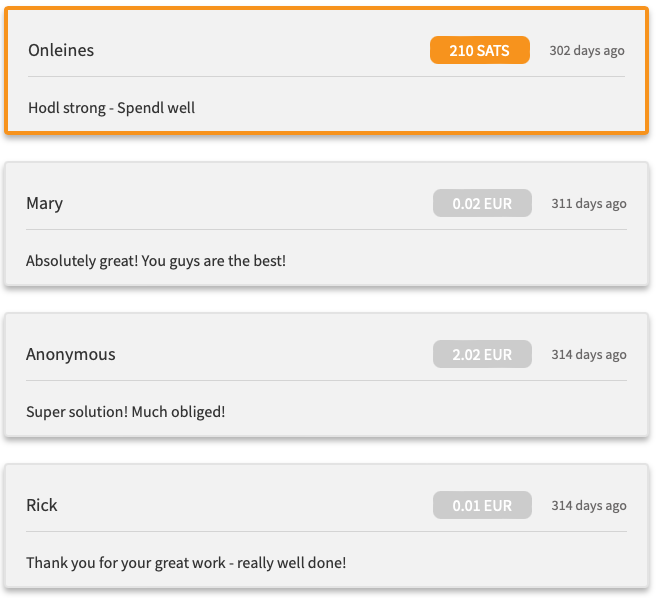
The premium shoutout amount defines a higher Bitcoin amount that marks a shoutout as premium. Premium shoutouts are highlighted in the shoutout list generated by the plugin. The list is automatically updated with each payment.
Premium shoutouts can also be creatively incentivized — for example, by promising that all premium shoutouts will be read out on your podcast or featured in a special section. Promise your followers something cool — and earn more Bitcoin!
[10] Shoutout List Page URL
The shoutouts are displayed in a so-called Shoutout list that contains all paid comments left by your donors. It is automatically generated by the plugin.
Using the shortcode, you can place this list anywhere you like, for example on a dedicated “comments” page. Simply paste the shortcode where you want the list to appear and enter the URL of that page in this field.
[11] Donor Information
Enables the collection of donor details such as name, email, and address. If disabled, donations can be made without entering personal information.
[12] First Name, [13] Last Name, [14] Email, [15] Address
If you want to collect any of this information, set the field to optional or required as needed. If you do not want to collect, for example, the address, select hidden.
[16] Custom Field Name, [17] Custom Field Visibility
Allows you to add a custom input field with your own label, for example to collect a reference, note, or campaign identifier. You can then determine whether the custom field is optional, mandatory, or hidden.
[18] Shortcode form
Displays the shortcode you will use to embed this donation form anywhere on your WordPress site, such as on pages, posts, or widgets.
[19] Shortcode list
Displays the shortcode you will use to embed the shoutout list anywhere on your WordPress site.
STEP 3 – PLACING THE BITCOIN SHOUTOUT ON YOUR WORDPRESS WEBSITE
To place the donation form anywhere on your website, simply copy the provided shortcode [shoutout_form] and paste it at the position where you want the donation form to appear. You can insert the shortcode directly into the content of a page or post to display the form within or below your text. You’ll find the shortcode at the bottom of the Shoutout Donation tab (see step 2).
The same shortcode can also be used in sidebars, footers, or other widget areas by pasting it into a Shortcode block or a Text/HTML widget. This gives you full flexibility to display the donation form exactly where it fits best in your layout—whether embedded in your main content, highlighted in a sidebar, or shown persistently in the footer.
The placement of the Shoutout list works the same way — just paste the shortcode [shoutout_list] where you want to present it.
Done
You’re now all set to allow Bitcoin and Lightning Shoutouts on your website. Simply place the Shoutout form anywhere on your website, and visitors can start supporting you right away.
STEP 4 — MAKE A TEST PAYMENT TO ENSURE EVERYTHING WORKS CORRECTLY
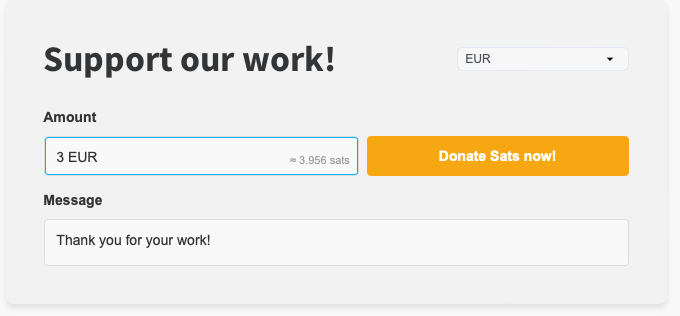
After all settings have been made, a test transaction should be carried out. Fill out a shoutout box that you created on your website and click the payment button (Donate Sats now!). If you are collecting donor information, fill out the form that appears next.
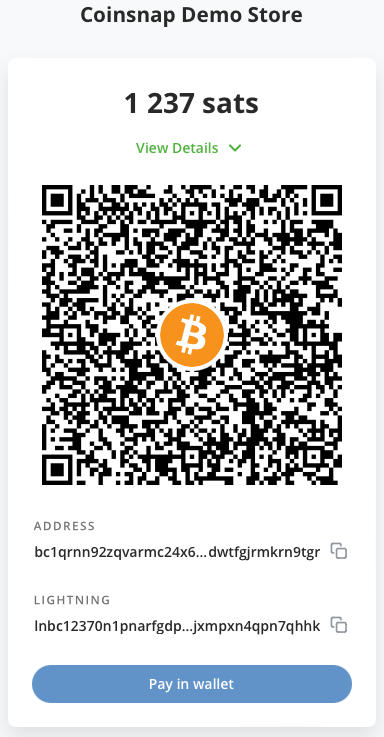
You will then be redirected to the Bitcoin payment page to complete the purchase.
The Bitcoin payment page allows the payer to choose between Bitcoin and Lightning. Both payment methods are integrated into the displayed QR code.
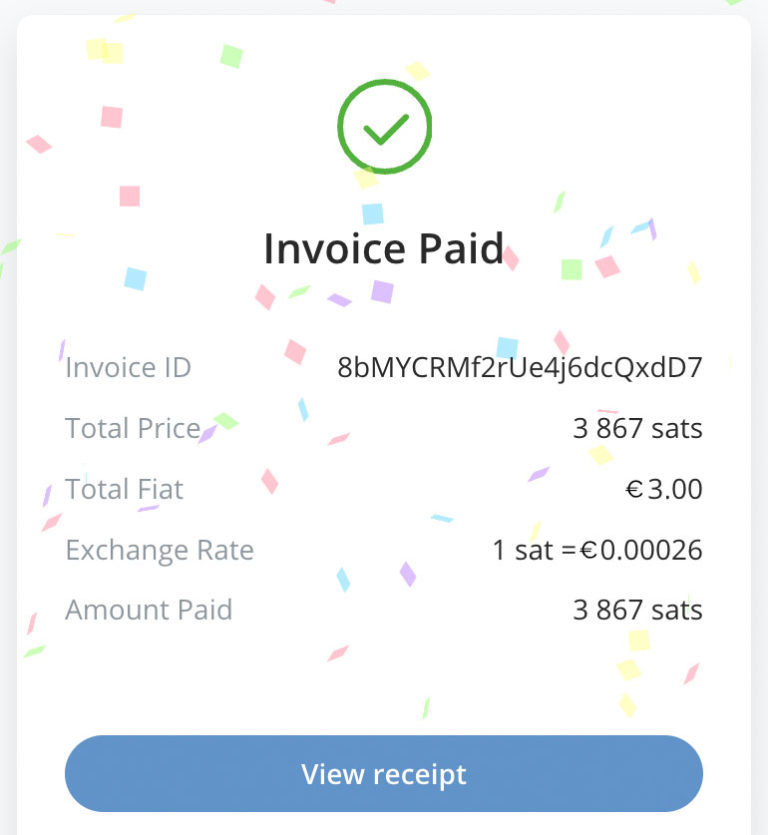
After a successful payment, the invoice can be viewed in detail.
If you encounter any issues or can’t get Bitcoin Donation to work as expected, you can always contact Coinsnap support directly from your Coinsnap account dashboard—our customer success team will be happy to help and set it up for you free of charge.
Shoutouts will not be published until payment is confirmed by Coinsnap.
Frequently Asked Questions
What Users Ask About This plugin
Does the plugin support anonymous shoutouts?
Yes — user identity is optional unless you require fields.
Can I use Bitcoin Shoutouts without a Coinsnap account?
Do users need a Bitcoin wallet to leave a shoutout?
Yes. Donors need a Bitcoin or Lightning wallet to scan the QR code and authorize the payment.
Can I define different prices for shoutouts?
Yes. You can set a minimum shoutout amount and a higher premium shoutout amount in the plugin settings.
Where are shoutouts displayed on my website?
Shoutouts are shown in the automatically generated Shoutout list, which you can place anywhere on your site using the [shoutout_list] shortcode.
Are shoutouts updated automatically after payment?
Yes. The Shoutout list is automatically updated after each successful Bitcoin or Lightning payment.
Can I customize how premium shoutouts look?
Yes. Premium shoutouts are marked by the plugin, and you can style or highlight them using your theme or custom CSS.
