Coinsnap for GetPaid
Installation Guide
You are using Gravity Forms, AffiliateWP, Contact form 7, Ninja Forms or GeoDirectory and want to accept Bitcoin payments?
Then install the GetPaid plugin and the Coinsnap for GetPaid plugin to give your customers the option of paying with Bitcoin and Lightning.
GetPaid is a payment plugin for WordPress. With GetPaid, website operators can sell individual products with a payment button or accept donations.
GetPaid can also be implemented as an add-on in other applications (such as Gravity Forms, AffiliateWP, Contact Form 7, Ninja Forms or GeoDirectory) for payment processing.
GetPaid provides a variety of payment gateways to various payment service providers for payment processing.
For Bitcoin and Lightning payments, there is a connection to the Bitcoin payment gateway from Coinsnap.
So if you want to accept Bitcoin and Lightning payments in Gravity Forms, AffiliateWP, Contact form 7, Ninja Forms or GeoDirectory, install the free plugins from GetPaid and Coinsnap for GetPaid.

- Blog Article: https://coinsnap.io/coinsnap-for-getpaid
- WordPress: https://wordpress.org/plugins/search/Coinsnap/
- GitHub: https://github.com/Coinsnap/Coinsnap-for-GetPaid
GetPaid Plugin for WordPress
You must have Gravity Forms, AffiliateWP, Contact Form 7, Ninja Forms or GeoDirectory running on your WordPress site and also have the GetPaid plugin installed.

Install Coinsnap for GetPaid in WordPress
With the Bitcoin payment plugin Coinsnap for GetPaid, you can quickly and easily integrate Bitcoin payments anywhere on your WordPress website or in many WordPress plugins.
You can download the plugin directly from the WordPress Marketplace or install it directly in your WordPress.
If you have already installed GetPaid, log in to your WordPress account.
Open the WordPress backend and go to Plugins > Add new.

Enter Coinsnap for GetPaid in the search field [1] and click on Install now [2], then activate the plugin.

The Coinsnap for GetPaid plugin is now installed. Next, you need to connect the plugin to your preferred payment provider (Coinsnap or BTCPay Server).
We will now show you how to do this:
Link Coinsnap for GetPaid with GetPaid
After installing Coinsnap for GetPaid, you need to link the plugin to your GetPaid plugin and your Coinsnap account so that your Bitcoin sales are credited to your Lightning wallet.
In the left menu bar, open GetPaid [1] and click on Settings [2].
Then open the Payment Gateways tab [3] and select Coinsnap [4] from the list of all GetPaid payment gateways.
Now click on Manage [5] to configure the individual settings.

Go to the Settings menu in the Coinsnap backend and then click on Store in the blue field. There you will find the Coinsnap Store ID [1] and the Coinsnap API Key [2]. Copy these into the corresponding fields in the Coinsnap settings (see above). Then click on save changes at the bottom of the page to apply and save the settings.
If you do not yet have an account with Coinsnap, you can create one here.
All you need is an email address and a Lightning wallet with a Lightning address. To find out how to create a Coinsnap account, go to Getting Started.

Now enter the Store ID [1] and API Key [2] in the GetPaid settings, and Bitcoin payment will be available in GetPaid immediately.
Don’t forget to enable Coinsnap [3] and save the page (click Save at the bottom of the page).

It’s that easy to set up the Coinsnap Bitcoin payment gateway with GetPaid using Coinsnap for GetPaid. Your customers can now pay with Bitcoin and Lightning on Gravity Forms, AffiliateWP, Contact Form 7, Ninja Forms, and GeoDirectory.
Connect Coinsnap for GetPaid with your BTCPay Server via Coinsnap
Coinsnap for Ninja Forms BTCPay Server Settings
You can also use the Coinsnap for GetPaid plugin with your own BTCPay server. All you need is the Coinsnap for GetPaid plugin, and you don’t even need to set up a Coinsnap account!
We’ll show you how to do this with the Coinsnap BTCPay server-wizard in two minutes:
After installing and activating the Coinsnap for GetPaid plugin, you need to configure the Coinsnap settings. Go to GetPaid, Settings in the black sidebar on the left, open the Payment Gateways tab [1], click on Coinsnap [2], and select the payment provider BTCPay Server [3]. Then click Save changes at the bottom.

Now log in to your BTCPay server. Once you have done this, enter the URL of your BTCPay server in the corresponding field [1].
Next, you need to click on the Generate API Key button [2].

You will then be redirected to your BTCPay server.
Select your shop [1] and then click Continue [2].

You will then be taken to this screen. Enter the name of your shop at the top [1] and then click on Authorise app [2].

Your BTCPay Server is now successfully connected to GetPaid via the Coinsnap for GetPaid plugin!
(You will now see the green success message).

All your GetPaid items, payment forms, invoices and discounts are now available with the Bitcoin+Lightning payment method. You don’t need to do anything else – if your customers want to pay with Bitcoin or Satoshi, they can now do so!
Try Bitcoin Payment with GetPaid
Once you have configured everything, you should perform a test transaction.
Simply click on a payment button (from GetPaid) on your website, and you will see a pop-up like this:

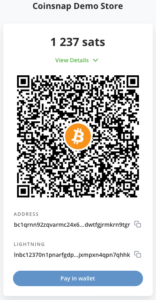
Once you have selected your price and clicked on Pay now with Bitcoin, you will see a QR code like this:
Scan it with your Lightning Wallet and authorise the payment!
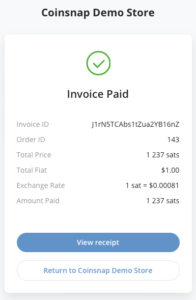
Once the payment has been made, you will see this payment confirmation!
GetPaid Demo Store
If you would like to try out GetPaid for yourself and see how you can pay with Bitcoin and Lightning, visit our GetPaid demo store here.