
 Connect DFX to Coinsnap if you want to accept Bitcoin payments without keeping your sales revenue in Bitcoin. Your Bitcoin and Lightning sales are automatically converted into euros or Swiss francs and paid directly into your bank account.
Once DFX payout is enabled, incoming Bitcoin payments are routed directly to DFX, converted into EUR or CHF, and settled to your registered bank account. Payouts are processed daily and are usually credited to your bank account the next business day.
In this guide, we show you step by step how to connect DFX to Coinsnap and set up automatic bank payouts in your Coinsnap dashboard.
Step 1: Select Bank as Your Deposit Method
In your Coinsnap dashboard, go to Finance → Settings → Deposit.
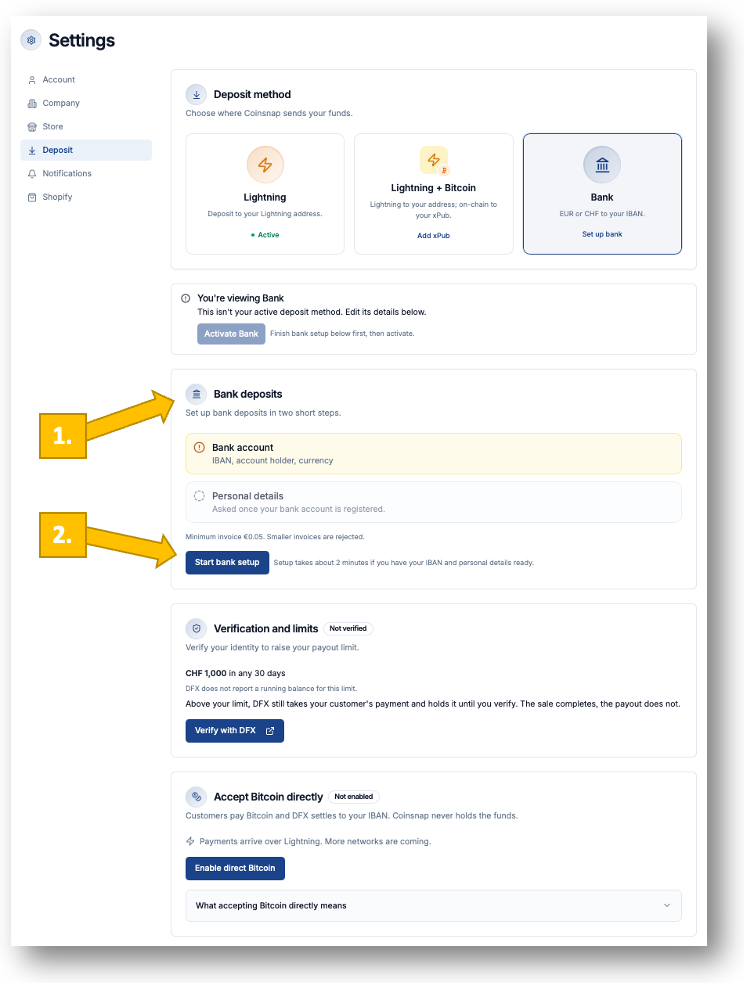
Here you can choose how Coinsnap sends you the funds from your Bitcoin sales. Select Bank as your deposit method to receive your sales revenue in EUR or CHF directly to your bank account via DFX.
Under Bank deposits [1], you can see the two steps required to set up your bank payouts: first your Bank account, followed by your Personal details.
Click Start bank setup [2] to begin.
Step 2: Register Your Bank Account
After clicking Start bank setup, a new Register your bank account field opens at the bottom of the screen. This is where you enter the bank account to which DFX should pay out your Bitcoin sales.
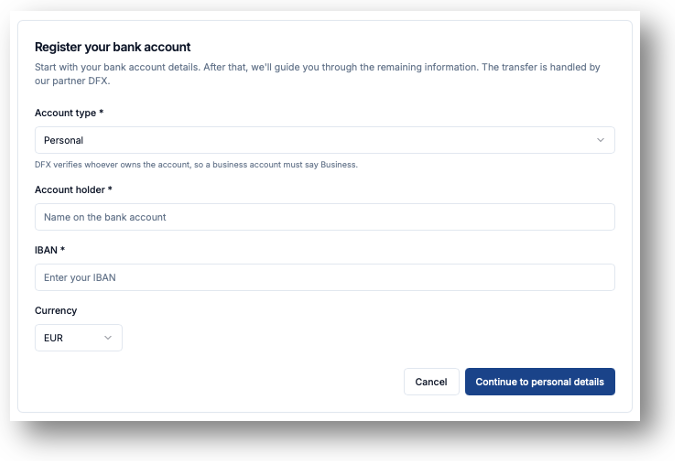
Under Account type, first select whether the bank account is Personal or Business. DFX verifies who owns the account, so make sure you select the appropriate account type. Private individuals and sole proprietors should select Personal, while companies and other legal entities should select Business.
Next, enter the Account holder exactly as it appears on the bank account, followed by the corresponding IBAN.
Finally, under Currency, select the currency in which you want to receive your payouts, for example EUR.
Make sure that the account holder matches the person or business that will be registered with DFX. For example, if your company is receiving the proceeds from your Bitcoin sales, select Business and enter the company as the account holder.
Once all bank account details are complete, click Continue to personal details.
Step 3: Enter Your Personal Details
After registering your bank account, Coinsnap asks you to complete the personal details required to activate your bank deposits with DFX.
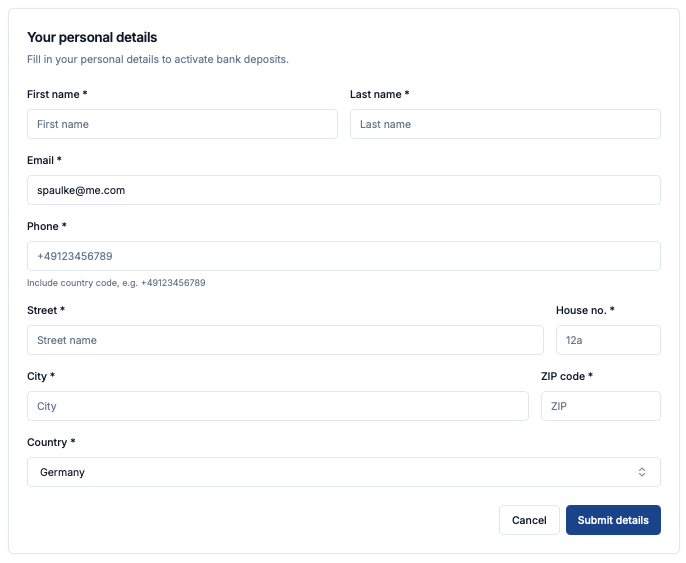
Enter your first and last name, email address and phone number. Then provide your address, including street and house number, city, ZIP code and country.
Some information already known to Coinsnap, such as your email address, may already be pre-filled, so you don’t have to enter it again.
Make sure that the information is correct and complete. Then click Submit details to submit your information and complete this part of the DFX account setup.
Step 4: Complete the DFX Assignment Agreement
Before DFX can process payments for your business, you need to enter into an Assignment Agreement with DFX. For this step, Coinsnap redirects you directly to DFX. The agreement is concluded on the DFX website because DFX is your contractual partner for converting your Bitcoin payments and settling them to your bank account.
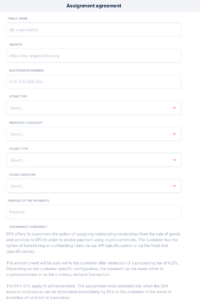
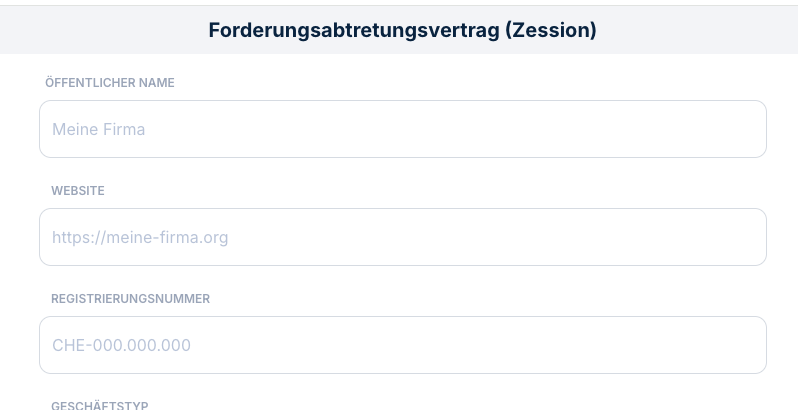
On the Assignment agreement page, DFX asks you to provide or confirm some information about your business and how you use Coinsnap.
What Information Does DFX Require?
The DFX form currently asks for the following information:
Public Name
Enter the public name of the person or organization entering into the agreement with DFX.
Website
Enter the website of your business or online store.
Registration Number
Enter your company or business registration number, if applicable.
Store Type
Select how you sell your products or services. DFX currently distinguishes between Online, Offline, and Online and Physical businesses.
Merchant Category
Select the category that best describes your business, such as Professional Services, Information, Retail, or Accommodation and Food Services.
Goods Type
Specify whether you sell physical products (Tangible) or virtual products or services (Virtual).
Goods Category
Select the category that best describes the products or services you sell.
Purpose of the Payments
Finally, briefly describe what your customers are paying you for.
It is a good idea to have this information ready before you start setting up DFX.
Some information already available to Coinsnap, such as your company name, website or registration number, may be transferred to DFX or pre-filled. The additional information about your business model is provided directly to DFX.
This also ensures that you always see the current information required by DFX. If DFX changes its regulatory requirements or needs additional information in the future, the DFX page will reflect those requirements.
Step 5: Accept the DFX Assignment Agreement
After you have provided the required information about your business, DFX presents the Assignment Agreement for your bank payouts.
Under this agreement, you assign the relevant receivables from the sale of your goods or services to DFX for payment processing. This enables DFX to receive your customers’ Bitcoin payments, convert them into fiat and settle the proceeds to your bank account.
The agreement also specifies the DFX processing fee of 0.2%, which is deducted from the amount paid out to your bank account.
Read the agreement carefully and, if you agree to its terms, confirm:
I accept the agreement
DFX records your acceptance and also sends you an email confirming the concluded Assignment Agreement.
Step 6: Complete KYC or KYB Verification
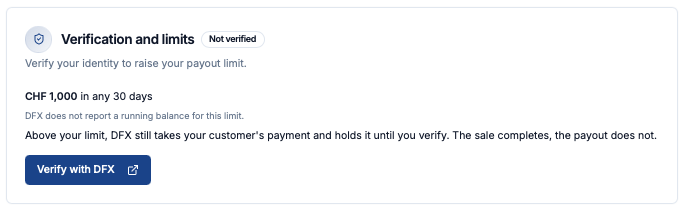
If you want to process payouts above your current DFX limit, you need to complete DFX verification. For an unverified account, the Coinsnap dashboard displays your current limit under Verification and limits. In the example shown here, the limit is EUR/CHF 1,000 within any rolling 30-day period.
DFX states that KYC verification is mandatory for transactions of EUR/CHF 1,000 or more. Individual transaction and payout limits may vary depending on the customer and verification status.
You can start the verification directly from your Coinsnap dashboard by clicking Verify with DFX.
The information and documents required depend on whether you are registering as an individual or sole proprietor, or on behalf of a company.
KYC for Individuals
For personal verification, DFX carries out a Know Your Customer (KYC) check to verify your identity.
As part of this process, you will be asked to identify yourself using a valid identity document. The verification process typically requires you to capture your ID document with your camera and complete a facial verification.
KYB for Companies
Companies are additionally subject to a Know Your Business (KYB) verification.
Depending on the company and its structure, DFX may request information and documents such as:
- Company registration documents
- Shareholder or ownership structure
- Information about the company and its business model
- Expected revenue or transaction volume
DFX also needs to identify the company’s ultimate beneficial owners (UBOs).
Under the current DFX verification process, shareholders or beneficial owners holding more than 25% of the company are required to complete their own personal KYC verification.
The entire KYC and KYB process is carried out directly by DFX. Coinsnap does not perform the verification and does not decide whether a DFX account is approved.
Step 7: Return to Coinsnap
Once you have completed the required steps with DFX, you will be redirected back to Coinsnap.
Coinsnap can then check the status of your DFX setup. Once your DFX account has been successfully approved, go to Deposit Method in your Coinsnap settings and select Bank as your active deposit method.
That’s it. Your DFX bank payout setup is now complete.
Future Bitcoin and Lightning payments can now be routed directly to DFX, converted into your selected fiat currency, and paid out to your registered bank account.
What Should You Have Ready Before You Start?
To make the setup as quick and straightforward as possible, we recommend having the following information and documents ready before you begin:
- Your IBAN and the exact name of the account holder
- Your company or business name
- Your company or business registration number, if applicable
- Your company and/or shop website
- Your contact details and business address
- A short description of your business activities
- Information about the products or services you sell
- A valid identity document
- For companies, your company registration documents and information about the ownership/shareholder structure
Having this information ready allows you to complete the Coinsnap bank setup, the DFX Assignment Agreement and, where required, the subsequent KYC or KYB verification without unnecessary interruptions.
FAQ – DFX Bank Payouts
You start the required steps from your Coinsnap dashboard. For the Assignment Agreement and KYC or KYB verification, you are redirected to DFX to complete the respective steps directly with DFX.
Your current verification status and payout limit are displayed under Verification and limits in your Coinsnap dashboard.
DFX handles the conversion of incoming Bitcoin payments and settlement to your bank account. To provide this service, DFX enters into an Assignment Agreement directly with you for the processing and assignment of the corresponding receivables.
In addition, a 1% conversion spread is included in the Bitcoin amount your customer pays. This amount is not deducted from your bank payout.
The separate 1% Coinsnap transaction fee is charged against your prepaid Coinsnap credit.
For a company, make sure you register the correct business bank account and use the company’s correct legal name.
No. The Assignment Agreement and KYC/KYB verification are handled directly by DFX. DFX reviews the information provided and decides whether the account meets its requirements.
Return to your Coinsnap dashboard and activate Bank as your deposit method. Once DFX is enabled for your account, your Bitcoin and Lightning sales can be routed directly to DFX, converted into fiat, and paid out to your registered bank account.