Self-Host BTCPay Server for WooCommerce (Complete 2025 Guide)

This guide shows you—step by step—how to use your BTCPay Server for WooCommerce Bitcoin payments and WooCommerce Lightning payments, and how to connect your BTCpay Server to WooCommerce easily.
We’ll cover why BTCPay is great for self-hosted bitcoin payments, how to deploy it, for whom and for which business cases WooCommerce Lightning payment by Coinsnap might be the way to go, plus best practices, compliance/accounting basics, and troubleshooting.

Why BTCPay Server for WooCommerce Bitcoin and WooCommerce Lightning payments?
BTCPay Server is the leading, most popular open-source, self-hosted Bitcoin payment processor. If you have one, you keep all the keys and data, pay no platform fee, and can accept both on-chain BTC and Lightning from any source, and of course from your WooCommerce store, too.
Some Woo store owners want to offer WooCommerce Bitcoin with their BTCPay Server, because unlike custodial Bitcoin payment providers, a self-hosted BTCPay Server keeps them out of third-party onboarding: there’s no KYB/KYC to accept BTC/Lightning to their own wallet—they go live with keys they control.
Also, with no processor caps or holds, their cash flow scales freely (whether €200 or €200,000+) and settles instantly.
And, last, but not least, they are not bound by any provider category bans—they can basically run any kind of business, so long as it isn’t illegal in their home jurisdiction. As all merchants, they still must meet local legal, tax, and consumer obligations (and any later fiat off-ramp may require KYC).
So for pure Bitcoin/Lightning, your own BTCPay Server maximizes sovereignty, speed, and freedom.
What is a Self-hosted BTCPay Server?
A self-hosted BTCPay Server is simply your own BTCPay instance running on a web server (where you installed it).
The server provides the user account, storage, and compute; BTCPay then runs your Bitcoin (and optionally Lightning, see below) stack, creates invoices, and talks to your store—without a third-party processor.
You keep the keys, data, and configuration, and you’re responsible for uptime, updates, and security; different hosts can provide the underlying web space, but it remains your BTCPay Server.
You can deploy BTCPay Server on any clean server, but turnkey “scripted” providers like LunaNode and Voltage offer preconfigured images and wizards that simplify setup, SSL, and ongoing updates.
Clean VPS vs. BTCPay-“friendly” host (quick compare)
- DIY (on any clean VPS)
- Pros: Maximum control, potentially lowest monthly cost, full customization.
- Cons: You own security hardening, Docker/OS updates, domain/SSL, backup strategy, and must react to incidents 24/7.
- Script-supported setup (on a “BTCPay-ready” VPS)
- Pros: Faster setup, sensible defaults, snapshots, easier maintenance; ideal for merchants who want reliability without babysitting a server.
- Cons: BTCPay Server–optimized hosts can be slightly more expensive than a bare VPS; for example, a solid LunaNode setup runs around $15 per mont
Why choose a specialized BTCPay Server host (like LunaNode or Voltage)?
- Time to live: Prebuilt BTCPay images/templates mean you’re live in minutes, not hours.
- SSL & updates: Streamlined HTTPS and easier lifecycle management (Docker, dependencies, kernel updates).
- Performance & uptime: Compute/storage tuned for a node that serves invoices 24/7.
- Backups & recovery: Snapshots and restore paths reduce downtime risk.
- Predictability: Transparent pricing for CPU/RAM/storage; you scale up only when needed.
- Fewer surprises: No port, firewall, or memory-pressure mysteries that derail checkout at peak times.
High-level BTCPay server install (example: LunaNode)
Here’s the bird’s-eye overview of the setup—the main stages in the right order—without the nitty-gritty commands or screenshots. It tells you what to do, not every technical detail. Use it to plan time/resources; then follow a detailed guide for the exact steps.
- Create a LunaNode account and add billing.
- Deploy BTCPay Server using their app template or image (choose region, CPU/RAM, and SSD to match your expected volume).
- Point your domain (e.g., pay.yourdomain.com) via an A-record to the instance IP.
- Bring up BTCPay (follow the on-screen/domain wizard). Ensure HTTPS is active.
- Create the admin user, then create your Store in BTCPay (set fiat currency, e.g., EUR/USD).
- Add payment methods:
- On-chain: connect/generate a wallet (xpub/descriptor, or hardware wallet).
- Lightning: choose your implementation (LND or Core Lightning), initialize channels/liquidity.
That’s basically it – you have a working BTCPay Server now. But to use it to accept WooCommerce Bitcoin or WooCommerce Lightning payments, you need to connect the BTCPay Server with WooCommerce on your WordPress site.
How to connect your BTCPay Server with your WooCommerce store?
Now we’ll show you how simple it is to install these plugins:
Classic DIY method: connect the BTCPay for WooCommerce plugin
Do you prefer the native route and want to stay within the BTCPay ecosystem? It couldn’t be simpler:
How to install BTCPay Server for WooCommerce
- Install the BTCPay plugin in WordPress.
- In BTCPay: Account → API Keys → create a Greenfield API Key with the right permissions for your Store.
- Copy your Store ID.
- In WooCommerce → Payments → BTCPay, paste BTCPay URL, API Key, and Store ID; Enable and save.
1.
Install the BTCPay Woo Plugin
2.
Connect your wallet
3.
Test the checkout
(C) videos: BTCPayserver.org
You’ve now successfully connected BTCPay Server to your WooCommerce store—and you’re ready to accept on-chain Bitcoin payments. If you also want to offer Lightning, you must set up and run a Lightning node inside your BTCPay Server, which brings the responsibilities we outlined above (channel and inbound liquidity management, 24/7 uptime, backups/updates, fee/capacity monitoring).
Coinsnap: accept BTCPay WooCommerce Bitcoin Lightning payments without running your own Lightning node
Coinsnap for WooCommerce takes care of the entire Lightning flow for you—no node to run, no channels to manage—and credits each payment directly to your own wallet in real time.
Just install the plugin (you do not even need to set up an account with Coinsnap to do this!), paste your credentials, and you’re live with a fast, low-fee Lightning checkout (with optional on-chain fallback). Because funds settle to your wallet, there’s no KYB/KYC for BTC/LN payouts, less operational overhead, and a smoother buyer experience from QR scan to order confirmation.
This lets you list two alternative methods in WooCommerce—Bitcoin (on-chain) via your BTCPay Server and Lightning payments routed to your BTCPay Server by Coinsnap—so shoppers have all the choice they need.
How to install Coinsnap for WooCommerce
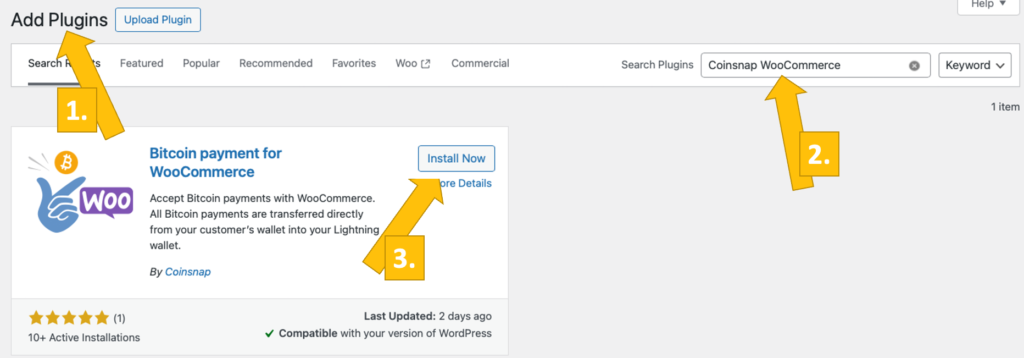
- Install Coinsnap for WooCommerce in your WordPress backend (you do NOT need to open an account with Coinsnap!)
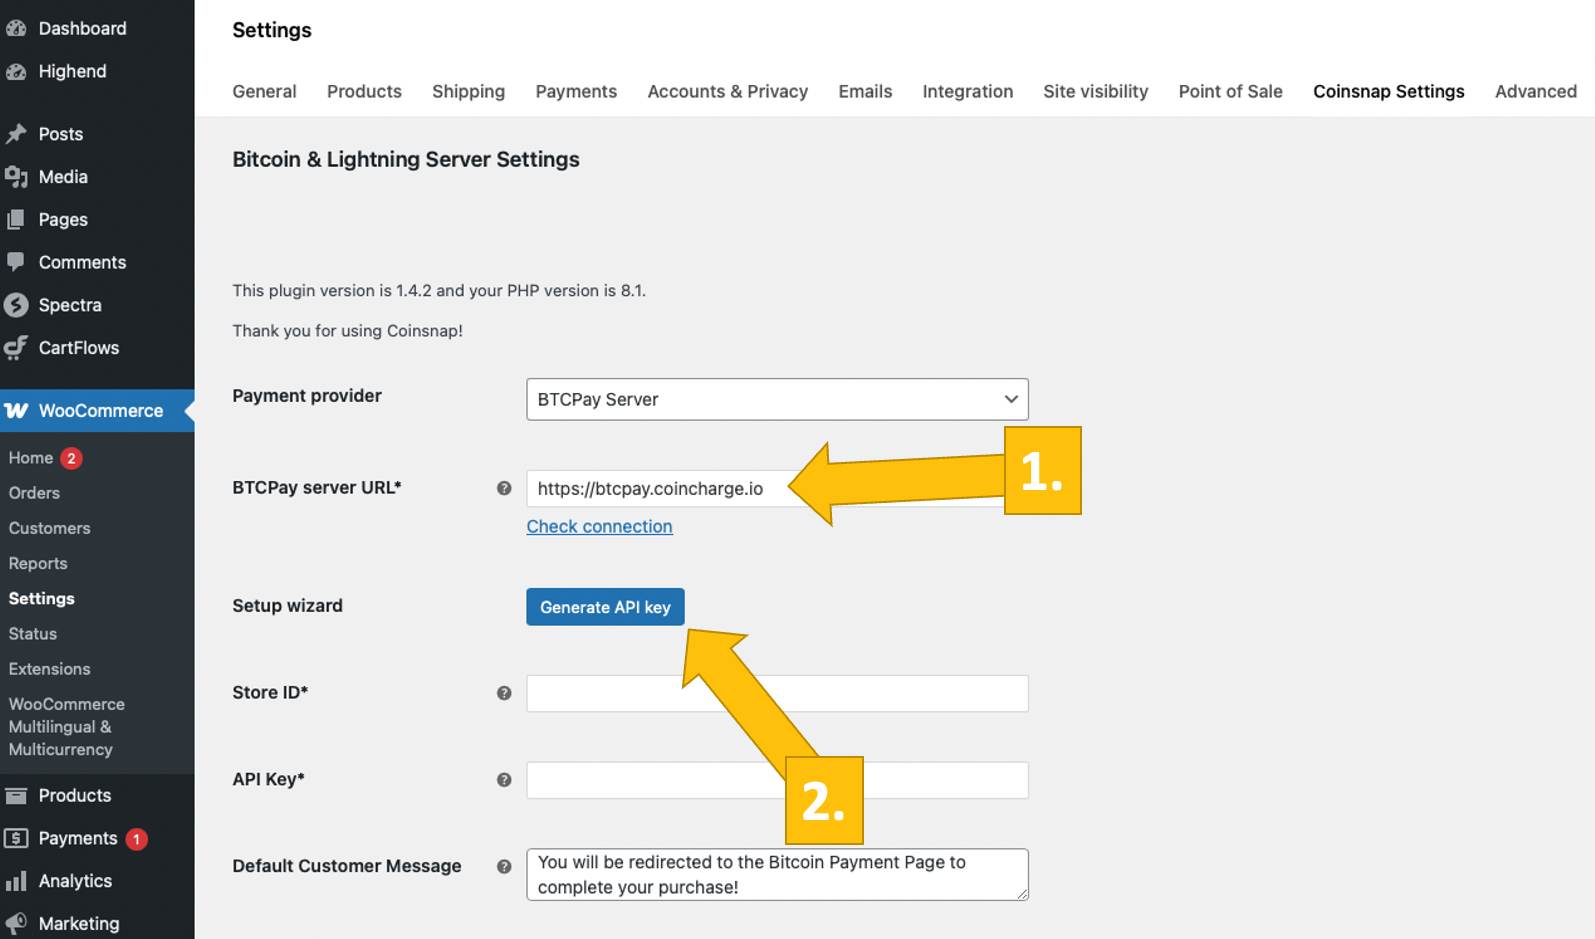
- Then go back into the WooCommerce Coinsnap settings, enter your BTCPay URL and click Generate API Key
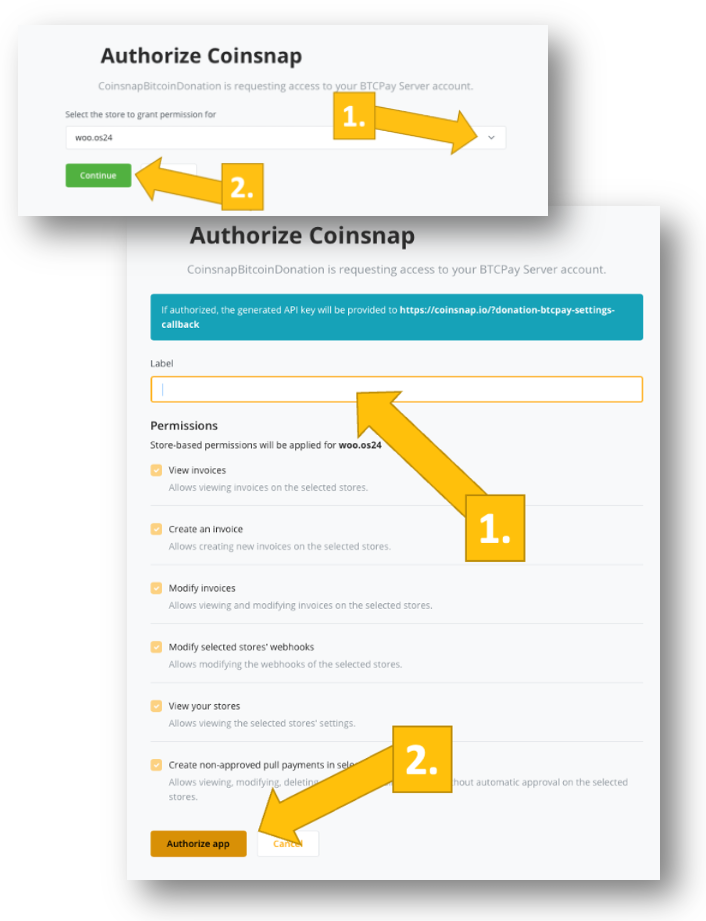
- confirm 2 prompts requested by your BTCPay Server
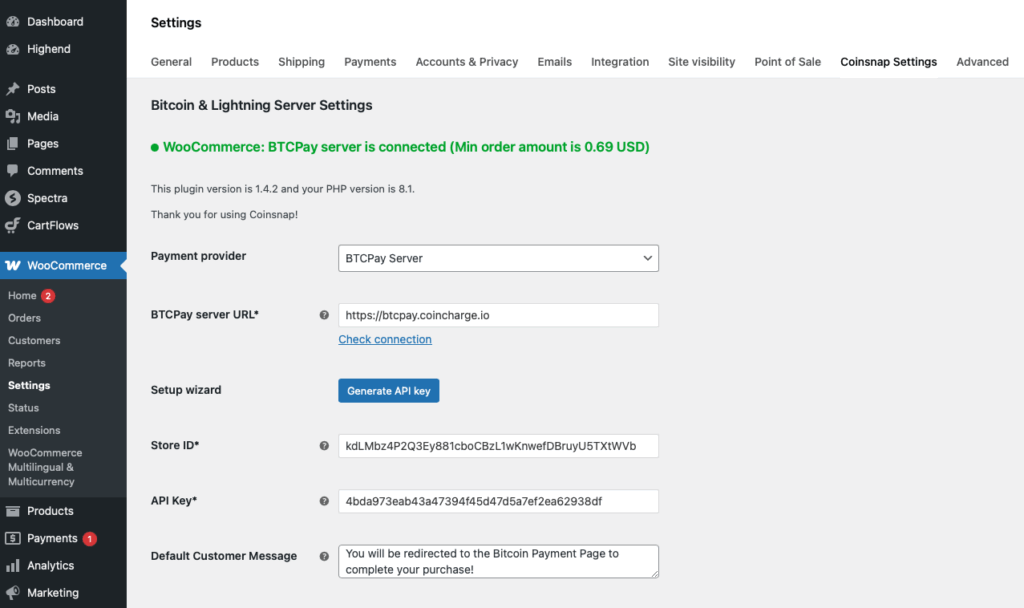
- and see all entries in WooCommerce Coinsnap settings
1.
install Coinsnap plugin
2.
start wizard
3.
confirm BTCPay prompts
4.
WooCommerce is now connected
(click images to enlarge)
See the detailed full Coinsnap for WooCommerce installation guide
Recommended settings (works for most stores)
With the Coinsnap plugin, the sensible defaults—Lightning on, on-chain fallback, rate-lock, and order-status mapping—are already pre-set, so you can review and offer WooCommerce Lightning payment with minimal tweaking.
If you setup BTCPay yourself, here is what you should look for:
- Lightning: ON (default rail for speed/cost).
- On-chain: ON (fallback for large carts or customer preference).
- Rate lock: 10–15 minutes.
- Order status mapping: “Paid → Processing” (or “Completed” for instant-delivery digital goods).
- Currencies: Keep store currency as fiat; BTCPay displays BTC/Sats amounts.
Tasks You Can’t Avoid When Running Your Own BTCPay Server for WooCommerce
Freedom and independence come with responsibility: if you choose to run your own BTCPay Server, you must continuously monitor a few things:
Security, maintenance & monitoring
- Backups: Store seeds (on-chain) and channel backups (Lightning) offline and redundant.
- Updates: Apply BTCPay/Docker/OS updates on a schedule; prefer maintenance windows.
- Access: Strong passwords, 2FA for BTCPay admin; firewall only needed ports.
- Monitoring: Uptime checks, disk-space alerts, Lightning channel health; log review.
Compliance, accounting & settlement (practical view)
- Compliance: Self-host usually means no KYB/KYC with a processor—but local tax/consumer law still applies (invoicing, VAT, refund policy).
- Accounting: Record BTC amount, fiat value at payment time, rate, order ID, TXID/payment hash. Export CSVs from BTCPay (or your Woo plugin) and reconcile monthly.
- Settlement choices:
- Hold BTC/LN (self-custody) and convert later on your terms.
- Automatic fiat payouts via an off-ramp partner (if you later decide you want EUR/USD in bank).
- Hybrid: Lightning for day-to-day, on-chain for large carts; periodic conversion to manage volatility.
Testing & troubleshooting
- Run two tests: one Lightning, one on-chain (small amounts). Confirm Woo order status transitions.
- Invoice timeouts: Align BTCPay invoice expiration with WooCommerce session/checkout timing.
- “Paid but pending” orders: Recheck API permissions, Store ID, and callback reachability (no firewall/caching blocking).
- Lightning fails sporadically: Inspect inbound liquidity, channel fees, and node uptime; try a second wallet to isolate.
When to use Coinsnap instead of full self-host
Coinsnap is a convenience add-on for merchants who already run a BTCPay Server but don’t want the hassle of administering their own Lightning node.
Keep BTCPay for on-chain sovereignty and larger tickets, and let Coinsnap handle the Lightning rail—no channels, liquidity, or node uptime to manage.
The built-in BTCPay wizard links everything in a few clicks, payments settle directly to your wallet, and you can offer both methods at checkout (Lightning via Coinsnap, on-chain via BTCPay) without sacrificing control.
And you do not even need a Coinsnap account to use their plugin!
FAQ
Does WooCommerce support Bitcoin natively?
No. You add Bitcoin/Lightning via a plugin. BTCPay Server (self-hosted) or a WooCommerce Bitcoin plugin like Coinsnap makes it work.
Is self-hosting hard?
If you know Linux, it's not too hard. if not, it’s manageable with a BTCPay-ready host like LunaNode. You’ll still handle periodic updates and basic ops.
What’s the easiest WooCommerce connection to BTCPay?
The Coinsnap plugin wizard: enter BTCPay URL, click Generate API Key, confirm prompts, enable, test.
Do I need Lightning and on-chain?
Most stores enable both: Lightning for everyday speed/cost; on-chain as a fallback for large tickets.
How do I avoid accounting headaches?
Record fiat value at payment time, rate, BTC amount, and TXID/payment hash; export CSVs and reconcile monthly.
Conclusion: the practical path to WooCommerce Lightning payment with BTCPay Server
For self-hosted bitcoin payments with maximum control, BTCPay Server + WooCommerce is hard to beat.
Use a specialized host like LunaNode or Voltage to reduce deployment/maintenance friction, and connect WooCommerce to Coinsnap if you expect substantial Lightning volume and don’t want to run your own Lightning node.
Enable both methods—Lightning via Coinsnap and on-chain via your BTCPay Server—to give customers a fast, modern checkout that lowers fees and boosts conversion without sacrificing your sovereignty.
Accept Bitcoin with your BTCPay Server and WooCommerce now
Have a BTCPay Server and a WooCommerce store? Turn on WooCommerce Bitcoin and Lightning in minutes with the Coinsnap for WooCommerce plugin—install it, start the wizard, and start receiving WooCommerce Bitcoin and WooCommerce Lightning payments:

